
-
Modelers Alliance has updated the forum software on our website. We have migrated all post, content and user accounts but we could not migrate the passwords.
This requires that you manually reset your password.
Please click here, http://modelersalliance.org/forums/login to go to logon page and use the "Forgot your Password" option.
You are using an out of date browser. It may not display this or other websites correctly.
You should upgrade or use an alternative browser.
You should upgrade or use an alternative browser.
Meng Merkava w/cope cage
- Thread starter iambrb
- Start date
iambrb
Well-known member
Wow the detail on this is really neat, but you have to be careful, because unlike my previously built Meng Magach 6B Gal, parts on this puppy can be built wrong! I was also surprised that there was flash on parts, despite beautiful molding!
By the way, if you’re ever thinking to yourself “how can I kill an hour of time today?” Well these two turret baskets really are the way to go:

By the way, if you’re ever thinking to yourself “how can I kill an hour of time today?” Well these two turret baskets really are the way to go:
Good start Bruce.
iambrb
Well-known member
Ok so coming along nicely! Note that the wheels, upper & lower, plus the cope cage are not yet glued
 bruce159.imgbb.com
Upload Image — Free Image Hosting
Free image hosting and sharing service, upload pictures, photo host. Offers integration solutions for uploading images to forums.
bruce159.imgbb.com
Brokeneagle
Master at Arms
Must have missed this one but getting nothing from the last post?
Bruce that imaging server must have some links to the images. We're just getting a prompt for account login.
Heavens Eagle
Well-known member
Looking good!
iambrb
Well-known member
Wow the tiny parts make this kit a real challenge!!! The other end of that tho is the level of detail. This is the mighty M2 which will end up on the barrel. Hard to see in that first pic but all the holes in barrel shroud are there! Same for the muzzle too, and note you can see thru the top cover as well!


Now to teach you how to insert an image to the post. Nice looking .50! 
iambrb
Well-known member
Ok so here is where things get “interesting.”
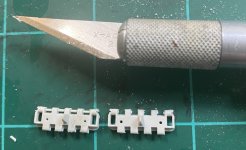
This what the instructions depict doing to build the tracks. The issue is that you have to connect to the next set as you build. That requires several sets of hands on a teeny part!
This what the instructions depict doing to build the tracks. The issue is that you have to connect to the next set as you build. That requires several sets of hands on a teeny part!
Attachments

iambrb
Well-known member
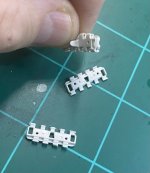
I struggled heavily with this. As this models tracks are different from other Merkava modes, basically my only option are metal links. Current lack of EBay access (long story) means Fruils which are nearly the cost of the kit when delivered. My way to deal with this is going to be to build the links, then cut out the ‘track pins’ (as shown) and press together. It’s going to be laborious but I think this will work. At least, it’s worth a shot
Attachments

Looks lke you're over thinking this. these types always have a bit of trickness at the start and finish but building shouldn't be an issue. You've already got a run started so take the bottom track, wedge it in with the pins aligned right then sandwich the top with a tiny bit of glue on the location pin, rinse and repeat.
But you do you.
But you do you.
Heavens Eagle
Well-known member
Bruce do these have a pin that slides through? If so then the link parts go together first, then the pin slides through to connect the parts.
If the hinge pin is part of one link half then that half isn't assembled until you connect the track that links to it. As Bob said it just takes a little forethought and planning.
I usually assemble the tracks in sets of 10 for the majority of the tracks, with plenty of single unassembled links. Then I assemble the sections and add single links to finish out the correct length.
The partial instructions clip doesn't really show how they actually completely fit together.

iambrb
Well-known member

You're supposed to sandwich the two parts on the pin of the first part.
Similar threads
- Replies
- 0
- Views
- 124