
Charming German
Panzerkampfwagen B2 740 (f)
Sven Frisch
Normally I spend most of my modeling time working on 1/48 armor models. But throughout the last year there weren’t too many appealing new kits, so I decided to open another kit 1/35 model I had in my stash. When working mostly with resin kits, the occasional “out of the box model “ can be very pleasing, especially when it is one of the new Tamiya kits. The B1 bis was a long anticipated model and the first release a few years ago was a great success. Therefore it was no surprise that Tamiya released a German version of the French B1 bis officially named "Panzerkampfwagen B2 740 (f)”. About 160 of these vehicles have served in the German army after their caption in 1940. Even though the tank’s design was more or less obsolete, it served in different roles on all fronts throughout the war.

------------------------------------
The kit in question is the Tamiya kit 35287 and I chose to replace the two barrels with items from the Voyager Model upgrade kit 35218.
Painting
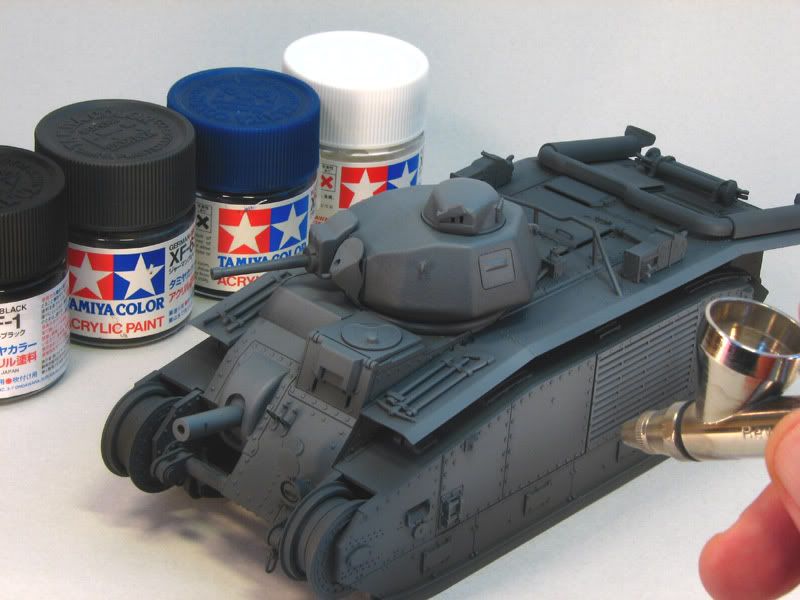
1.) The painting process always begins with a priming coat from Mr. Surfacer. Prior the application with the airbrush it must be thinned to the appropriate consistency.

2.) Next the German Grey basecoat has been applied. The grey was a mixture from XF-63 (German Grey) and XF-8 (Flat Blue) mixed at a ratio at 5:1. The Tamiya paints can also be thinned with Mr. Color Thinner, providing a very smooth finish.

3.) Then the basecoat received more highlights. This will give the model a more vibrant appearance.
4.) Now we have the appearance of an extra light source over the model. Certain areas can be masked to obtain sharper borders between the dark and the light areas. One shouldn’t be too concerned about the high contrast at this point, as it can be toned down with Filters again. Also if you plan to add lots of earth tones later on, this should be the right amount of contrast, otherwise the pigments can ruin the effect.

5.) Next the markings were applied with the aid of Set&Sol, which provides the decals a look as if they were painted on.

6.) To protect the decals and the base coat from the weathering steps to follow and to give the model the satin sheen of painted steel, thinned Tamiya X-22 Clear with a drop of XF-21 was airbrushed onto the model. Even more important is the fact the thinned oil paints perform much batter on a satin surface.

7.) Then a Filter from Sin Industries was applied. This will blend the decals and reduce the contrast of the various shades of grey.

8.) To blend the base coat a little more, oil paints were used to achieve a subtle streaking. A pin wash has been applied during this step as well.

9.) With the oil paints completely dry, I made the chipped paint effects with a 10/0 brush and different Vallejo acrylic paints.

10.) This picture displays the different shades used. Light scratches were painted in grey, deeper scratches with red to represent the red oxide primer and the deepest areas of worn off paint were simulated in a dark brown tone.

11.) Now the tracks have been primed with Tamiya XF-52 (Flat Earth) and various shades of Mig Pigments have been used on them. Their Pigment Fixer is ideal for such a task, as the Pigments will remain on the tracks permanently. It is important to achieve a tonal variation on the tracks, especially when they are so prominent like on our Char bis example here.

12.) Next the details were painted, mostly with Vallejo acrylic paints again. The exhaust received its rusty look from 502 Abteilung oil paints.
13.) A predusting coat from thinned Tamiya XF-57 (Buff) has been airbrushed on the hull sides and to areas where dust would normally accumulate next. This will be a good base for the pigments to be applied next.

14.) Various shades of Mig Pigments give the model a dusty look. Especially the hull sides received a good treatment. Again the Pigment Fixer served well. At this point there is not enough tonal variation yet. Again splash marks have been by blowing air through your airbrush on a brush loaded with a mixture from pigments, water and mate acrylic varnish.

16.) In the last step oil and grease was applied with a mixture from brown and black oil paints with glossy enamel paint.

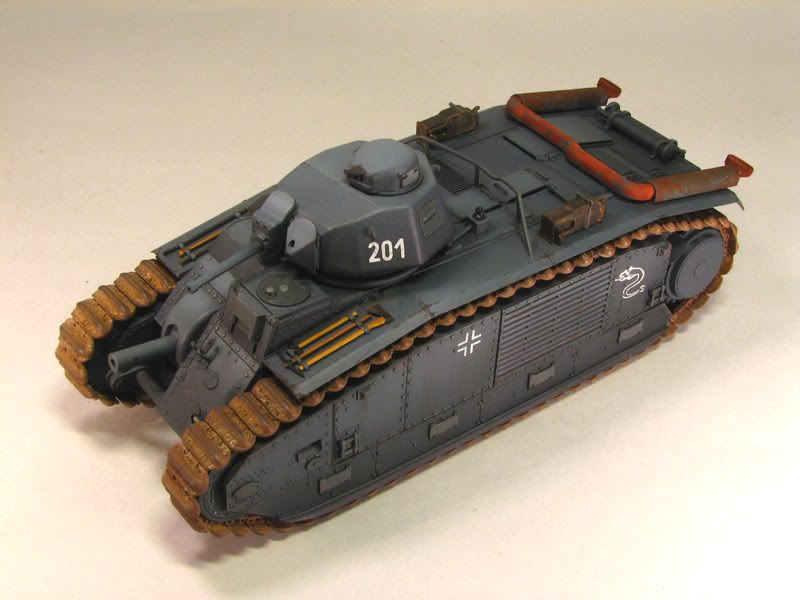
After some final touch ups the model was finished. Note how the contrast is less more prominent on the weathered model. Both the Modulation Style and the application of Pigments can “make or break” a model in my humble opinion. Both need to be balanced, but if applied properly it can lead to an interesting result.
Finally, here are some more pictures of the finished model.


Thanks for looking !
Happy Modelling
Sven
Panzerkampfwagen B2 740 (f)
Sven Frisch
Normally I spend most of my modeling time working on 1/48 armor models. But throughout the last year there weren’t too many appealing new kits, so I decided to open another kit 1/35 model I had in my stash. When working mostly with resin kits, the occasional “out of the box model “ can be very pleasing, especially when it is one of the new Tamiya kits. The B1 bis was a long anticipated model and the first release a few years ago was a great success. Therefore it was no surprise that Tamiya released a German version of the French B1 bis officially named "Panzerkampfwagen B2 740 (f)”. About 160 of these vehicles have served in the German army after their caption in 1940. Even though the tank’s design was more or less obsolete, it served in different roles on all fronts throughout the war.
------------------------------------
The kit in question is the Tamiya kit 35287 and I chose to replace the two barrels with items from the Voyager Model upgrade kit 35218.
Painting
1.) The painting process always begins with a priming coat from Mr. Surfacer. Prior the application with the airbrush it must be thinned to the appropriate consistency.
2.) Next the German Grey basecoat has been applied. The grey was a mixture from XF-63 (German Grey) and XF-8 (Flat Blue) mixed at a ratio at 5:1. The Tamiya paints can also be thinned with Mr. Color Thinner, providing a very smooth finish.
3.) Then the basecoat received more highlights. This will give the model a more vibrant appearance.
4.) Now we have the appearance of an extra light source over the model. Certain areas can be masked to obtain sharper borders between the dark and the light areas. One shouldn’t be too concerned about the high contrast at this point, as it can be toned down with Filters again. Also if you plan to add lots of earth tones later on, this should be the right amount of contrast, otherwise the pigments can ruin the effect.
5.) Next the markings were applied with the aid of Set&Sol, which provides the decals a look as if they were painted on.
6.) To protect the decals and the base coat from the weathering steps to follow and to give the model the satin sheen of painted steel, thinned Tamiya X-22 Clear with a drop of XF-21 was airbrushed onto the model. Even more important is the fact the thinned oil paints perform much batter on a satin surface.
7.) Then a Filter from Sin Industries was applied. This will blend the decals and reduce the contrast of the various shades of grey.
8.) To blend the base coat a little more, oil paints were used to achieve a subtle streaking. A pin wash has been applied during this step as well.
9.) With the oil paints completely dry, I made the chipped paint effects with a 10/0 brush and different Vallejo acrylic paints.
10.) This picture displays the different shades used. Light scratches were painted in grey, deeper scratches with red to represent the red oxide primer and the deepest areas of worn off paint were simulated in a dark brown tone.
11.) Now the tracks have been primed with Tamiya XF-52 (Flat Earth) and various shades of Mig Pigments have been used on them. Their Pigment Fixer is ideal for such a task, as the Pigments will remain on the tracks permanently. It is important to achieve a tonal variation on the tracks, especially when they are so prominent like on our Char bis example here.
12.) Next the details were painted, mostly with Vallejo acrylic paints again. The exhaust received its rusty look from 502 Abteilung oil paints.
13.) A predusting coat from thinned Tamiya XF-57 (Buff) has been airbrushed on the hull sides and to areas where dust would normally accumulate next. This will be a good base for the pigments to be applied next.
14.) Various shades of Mig Pigments give the model a dusty look. Especially the hull sides received a good treatment. Again the Pigment Fixer served well. At this point there is not enough tonal variation yet. Again splash marks have been by blowing air through your airbrush on a brush loaded with a mixture from pigments, water and mate acrylic varnish.
16.) In the last step oil and grease was applied with a mixture from brown and black oil paints with glossy enamel paint.
After some final touch ups the model was finished. Note how the contrast is less more prominent on the weathered model. Both the Modulation Style and the application of Pigments can “make or break” a model in my humble opinion. Both need to be balanced, but if applied properly it can lead to an interesting result.
Finally, here are some more pictures of the finished model.
Thanks for looking !
Happy Modelling
Sven