
Hello everybody, in my first sbs I would like to display my approach on a winter camoflague, the often feared "white wash". The following pictures will hopefully illustrate my efforts on a 1/48th scale StuG III Ausf. B. I did last year. It's the Tamiya kit and I used all kinds of bits and pieces, to get the highest possible level of detail (at least according to my skills and patience
 ).
).
Now lets me start a few pictures of the unpainted model:

------------------------------------


But let's not waste too much time and get started with the painting process:
Picture 1: Priming
 It all started with a thin coat of Mr. Surfacer 1200, thinned to a milky consistence. This coat will be a good base for the painting and weathering to follow and also reveals areas which still might require additional clean, before proceeding with the base coat.
Picture 2: Base Coat

The interior received a flat black coat to avoid any light reflections while the visible rear wall below the open hatch was painted in white. Then the base coat was applied with a mixture from Tamiya XF-63 and XF-8 mixed at a 7:1 ratio to add a slightly bluish tint to the grey. It's not accurate, but looks more appealing that the very dark original German grey.
Picture 3: Markings

The markings are dry transfers from MIG Productions.
Picture 4: White Camo

In the next step Tamiya XF-2 was randomly applied letting the base coat still shine through, as I wanted to obtain a rather worn off white wash.
Picture 5: Clear Coat

Now a clear coat from a mix of X-22 and X-21 mixed at a 4:1 ratio was applied to achieve a slightly satin finish and to protect the base coat and the markings from the weathering to follow.
Picture 6: Filter
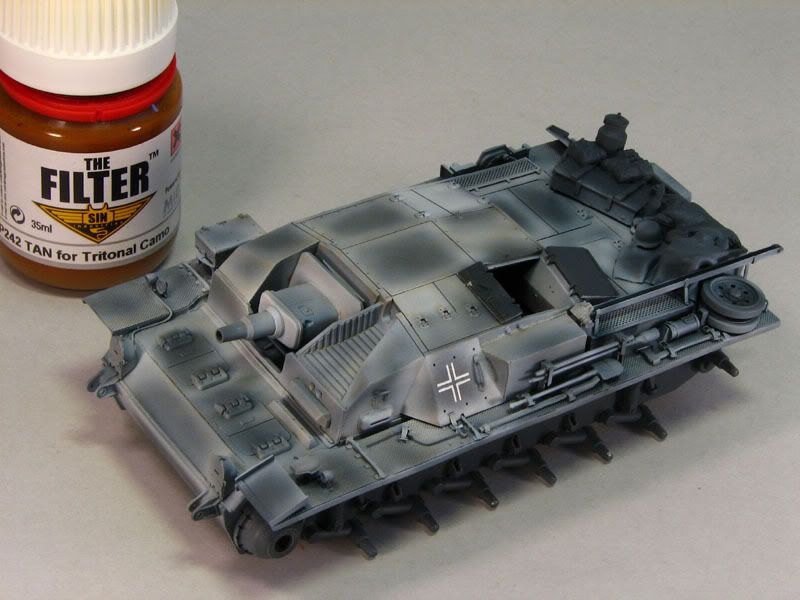
Then a first filter from Sin Industries was applied to tone down the white color. If the effect of the filter is too strong you can blend or even remove parts of it with a clean brush and thinner.
Picture 7: White Wash

Now I used casein paint to obtain more variations of the white wash. The paint can be thinned with water was applied with a brush. The paint has a rather slow drying time and can therefore be blended and relocated for a longer time than acrylics.
Picture 8: Washing

In the next step a dark wash was applied to create a sense of depth and to emphasize different details.
Picture 9: Paint Chipping
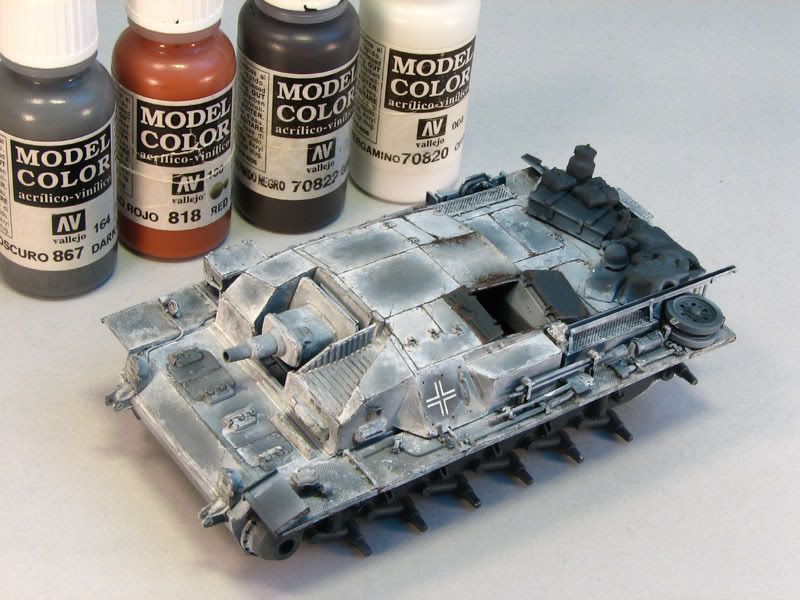
Worn and chipped off paint effects were created with a 10/0 brush and different shades of Vallejo acrylic paints. Working witgh a fine brush is indeed time consuming, but gives me much better control of the effect.
Picture 10: Filter

Another Filter was applied to blend in the chipped paint effect and to enhance the worn off effect of the white wash.
Picture 11: Detail Painting

The Details such as the tools and the gear on the engine deck were painted with Vallejo acrylic paints again.
Picture 12: More paint chips

At this point I was not quite pleased with the paint chips and I decided to add some more scratches and highlighted them in some areas with tiny dots of white again.
Picture 13: White traces

Then I painted white traces caused by the chalk paint by using 502 Abteilung oil paint.
Picture 14: Rust

Rust was also created with the aid of oil paints in the following step.
Picture 15: Dust

I tried to keep the dust on the upper hull rather subtle, because I was after a harsh contrast between the white washed areas and the lower hull. Pigments have been applied to selected areas with the aid of the Pigment Fixer from MIG Productions.
Picture 16: Wet Mud

The same mixture of pigments was applied to the lower hull as well, but in a much greater amount. When the dry mud mixture has actually dried, I added some dark brown and gloss acrylic paint to the mixture and applied it to the lower areas with quick bursts of my airbrush on a brush loaded with the mixture. I repeated this step with slightly different mixtures to get more tonal variations of the earth tones.
Picture 17: Tracks

The wheels and the tracks were painted in the same manner as explained above. The spare tracks at the front received more rust tones instead of earth tones. The teeth of the drive sprocket and the polished surface of the idler wheels have been threatened with Gun Metal Pigments also from MIG Productions.
Finally a few pictures of the finished model. The figure was (once again) painted by my dear friend Robert Doepp.


Well....that's it ! Thanks for looking and feel free to ask, if you have any questions.
Happy Modelling
Sven
Now lets me start a few pictures of the unpainted model:
------------------------------------
But let's not waste too much time and get started with the painting process:
Picture 1: Priming
Picture 2: Base Coat
The interior received a flat black coat to avoid any light reflections while the visible rear wall below the open hatch was painted in white. Then the base coat was applied with a mixture from Tamiya XF-63 and XF-8 mixed at a 7:1 ratio to add a slightly bluish tint to the grey. It's not accurate, but looks more appealing that the very dark original German grey.
Picture 3: Markings
The markings are dry transfers from MIG Productions.
Picture 4: White Camo
In the next step Tamiya XF-2 was randomly applied letting the base coat still shine through, as I wanted to obtain a rather worn off white wash.
Picture 5: Clear Coat
Now a clear coat from a mix of X-22 and X-21 mixed at a 4:1 ratio was applied to achieve a slightly satin finish and to protect the base coat and the markings from the weathering to follow.
Picture 6: Filter
Then a first filter from Sin Industries was applied to tone down the white color. If the effect of the filter is too strong you can blend or even remove parts of it with a clean brush and thinner.
Picture 7: White Wash
Now I used casein paint to obtain more variations of the white wash. The paint can be thinned with water was applied with a brush. The paint has a rather slow drying time and can therefore be blended and relocated for a longer time than acrylics.
Picture 8: Washing
In the next step a dark wash was applied to create a sense of depth and to emphasize different details.
Picture 9: Paint Chipping
Worn and chipped off paint effects were created with a 10/0 brush and different shades of Vallejo acrylic paints. Working witgh a fine brush is indeed time consuming, but gives me much better control of the effect.
Picture 10: Filter
Another Filter was applied to blend in the chipped paint effect and to enhance the worn off effect of the white wash.
Picture 11: Detail Painting
The Details such as the tools and the gear on the engine deck were painted with Vallejo acrylic paints again.
Picture 12: More paint chips
At this point I was not quite pleased with the paint chips and I decided to add some more scratches and highlighted them in some areas with tiny dots of white again.
Picture 13: White traces
Then I painted white traces caused by the chalk paint by using 502 Abteilung oil paint.
Picture 14: Rust
Rust was also created with the aid of oil paints in the following step.
Picture 15: Dust
I tried to keep the dust on the upper hull rather subtle, because I was after a harsh contrast between the white washed areas and the lower hull. Pigments have been applied to selected areas with the aid of the Pigment Fixer from MIG Productions.
Picture 16: Wet Mud
The same mixture of pigments was applied to the lower hull as well, but in a much greater amount. When the dry mud mixture has actually dried, I added some dark brown and gloss acrylic paint to the mixture and applied it to the lower areas with quick bursts of my airbrush on a brush loaded with the mixture. I repeated this step with slightly different mixtures to get more tonal variations of the earth tones.
Picture 17: Tracks
The wheels and the tracks were painted in the same manner as explained above. The spare tracks at the front received more rust tones instead of earth tones. The teeth of the drive sprocket and the polished surface of the idler wheels have been threatened with Gun Metal Pigments also from MIG Productions.
Finally a few pictures of the finished model. The figure was (once again) painted by my dear friend Robert Doepp.
Well....that's it ! Thanks for looking and feel free to ask, if you have any questions.
Happy Modelling
Sven