
Italeri Short Stirling 1/72
While not a really new kit, due to distributor issues this one took a long time to show up from US sources.
History:
The Short Stirling has the distinction of being the first four engine bomber to be introduced into service with the Royal Air Force.
The Stirling was designed during the late 1930s by Short Brothers to conform with the requirements laid out in Air Ministry Specification B.12/36. Prior to this, the RAF had been primarily interested in developing increasingly capable twin engine bombers but had been persuaded to investigate a prospective four engine bomber as a result of promising foreign developments in the field. Out of the submissions made to the specification, Supermarine proposed the Type 317 which was viewed as the favorite, while Short's submission, named the S.29, was selected as an alternative. When the preferred Type 317 had to be abandoned, the S.29, which later received the name Stirling, proceeded to production.
During early 1941, the Stirling entered squadron service. During its use as a bomber, pilots praised the type for its ability to out turn enemy night fighters and its favorable handling characteristics, while the altitude ceiling was often a subject of criticism. The Stirling had a relatively brief operational career as a bomber before being relegated to second line duties from late 1943. This was due to the increasing availability of the more capable Handley Page Halifax and Avro Lancaster, which took over the strategic bombing of Germany. Decisions by the Air Ministry on certain performance requirements, such as to restrict the wingspan of the aircraft to 100 feet, had played a role in limiting the Stirling's performance, these restrictive demands had not been placed upon the Halifax and Lancaster bombers once they were converted from two to four engine bombers.
During its later service, the Stirling was used for mining German ports, new and converted aircraft also flew as glider tugs and supply aircraft during the Allied invasion of Europe during 1944–1945. In the aftermath of the Second World War the type was rapidly withdrawn from RAF service, having been replaced in the transport role by the Avro York, a derivative of the Lancaster that had previously displaced it from the bomber role. A handful of ex-military Stirlings were rebuilt for the civil market.
The Stirling used the Sunderland's 114 ft wing and it had to be reduced to less than 100 ft, the same limit as that imposed on the P.13/36 designs (Handley Page Halifax and Avro Manchester). In order to get the needed lift from a shorter span and excess weight, the redesigned wing was thickened and reshaped. It is often said that the wingspan was limited to 100 ft so the aircraft would fit into existing hangars but the maximum hangar opening at the time was 112 ft and the specification required outdoor servicing. The wingspan limitation has been alleged to have actually been enforced as a method of restricting the designer into keeping the overall weight down.
The Kit:
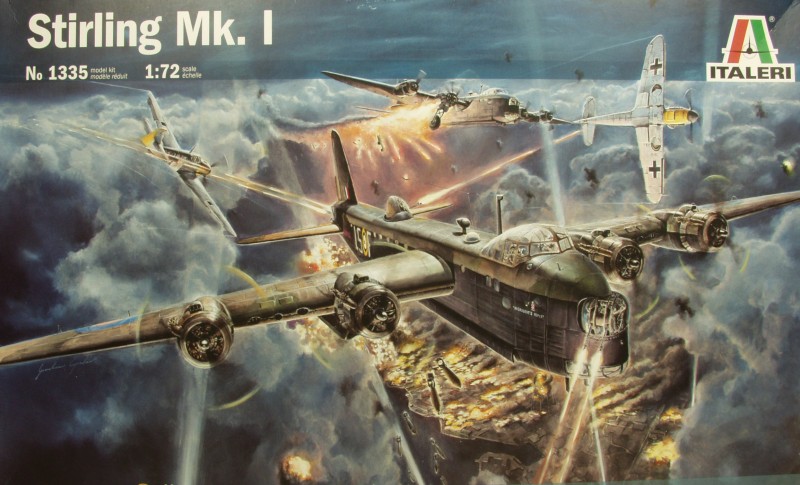
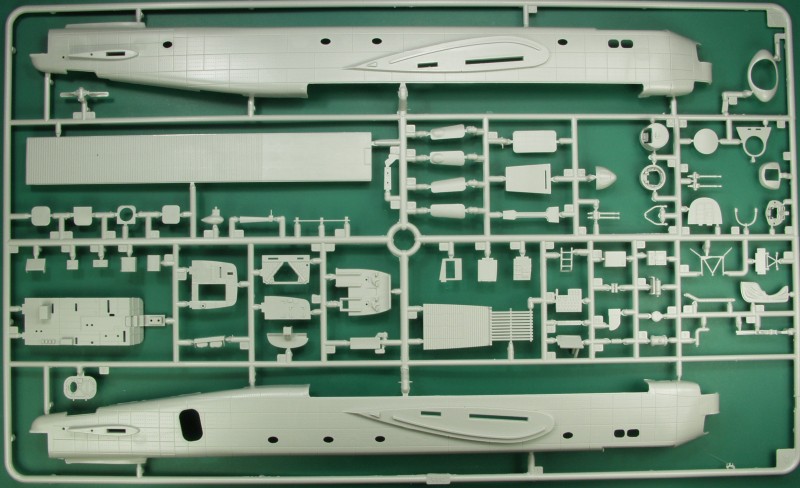
The Italeri kit comes in large size box that seems to be in vogue these days, while it's sized to fit the largest sprue the remaining sprues are considerably smaller so there ends up being a lot of empty space in the box. The box is a top open tray type box of thin card stock so not overly sturdy with nice artwork on the front. Inside the box one finds three separate bags with the main sprues and one small one with the clear parts. The largest sprue is bagged by itself, the other two bags have two sprues in each, one has the two sprues with the wing halves and the other has two identical sprues. There is also a small fret of photo etch in a plastic sleeve.
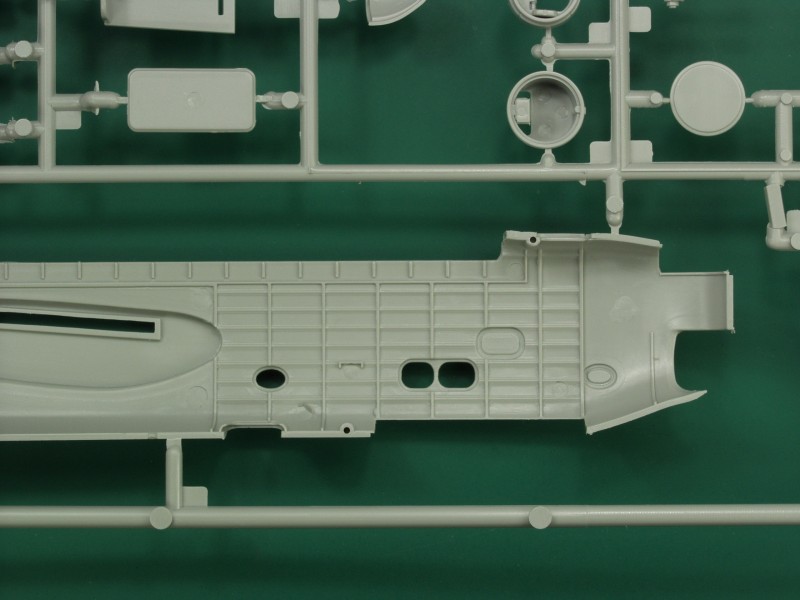
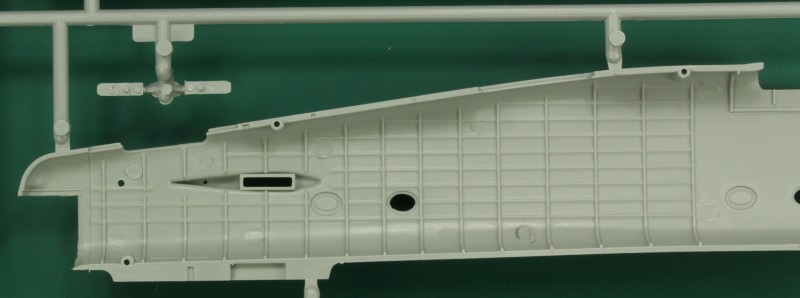
The kit is molded in a light gray color. The parts for the most part are crisply molded with some light flash here and there and mold separation lines are light. The surface detail consists of recessed panel lines and rivets. The panel lines are oversized for the scale, better than the Sunderland from Italeri but still a bit deep. The rivets on the other hand could have been left off altogether as they are way too big and not uniform, some on curved surfaces are more tear drop in shape. They are also not uniform across the surface with some being sharply molded and others rather soft. Hopefully a couple heavy coats of primer will help subdue them. I found several surface defects on the fuselage halves, there are sink marks on the sides where alternative window openings are located but these get cut open later and a couple on the top and bottom where alignment hole structure is molded on the inside. The rivets will make filling these spots an issue. The rivets on the wings seemed more uniform and I found no surface defects on them. The fuselage has internal structure molded in and although there are some ejector pin marks it appears that most are located where they won't be seen.
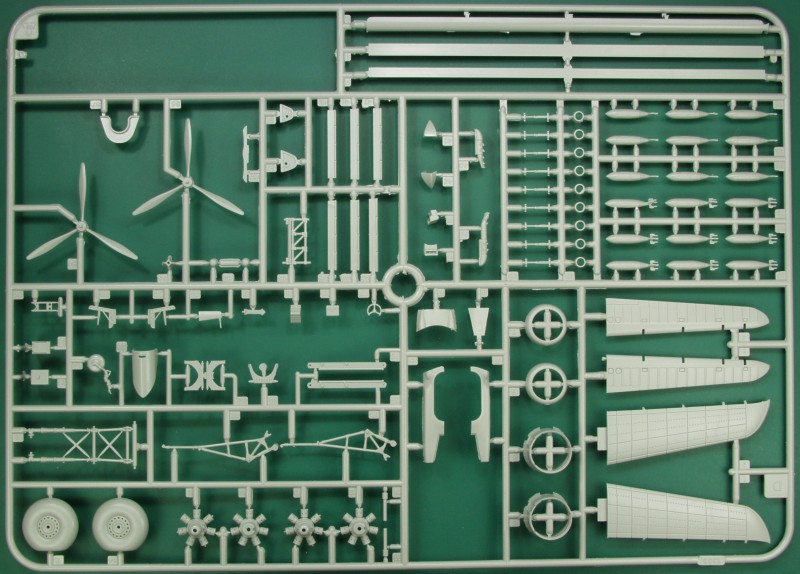
The control surfaces with the exception of the flaps are all molded separately. The cockpit area is very nicely detailed back as far as the astro dome on the top although not much will be seen of the last two sections. The small photo etch fret supplies an instrument panel which is layered over a decal, seat restraints, some levers for the throttle quadrant and a couple other details. The photo etch is pretty thick so annealing may be needed especially on the seat restraints. The rear portion of the fuselage is also well detailed again with some photo etch parts and there is an option to leave the crew door open so some of it can be seen if desired. The bomb bay features structural detail and bombs are supplied to fill it. The bomb doors are separate which is great if you want them open but the six full length doors look like they might be problematic getting them all in place if you want them closed. A single molded closed piece would have made life easier. There are also bombs supplied for the bomb cells in the wings and again the bomb doors are supplied separately but these look to be easier to position closed. The turrets are well detailed for the scale and it appears that the front and upper turrets must be installed when closing the fuselage. The rear turret looks like it can be installed later.
The landing gear assemblies are quite complete and complex looking and there is extra structure that gets installed in the gear bays. The tires are molded in halves and are weighted but look way too flat to me. The engines are nothing to write home about but are molded with two banks of cylinders and will probably look OK once painted and installed. The propellers are one piece moldings. There is a photo etch part for the cowl supports. no effort has been made to model the exhaust connections to the collector ring. OK enough verbiage lets look at the sprues.
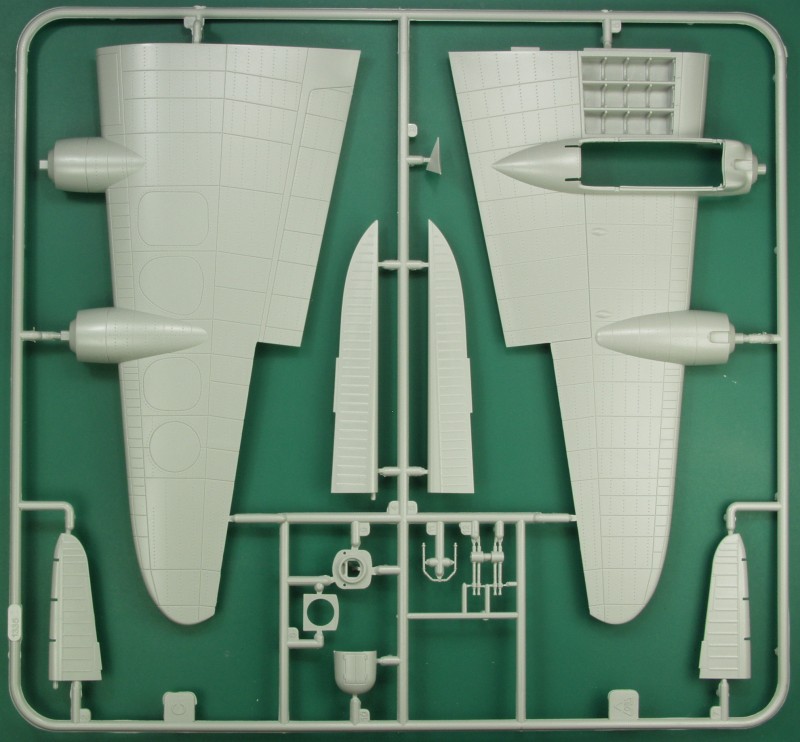
A look at the interior structure molding.
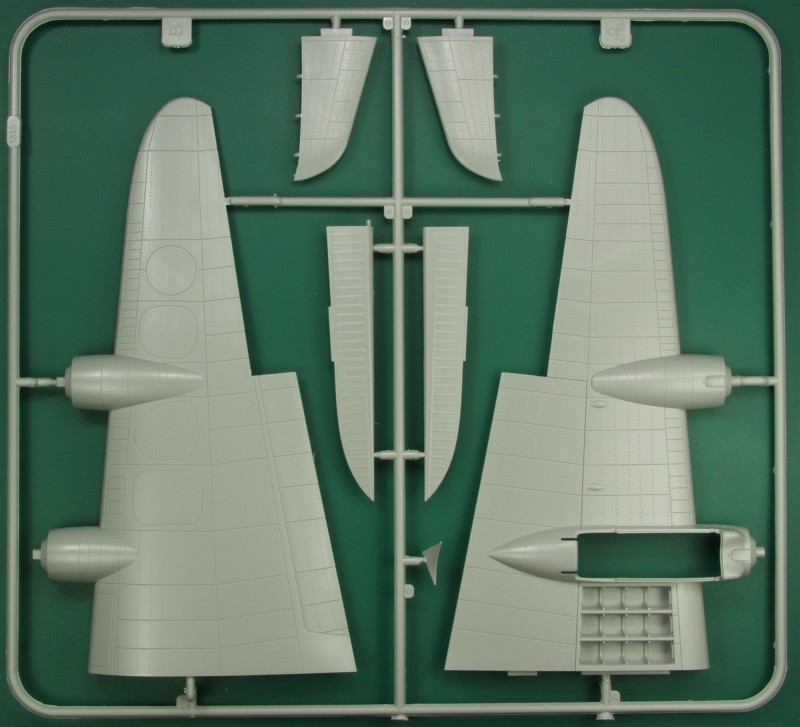
There are two of the following sprue. At the top right are half of the six bomb bay doors that will need to fitted into place if you want the bomb bay doors closed.
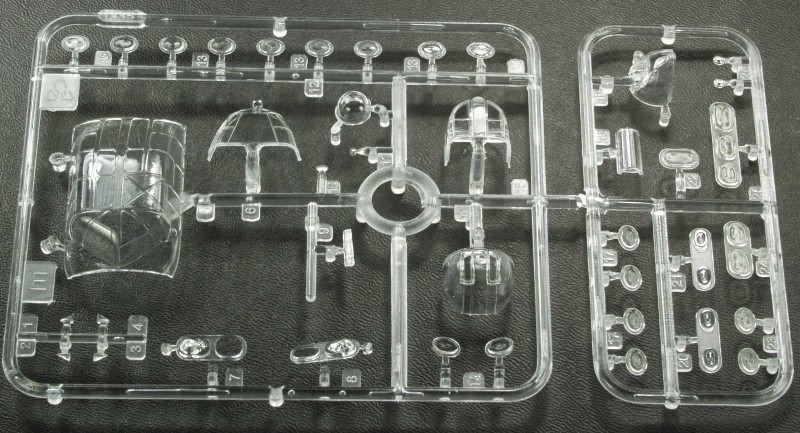
The clear parts are thin enough and the frame lines are well defined but the optical clarity is not all that great and the turrets have a lot of optical distortion. Not uncommon for kits in this scale many of the small windows have bubbles or fish eyes in them.
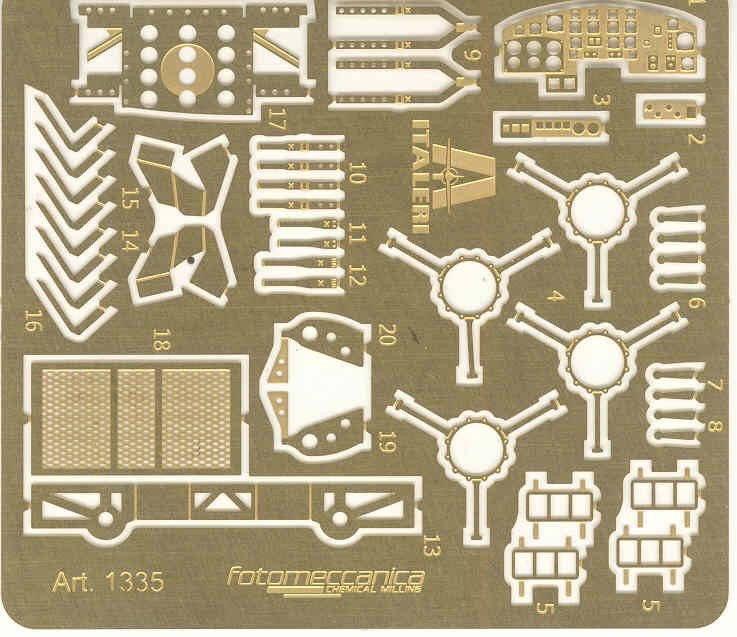
This photo etch fret is supplied with the kit and includes a lot of detail for use in the cockpit, turrets, rear fuselage and engines. It is quite thick compared to most PE so annealing may be helpful at least on the seat restraints and any parts that need to be folded.
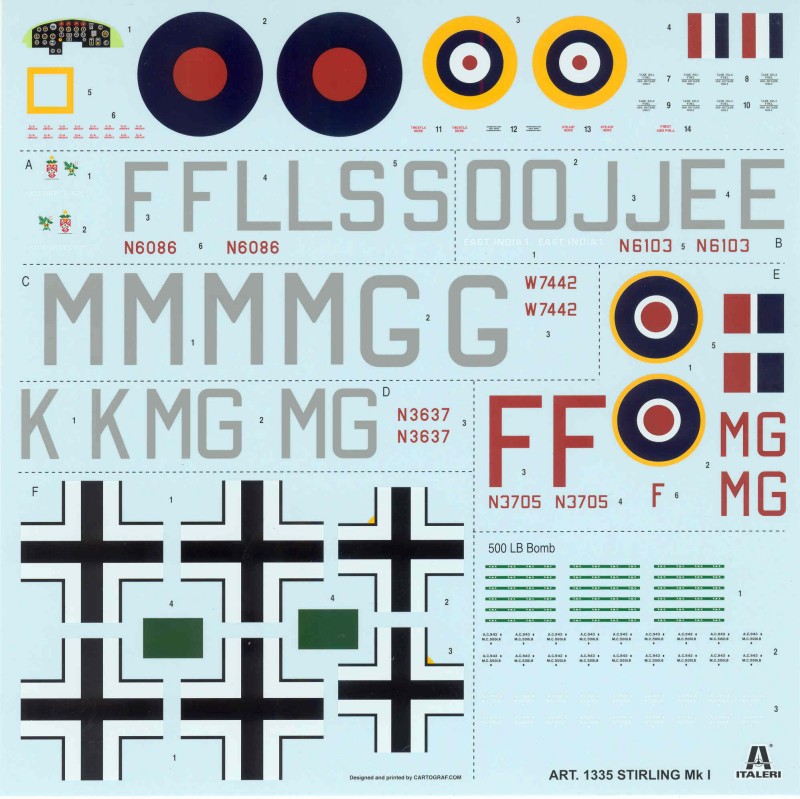
The decals are thin, glossy and in register. They are printed by Cartograph so they should behave with no issues. The sheet provides marking for six aircraft, two from #15 Squadron in 1941, two from #7 Squadron in 1941 and two from #7 squadron 1942, one before being shot down and one after crash landing and recovered and remarked by the Germans. A fair amount of stencils are supplied, all of which are readable with magnification and there are even stencils for the bombs.
The instructions are a 20 page booklet, A4 size. The cover page has a brief history in six languages and the the usual safety warnings, the next two pages have a parts map and a paint chart with generic names, FS numbers and Italeri paint numbers. The next 14 pages are the assembly steps with 3D cad type drawings in 30 steps. The last three pages are the painting and marking diagrams which are in color.
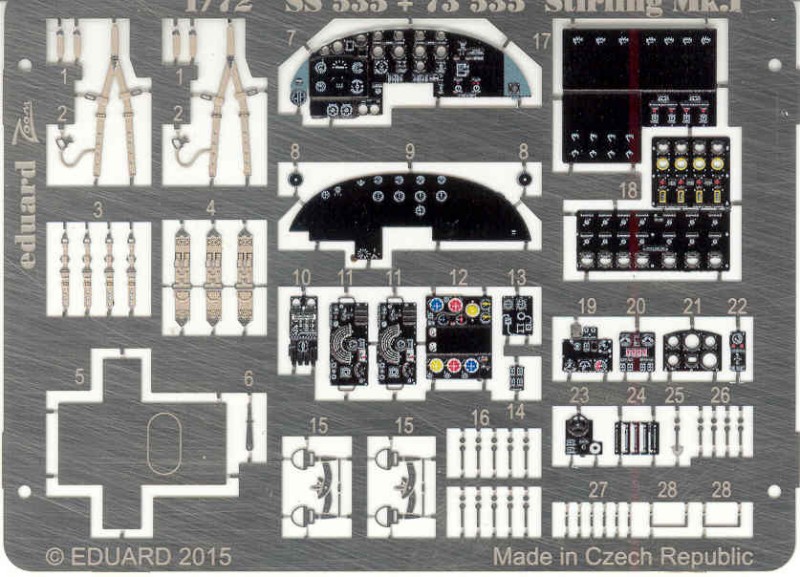
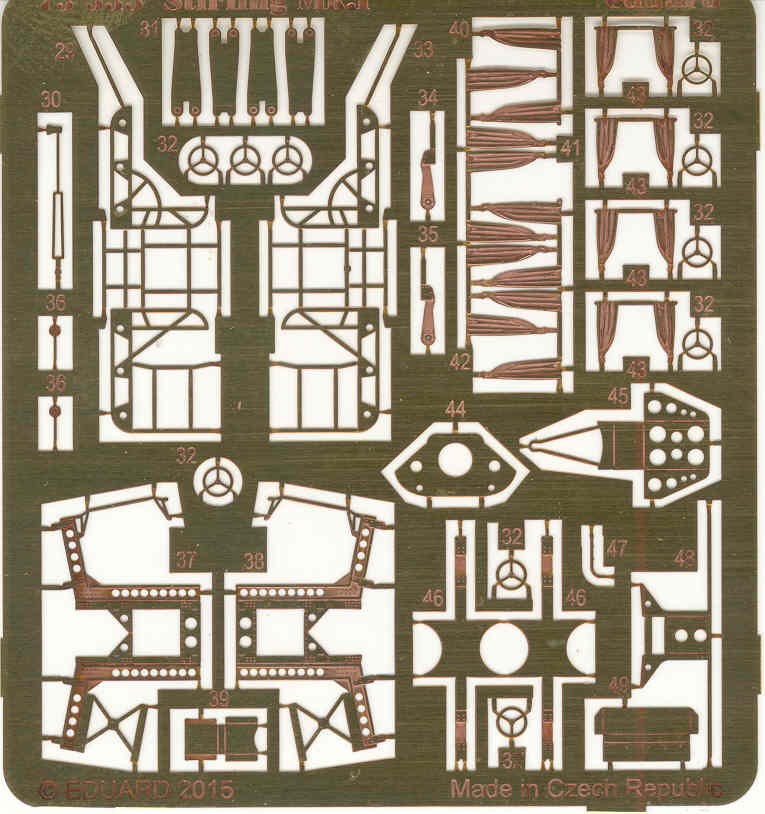
Eduard, as usual, has developed a PE set, not sure how useful it will be but I got it anyway. I have issues painting instrument panels in 1/32 so no way am I'm going to try it in 1/72. How much of the rest of it ends up being used will remain to be seen.
My 2¢ worth:
This is a really nicely detailed kit and certainly way nicer than the aging Airfix kit. I personally don't care for the surface detail, the panel line trenches could be toned down and the rivets eliminated altogether as far as I'm concerned. That said I had similar thoughts about their Sunderland kit but once painted it wasn't all that noticeable. Hopefully a couple coats of primer will tone it down some. If the kit builds up as well as their Sunderland kit it should be a relatively easy build except for its complexity.
Thanks for looking !
------------------------------------
While not a really new kit, due to distributor issues this one took a long time to show up from US sources.
History:
The Short Stirling has the distinction of being the first four engine bomber to be introduced into service with the Royal Air Force.
The Stirling was designed during the late 1930s by Short Brothers to conform with the requirements laid out in Air Ministry Specification B.12/36. Prior to this, the RAF had been primarily interested in developing increasingly capable twin engine bombers but had been persuaded to investigate a prospective four engine bomber as a result of promising foreign developments in the field. Out of the submissions made to the specification, Supermarine proposed the Type 317 which was viewed as the favorite, while Short's submission, named the S.29, was selected as an alternative. When the preferred Type 317 had to be abandoned, the S.29, which later received the name Stirling, proceeded to production.
During early 1941, the Stirling entered squadron service. During its use as a bomber, pilots praised the type for its ability to out turn enemy night fighters and its favorable handling characteristics, while the altitude ceiling was often a subject of criticism. The Stirling had a relatively brief operational career as a bomber before being relegated to second line duties from late 1943. This was due to the increasing availability of the more capable Handley Page Halifax and Avro Lancaster, which took over the strategic bombing of Germany. Decisions by the Air Ministry on certain performance requirements, such as to restrict the wingspan of the aircraft to 100 feet, had played a role in limiting the Stirling's performance, these restrictive demands had not been placed upon the Halifax and Lancaster bombers once they were converted from two to four engine bombers.
During its later service, the Stirling was used for mining German ports, new and converted aircraft also flew as glider tugs and supply aircraft during the Allied invasion of Europe during 1944–1945. In the aftermath of the Second World War the type was rapidly withdrawn from RAF service, having been replaced in the transport role by the Avro York, a derivative of the Lancaster that had previously displaced it from the bomber role. A handful of ex-military Stirlings were rebuilt for the civil market.
The Stirling used the Sunderland's 114 ft wing and it had to be reduced to less than 100 ft, the same limit as that imposed on the P.13/36 designs (Handley Page Halifax and Avro Manchester). In order to get the needed lift from a shorter span and excess weight, the redesigned wing was thickened and reshaped. It is often said that the wingspan was limited to 100 ft so the aircraft would fit into existing hangars but the maximum hangar opening at the time was 112 ft and the specification required outdoor servicing. The wingspan limitation has been alleged to have actually been enforced as a method of restricting the designer into keeping the overall weight down.
The Kit:
The Italeri kit comes in large size box that seems to be in vogue these days, while it's sized to fit the largest sprue the remaining sprues are considerably smaller so there ends up being a lot of empty space in the box. The box is a top open tray type box of thin card stock so not overly sturdy with nice artwork on the front. Inside the box one finds three separate bags with the main sprues and one small one with the clear parts. The largest sprue is bagged by itself, the other two bags have two sprues in each, one has the two sprues with the wing halves and the other has two identical sprues. There is also a small fret of photo etch in a plastic sleeve.
The kit is molded in a light gray color. The parts for the most part are crisply molded with some light flash here and there and mold separation lines are light. The surface detail consists of recessed panel lines and rivets. The panel lines are oversized for the scale, better than the Sunderland from Italeri but still a bit deep. The rivets on the other hand could have been left off altogether as they are way too big and not uniform, some on curved surfaces are more tear drop in shape. They are also not uniform across the surface with some being sharply molded and others rather soft. Hopefully a couple heavy coats of primer will help subdue them. I found several surface defects on the fuselage halves, there are sink marks on the sides where alternative window openings are located but these get cut open later and a couple on the top and bottom where alignment hole structure is molded on the inside. The rivets will make filling these spots an issue. The rivets on the wings seemed more uniform and I found no surface defects on them. The fuselage has internal structure molded in and although there are some ejector pin marks it appears that most are located where they won't be seen.
The control surfaces with the exception of the flaps are all molded separately. The cockpit area is very nicely detailed back as far as the astro dome on the top although not much will be seen of the last two sections. The small photo etch fret supplies an instrument panel which is layered over a decal, seat restraints, some levers for the throttle quadrant and a couple other details. The photo etch is pretty thick so annealing may be needed especially on the seat restraints. The rear portion of the fuselage is also well detailed again with some photo etch parts and there is an option to leave the crew door open so some of it can be seen if desired. The bomb bay features structural detail and bombs are supplied to fill it. The bomb doors are separate which is great if you want them open but the six full length doors look like they might be problematic getting them all in place if you want them closed. A single molded closed piece would have made life easier. There are also bombs supplied for the bomb cells in the wings and again the bomb doors are supplied separately but these look to be easier to position closed. The turrets are well detailed for the scale and it appears that the front and upper turrets must be installed when closing the fuselage. The rear turret looks like it can be installed later.
The landing gear assemblies are quite complete and complex looking and there is extra structure that gets installed in the gear bays. The tires are molded in halves and are weighted but look way too flat to me. The engines are nothing to write home about but are molded with two banks of cylinders and will probably look OK once painted and installed. The propellers are one piece moldings. There is a photo etch part for the cowl supports. no effort has been made to model the exhaust connections to the collector ring. OK enough verbiage lets look at the sprues.
A look at the interior structure molding.
There are two of the following sprue. At the top right are half of the six bomb bay doors that will need to fitted into place if you want the bomb bay doors closed.
The clear parts are thin enough and the frame lines are well defined but the optical clarity is not all that great and the turrets have a lot of optical distortion. Not uncommon for kits in this scale many of the small windows have bubbles or fish eyes in them.
This photo etch fret is supplied with the kit and includes a lot of detail for use in the cockpit, turrets, rear fuselage and engines. It is quite thick compared to most PE so annealing may be helpful at least on the seat restraints and any parts that need to be folded.
The decals are thin, glossy and in register. They are printed by Cartograph so they should behave with no issues. The sheet provides marking for six aircraft, two from #15 Squadron in 1941, two from #7 Squadron in 1941 and two from #7 squadron 1942, one before being shot down and one after crash landing and recovered and remarked by the Germans. A fair amount of stencils are supplied, all of which are readable with magnification and there are even stencils for the bombs.
The instructions are a 20 page booklet, A4 size. The cover page has a brief history in six languages and the the usual safety warnings, the next two pages have a parts map and a paint chart with generic names, FS numbers and Italeri paint numbers. The next 14 pages are the assembly steps with 3D cad type drawings in 30 steps. The last three pages are the painting and marking diagrams which are in color.
Eduard, as usual, has developed a PE set, not sure how useful it will be but I got it anyway. I have issues painting instrument panels in 1/32 so no way am I'm going to try it in 1/72. How much of the rest of it ends up being used will remain to be seen.
My 2¢ worth:
This is a really nicely detailed kit and certainly way nicer than the aging Airfix kit. I personally don't care for the surface detail, the panel line trenches could be toned down and the rivets eliminated altogether as far as I'm concerned. That said I had similar thoughts about their Sunderland kit but once painted it wasn't all that noticeable. Hopefully a couple coats of primer will tone it down some. If the kit builds up as well as their Sunderland kit it should be a relatively easy build except for its complexity.
Thanks for looking !
------------------------------------