
-
Modelers Alliance has updated the forum software on our website. We have migrated all post, content and user accounts but we could not migrate the passwords.
This requires that you manually reset your password.
Please click here, http://modelersalliance.org/forums/login to go to logon page and use the "Forgot your Password" option.
You are using an out of date browser. It may not display this or other websites correctly.
You should upgrade or use an alternative browser.
You should upgrade or use an alternative browser.
Dragon Pz.Kpfw.IV
- Thread starter moon puppy
- Start date
roadwheels.... 
 ...
...JSteinman
Master at Arms
roadwheels....
Leave off a few outer tires...
I'm cool with that, but that only lowers the part count to 7...
JSteinman
Master at Arms
lowers it to 7 on just a few..
Oh yeah, when it comes time to add the final drive housing, DO NOT FOLLOW THE DIRECTIONS!
Below is taken from my MMiR article on this kit.
Oh yeah, when it comes time to add the final drive housing, DO NOT FOLLOW THE DIRECTIONS!
Below is taken from my MMiR article on this kit.
Honestly, there are only a handful of detail errors that really bugged me on the finished kit; the biggest is the relation of the drive sprocket to the first return roller and anterior portion of the lower hull. This combined with a slightly undersized drive sprocket and oversized return rollers give a noticeable downhill slope to the track run from the first roller to the top of the sprocket. In Kit 6301 this is fixed. But I am going to describe a VERY EASY way to camouflage this. It is not a correction, but just a sleight of hand to make the parts appear in a better relationship.
Before we begin the discussion, I want to give a warning. This kit is like a Ferrari. It’s sleek, sexy, finely tuned and has super tight tolerances. But it also is temperamental, won’t take abuse well, and can be unforgiving. My advice is to become very familiar with the instructions, and to test fit EVERYTHING! This is not a kit to be rushed, it, like a fine wine, is to be savored and enjoyed. One other thing, be prepared for lots of exclamation points. This kit deserves them.
As molded, the final drive assemblies sit 2mm too low. This combined with the undersized drive sprocket and oversized return rollers, gives a noticeable down hill run to the track as it passes over the first return roller on its way to the drive sprocket. I have seen a couple different ways to fix this, some fairly complex. My fix is fairly simple, but is cosmetic only. What I did was to rotate the entire cover up about 2mm. You must then trim away the section of the bolt plate that is exposed. This moved the drive sprocket up, but also slightly forward. In my opinion this is not nearly as noticeable as the low position. It also changes the relationship of the armored cover to the hull front, but again much less noticeable.
lowers it to 7 on just a few..
Oh yeah, when it comes time to add the final drive housing, DO NOT FOLLOW THE DIRECTIONS!
Below is taken from my MMiR article on this kit.
Honestly, there are only a handful of detail errors that really bugged me on the finished kit; the biggest is the relation of the drive sprocket to the first return roller and anterior portion of the lower hull. This combined with a slightly undersized drive sprocket and oversized return rollers give a noticeable downhill slope to the track run from the first roller to the top of the sprocket. In Kit 6301 this is fixed. But I am going to describe a VERY EASY way to camouflage this. It is not a correction, but just a sleight of hand to make the parts appear in a better relationship.
Before we begin the discussion, I want to give a warning. This kit is like a Ferrari. It’s sleek, sexy, finely tuned and has super tight tolerances. But it also is temperamental, won’t take abuse well, and can be unforgiving. My advice is to become very familiar with the instructions, and to test fit EVERYTHING! This is not a kit to be rushed, it, like a fine wine, is to be savored and enjoyed. One other thing, be prepared for lots of exclamation points. This kit deserves them.
As molded, the final drive assemblies sit 2mm too low. This combined with the undersized drive sprocket and oversized return rollers, gives a noticeable down hill run to the track as it passes over the first return roller on its way to the drive sprocket. I have seen a couple different ways to fix this, some fairly complex. My fix is fairly simple, but is cosmetic only. What I did was to rotate the entire cover up about 2mm. You must then trim away the section of the bolt plate that is exposed. This moved the drive sprocket up, but also slightly forward. In my opinion this is not nearly as noticeable as the low position. It also changes the relationship of the armored cover to the hull front, but again much less noticeable.

I'm a visual guy. Is that article online?
Sherman 18
Master at Arms
Nice tip
Skinny_Mike
Well-known member
lowers it to 7 on just a few..
Oh yeah, when it comes time to add the final drive housing, DO NOT FOLLOW THE DIRECTIONS!
Below is taken from my MMiR article on this kit.
Honestly, there are only a handful of detail errors that really bugged me on the finished kit; the biggest is the relation of the drive sprocket to the first return roller and anterior portion of the lower hull. This combined with a slightly undersized drive sprocket and oversized return rollers give a noticeable downhill slope to the track run from the first roller to the top of the sprocket. In Kit 6301 this is fixed. But I am going to describe a VERY EASY way to camouflage this. It is not a correction, but just a sleight of hand to make the parts appear in a better relationship.
Before we begin the discussion, I want to give a warning. This kit is like a Ferrari. It’s sleek, sexy, finely tuned and has super tight tolerances. But it also is temperamental, won’t take abuse well, and can be unforgiving. My advice is to become very familiar with the instructions, and to test fit EVERYTHING! This is not a kit to be rushed, it, like a fine wine, is to be savored and enjoyed. One other thing, be prepared for lots of exclamation points. This kit deserves them.
As molded, the final drive assemblies sit 2mm too low. This combined with the undersized drive sprocket and oversized return rollers, gives a noticeable down hill run to the track as it passes over the first return roller on its way to the drive sprocket. I have seen a couple different ways to fix this, some fairly complex. My fix is fairly simple, but is cosmetic only. What I did was to rotate the entire cover up about 2mm. You must then trim away the section of the bolt plate that is exposed. This moved the drive sprocket up, but also slightly forward. In my opinion this is not nearly as noticeable as the low position. It also changes the relationship of the armored cover to the hull front, but again much less noticeable.
Darn It! I already installed the drive housings!
JSteinman
Master at Arms
lowers it to 7 on just a few..
Oh yeah, when it comes time to add the final drive housing, DO NOT FOLLOW THE DIRECTIONS!
Below is taken from my MMiR article on this kit.
Honestly, there are only a handful of detail errors that really bugged me on the finished kit; the biggest is the relation of the drive sprocket to the first return roller and anterior portion of the lower hull. This combined with a slightly undersized drive sprocket and oversized return rollers give a noticeable downhill slope to the track run from the first roller to the top of the sprocket. In Kit 6301 this is fixed. But I am going to describe a VERY EASY way to camouflage this. It is not a correction, but just a sleight of hand to make the parts appear in a better relationship.
Before we begin the discussion, I want to give a warning. This kit is like a Ferrari. It’s sleek, sexy, finely tuned and has super tight tolerances. But it also is temperamental, won’t take abuse well, and can be unforgiving. My advice is to become very familiar with the instructions, and to test fit EVERYTHING! This is not a kit to be rushed, it, like a fine wine, is to be savored and enjoyed. One other thing, be prepared for lots of exclamation points. This kit deserves them.
As molded, the final drive assemblies sit 2mm too low. This combined with the undersized drive sprocket and oversized return rollers, gives a noticeable down hill run to the track as it passes over the first return roller on its way to the drive sprocket. I have seen a couple different ways to fix this, some fairly complex. My fix is fairly simple, but is cosmetic only. What I did was to rotate the entire cover up about 2mm. You must then trim away the section of the bolt plate that is exposed. This moved the drive sprocket up, but also slightly forward. In my opinion this is not nearly as noticeable as the low position. It also changes the relationship of the armored cover to the hull front, but again much less noticeable.
Darn It! I already installed the drive housings!
Hmmm, maybe lower the return rollers?
Tally Ho...
Nice looking brass.
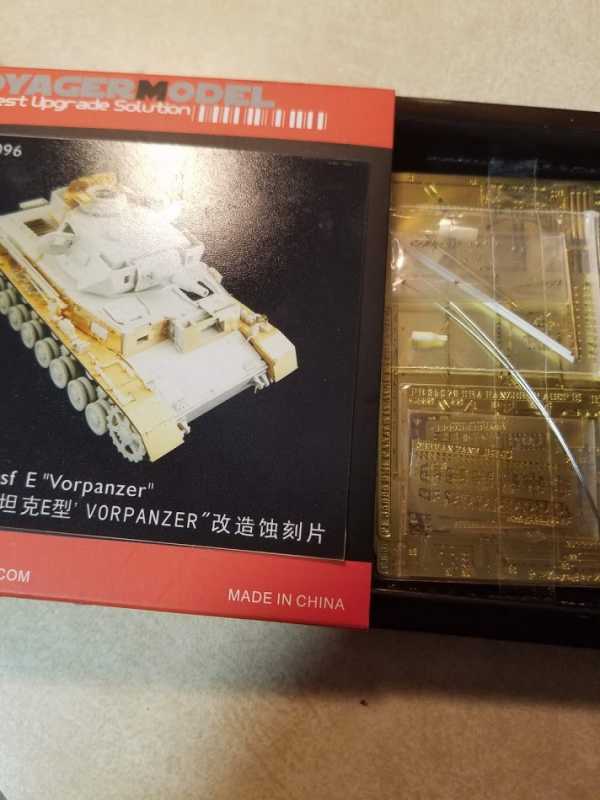
Might be able to crank up the soldiering iron on some of this.
Nice looking brass.
Might be able to crank up the soldiering iron on some of this.
HA! I haven't even started to screw this up yet.
So is kit 6291 the same kit, I know it's a different model tank but I notice the part numbers are the same and it looks like the same PE (for the most part) is in the box.
So is kit 6291 the same kit, I know it's a different model tank but I notice the part numbers are the same and it looks like the same PE (for the most part) is in the box.
Sherman 18
Master at Arms
I have a couple Voyager sets for projects. All I can say is they look good in their packaging
JSteinman
Master at Arms
HA! I haven't even started to screw this up yet.
So is kit 6291 the same kit, I know it's a different model tank but I notice the part numbers are the same and it looks like the same PE (for the most part) is in the box.
The vorpanzer kit was dragons response to the few and I mean few negative issue with the DAK kit. They fixed the drive sprocket but took away some of the goodies...
And yeah Voyager is good stuff, but requires a bit more effort than Aber. I used. Voyager set on the 10/5.
I don't think I got the full fenders on this. Lots of freakin clamps!
Looking back over my photos, it's been a slow modeling year. Future doesn't look better. Will be in Maryland next weekend for work.
But I do have 22 days of vacation to burn before Sept.
:dude
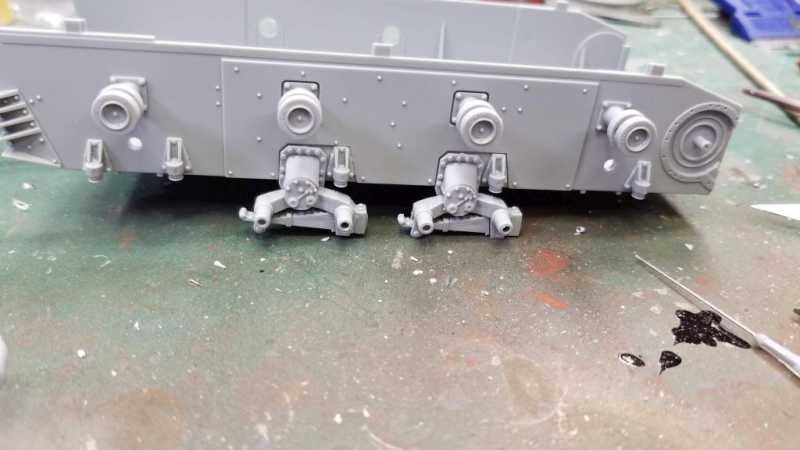
Product of my work this weekend. Complex assembly but not so bad once you understand what you're doing.
But I do have 22 days of vacation to burn before Sept.
:dude
Product of my work this weekend. Complex assembly but not so bad once you understand what you're doing.

They work! Could be posed up nicely on a rocky base. 