• Modelers Alliance has updated the forum software on our website. We have migrated all post, content and user accounts but we could not migrate the passwords.
    This requires that you manually reset your password.
    Please click here, http://modelersalliance.org/forums/login to go to logon page and use the "Forgot your Password" option.

All Righty ... What's on the bench today?

After watching some videos...I decided to try playing w/ oils again for a panel wash/weather attempt. Screwed around on a poor F4F that got destroyed by a cat before it was ever completed. It lives on as a test aircraft. :salute

DSCF2214.JPG

DSCF2215.JPG


Progress in the right direction. Best results yet. I know a couple things I'll probably tweak a bit next go around. But I'm getting confident enough in the process I may try it on the next model completed. :blink
 
Trying to get the mojo back, I grabbed an easy one.

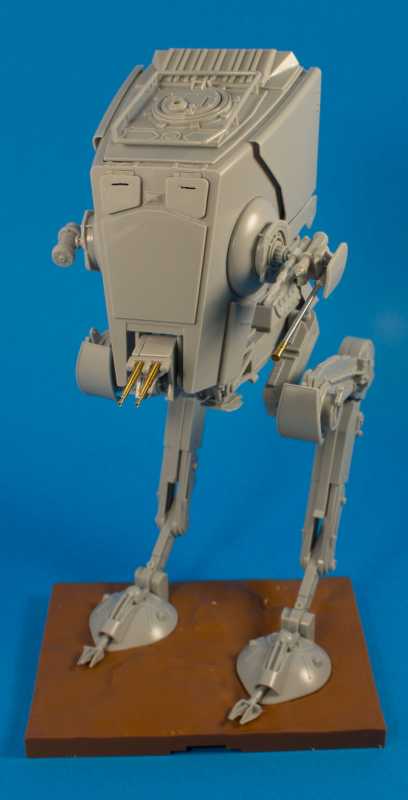
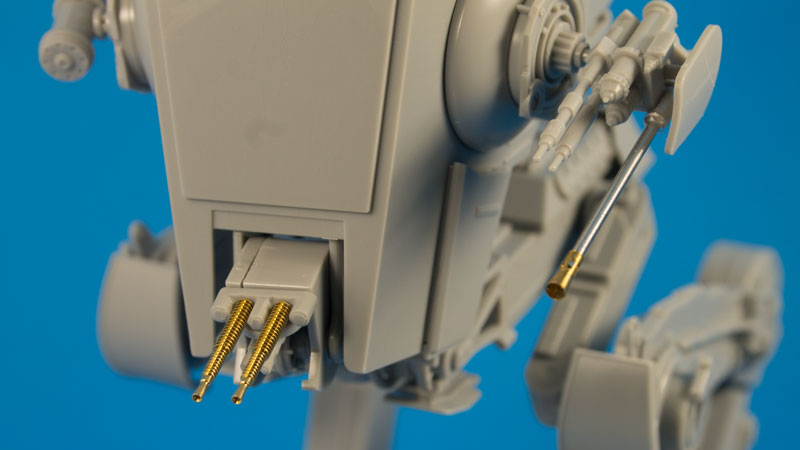
The Bandai AT-ST. I swapped out the laser canons for twin 37 Czech MG and a 20mm Flak on the side. I'll be giving it a well worn Octo Camo.


hafd9342.jpg


h8aaac3d.jpg
 
A little bit of modeling today. T-54B from Somaliland and an Iraqi T-62 with track width mine plows.

DSC06904.JPG


DSC06906.JPG


James
 
Awesome AT-ST Ausf! Those different guns really make this pop! Way to go!

James, those look fantastic! It's great to see your work again.

I managed to find a little more time today so I was able to get done everything that I wanted to finish yesterday... and maybe even a little more.

I'll start with my VW Bus. I took all the tape off to see how well everything looked and was a bit disappointed:

WIP_VW_Van_X.jpg


Gonna have to re-tape and shoot some more white. Oh well. I'll take my time as you can see that one door is missing. The chrome parts are missing too, or I would have assembled even more of this bus, but alas, that is not to be for now. Time to move on....


Next I took some time to finish the camouflage on the Dragonfly. I re-shot the tan color first:

WIP_A_37A_Dragonfly_XIII.jpg


After that dried, I added some more Silly Putty to shoot the third and final color:

WIP_A_37A_Dragonfly_XIV.jpg


Here is the final color on this model now:

WIP_A_37A_Dragonfly_XV.jpg


Finally, after everything had dried sufficiently; I pulled the Silly Putty off this model, along with the tape:

WIP_A_37A_Dragonfly_XVI.jpg


It looks okay; certainly not as fine a paint job as I wanted to do. There are some touch-ups to do so I'll work on them and just move on. I never expected this to give me such trouble getting done.


Moving on to my Armor, I tried again with my Sherman mineroller. After two and a half hours and five lost parts; I managed to get one bogie done! Geez! UM kits really bite!

WIP_Sherman_Mineroller_II.jpg


I was about to put this away again, but then I thought, why don't I just build other sub assemblies? So, I pulled out the sprues for the turret and got that started. I managed to get most of it done fairly easy:

WIP_Sherman_Mineroller_III.jpg


I even drilled out the gun barrel. Then I decided to assemble the mine roller itself. That took some time and after a couple more lost pieces; I finally have a decent looking mine roller:

WIP_Sherman_Mineroller_IV.jpg


This one will take some time to finish. Meanwhile, since I still had the compressor fired up, I pulled out my T-14 Armata and put down the base coat. This model's instructions called for a 'yellow grey' so I decided to use Panzer Dunklegelb. It went on pretty well:

WIP_CTA_III_T-14_Armata_Tank_XVII.jpg


WIP_CTA_III_T-14_Armata_Tank_XVIII.jpg


Later on I went in and filled in the under-sprayed areas.

While that was drying, I shot the second color on the FWD 3-ton. This was the light tan:

WIP_FWD_3_Ton_Ammo_Carrier_VII~0.jpg


After it dried, I added more Silly Putty to mask this for the third color. The third color then went on; this time it was a light grey:

WIP_FWD_3_Ton_Ammo_Carrier_VIII.jpg


Once that was dry, I added more Silly Putty to this to cover the grey in preparation for the fourth and last color:

WIP_FWD_3_Ton_Ammo_Carrier_IX.jpg


Then I pulled out a Flat Black and lightened it up a bit for a charcoal black. I shot this color on all the remaining exposed areas:

WIP_FWD_3_Ton_Ammo_Carrier_X.jpg


WIP_FWD_3_Ton_Ammo_Carrier_XI.jpg


Once that had sufficient time to dry, I pulled (almost) all the Silly Putty off. (You can see some I left on the left front wheel) Amazingly enough I had no broken parts from pulling that off, thank God! I am far more pleased with this pattern than I am with the Dragonfly:

WIP_FWD_3_Ton_Ammo_Carrier_XII.jpg


WIP_FWD_3_Ton_Ammo_Carrier_XIII.jpg


With that done, I was able to wrap up another day on the bench. Now I feel I accomplished something. This was where I wanted to be yesterday. I am very happy now with this latest progress. I hope you enjoy it too.

Thanks all for looking in, comments are welcome.
 
Worked on the Patton tank weathering and also this beast...didn't take tank pics- but did something very similar to this to both--

IMG_20170422_185316269-800x450.jpg
 
I'll get some pics of both and the results of the filtering after I get home from my daughter's very wet horse show...
 
Sorry...weekend and the week got away from me...
IMG_20170508_175351303-800x450.jpg

IMG_20170508_175405962-800x450.jpg

And the birds ravaged the windshield ;)
IMG_20170508_175420518-800x450.jpg

And the Patton....
IMG_20170508_175447045-800x450.jpg

IMG_20170508_175502861-600x1067.jpg
 
My gun truck has wondered back to the bench :idonno

3004.jpg


Thought I started a build thread years ago, but will have to look some more

Also goofing off with a Tamiya 1/48 F51D, this I'll start a thread when I can

321~0.jpg


Have a good weekend everyone, kinda rockin at the bench last couple days. So I'm off

:drinks
 
So did you finish the car Jeff?

:(

Nope.

I've been having bad issues with my lungs since November. Can't be around exhaust (heater), chemicals, moisture, etc. So can't work on the car. I had a week off work in December as it almost put me in the hospital. That didn't end up helping as I ended up working the next 20 days straight with an average 14 plus hours a day. I'm still fighting the fluid in my lungs. Working plus sick at the same time, I have not energy. Found out a birth defect with my stomach is causing it. I have to have surgery done by September. I'll be off work for 6-8 weeks for sure. I hoped to have it done the first of this month, but things don't go as you plan. Work has kept me, really to busy. This week a lone I'm at 35 hours overtime. :gogo 3 hours sleep since Thursday morning. If I'm off I really like a vegetable. Like today I was called out a little after midnight (went to bed at 11 pm) got back after 1100, softball practice with Grace at 1 until 3. Now I'm just trying to stay awake until 8.

But this week for some reason I've been feeling better health wise. I got a little bit done at the bench. Which was great, planned on camping there on and off today.

:laugh:

I'm not posting anything more tonight to risky.

:drinks
 
Man! I thought I was putting in hours lately. :soldier

Good they have your problem IDed, let them do that voodoo that they do on you and get better! :zen

Tell Grace we all said Howdy :mpup :v :Hiay
 
Wow Jeff, I'll be praying for a swift recovery. I hope you get back to 100% very soon. Glad to see you back on the bench.

Well, I have a lot on the workbench so this will be a pretty long post with tons of pics. Brace yourselves people for a wild ride!


I'll start out with the two F-14's I've been doing for a review. These models are some tough birds to build! This past Hobby Day I decided to try and finish the cockpits/forward fuselage sections. I am only going to show one plane as I go through this as most all of these issues were the same for each aircraft. In the event I need to show differences due to alternate parts for specific variants I'll show the two together.

The first thing I did was I tried to add the instrument panel cowls over the two instrument panels. The forward one managed to fit okay with only some minor adjustment to the instrument panel. The second one required that I break off the instrument panel since it did not fit at all:

WIP_F-14_Tomcats_SPAM_Review_VIIIp.jpg


So this time, I cemented the instrument panel inside the cowl before adding it back to the cockpit:

WIP_F-14_Tomcats_SPAM_Review_VIIIr.jpg


That finally fit right. Both cockpit assemblies had this problem and needed to be completed this way.

Another issue I had was when I tried to add the rear cover to the opening behind the second pilot seat. The part would not quite fit the way it was indicated on the instruction sheet below the model:

WIP_F-14_Tomcats_SPAM_Review_VIIIs.jpg


In order to get that part to fit, you need to push it inside the rear opening as seen above, only push it further back in order to clear the seat. Then, as you are pressing it down, you'll need to also push it forward toward the seat until it snaps into position flat against the fuselage edges like so:

WIP_F-14_Tomcats_SPAM_Review_VIIIt.jpg


Now it was time to turn these over and complete the assembly by adding the lower panel behind the forward landing gear bay. Once again, I ran into poor fitting parts. I lined up one side flush with the fuselage assembly and found that these panels are too wide:

WIP_F-14_Tomcats_SPAM_Review_VIIIu.jpg


WIP_F-14_Tomcats_SPAM_Review_VIIIv.jpg


The solution I came up with was to cement one side and wait for it to dry sufficiently. Then I pressed the other side in until it snapped flush with the fuselage and glued it into place so it was flush on that side as well. Later on I then pressed the forward part down to make it relatively flush along the front join. I figured the shorter step would be easier to sand and be less noticeable that the sanding along the side of the fuselage.

Finally after adding a few more small panels to openings and adding the nose cones, I was able to declare these two forward fuselage assemblies completed:

WIP_F-14_Tomcats_SPAM_Review_IXa.jpg


WIP_F-14_Tomcats_SPAM_Review_IXb.jpg


Now I could move onto the main fuselage parts. I started out with the tail section that holds the tailhook. This went together fairly well so far, considering there are six entire pieces in that assembly:

WIP_F-14_Tomcats_SPAM_Review_Xa.jpg


The steps along the sides are supposed to be there to conform to the main body of the plane when it is assembled. That part on the right side sticking out under the end of the tailhook is one of two different parts. One is for the F-14A and the other for the F-14B. Watch closely to be sure you are adding the right part for the version you are doing.

Next I had to add two side pieces for the main landing gear bays. Why these weren't molded into place I don't know, but I will probably find out later on in this build. They were slightly bent so I needed to glue the one end and then clamped the other end to cement it correctly:

WIP_F-14_Tomcats_SPAM_Review_X.jpg


Yes, those are mini clothespins that my wife got me from a local 99-cent store.

Later, after opening the holes I needed to open for the particular weapons system I wanted to load on this; I cemented the two fuselage halves together. These fit pretty well in the front section. At the rear, they fit badly with gaps alongside the L-shaped joint. These joints also stepped unevenly and needed to be adjusted for a flush joint. Putty will be needed to complete the seam repair:

WIP_F-14_Tomcats_SPAM_Review_Xb.jpg


Later I added the tailhook assembly to the rear of this. You can see more clearly here the gap in the rear seam as well:

WIP_F-14_Tomcats_SPAM_Review_Xc.jpg


After all of that frustration with these models, I felt it was time to move onto something else...

I pulled out my F-102 Delta Dagger to get more done on it. I started out finishing a few minor details on the cockpit and then I cemented it inside the two fuselage halves along with the exhaust shroud:

WIP_CDS_Meng_F-102_Dagger_IX.jpg


This went together well, I had no seam issues at all. The gap you see on top is because I didn't add cement to the spine of this yet. There is a long opening along the bottom of this that gives no support to the fuselage when pressing it together. So I cemented the ends together and later on when it was dry, I cemented the spine when I could hold it better.

After some time I snapped the wing assembly into the fuselage to see how it fit. This fits like a glove:

WIP_CDS_Meng_F-102_Dagger_X.jpg


That is only dry fit in there!

Later on when I had cemented the spine and let it dry, I then added the nose. Again, the wings are only snapped into place and not glued yet:

WIP_CDS_Meng_F-102_Dagger_XI.jpg


Some time after that, I dipped the canopy parts in Future and now they are drying. I should be able to close up the cockpit tomorrow.

Well that's all I got done on my aircraft. Now lets check out my armor work....


Once again, I was a glutton for punishment, trying to make progress on some more difficult models. With all the time I have at Hobby Day to work; Hobby Day weekends are perfect for doing these types of difficult models.

I started out getting the rest of the bogies done on my Sherman with the mineroller mounted. After two and a half more hours, I had these three done and added to the side of the hull:

WIP_Sherman_Mineroller_V.jpg


Another two and a half hours or so later, I finally manage to get all the wheels and bogies mounted on the lower hull. Repeated assembly of these bogies allowed me to get faster with each new one I built:

WIP_Sherman_Mineroller_Va.jpg


WIP_Sherman_Mineroller_Vb.jpg


Next I added the sponson floors to the undersides of the upper hull sides. Afterward I test fit the upper and lower hulls to see how this fit together:

WIP_Sherman_Mineroller_VI.jpg


That ain't too bad. I still have to work it a bit, but this will glue together fine. Just for fun, I added the turret and then positioned the mine roller assembly in front of this to see how it was going to look:

WIP_Sherman_Mineroller_VII.jpg


This is gonna look cool!

Moving on, I started again on the Russian GAZ fuel truck. Some time before I had slathered on a ton of Mr. Surfacer to fill in the gaps and seams (canyons!) on the sponsons on either side of the tank:

WIP_Russian_Truck_VIII.jpg


Once that was dry, I carved, sanded and smoothed out this tank, It looks far better now:

WIP_Russian_Truck_X.jpg


While that tank was drying and before I sanded it; I test fit the two parts of the truck cab on the chassis:

WIP_Russian_Truck_IX.jpg


Yeah, that is going to take a lot of work to fit right...

For the next hour and a half, I sanded, carved and test-fit that cab together until almost all the gaps disappeared. Finally they were small enough that any gaps left could easily be dealt with easily. Now I added the windows to this cab:

WIP_Russian_Truck_XI.jpg


These aren't the best windows ever molded, but they fit fairly well in comparison to the rest of the model. Once they dried, I cemented the two cab parts together and then cemented them onto the chassis. These parts took quite a bit of persuasion to glue correctly:

WIP_Russian_Truck_XII.jpg


Finally, when that was dry enough, I added the tank to the rear of this truck:

WIP_Russian_Truck_XIII.jpg


Now all I have to do is mask the windows, fix the remaining seams and this will be ready for paint. Finally, this is starting to look like a truck!

The last model I worked on was my little FWD ammo carrier. I had already painted the camo pattern on this so I took a fine-tipped black marker and drew in all the demarcation lines:

WIP_FWD_3_Ton_Ammo_Carrier_XIV.jpg


WIP_FWD_3_Ton_Ammo_Carrier_XV.jpg


Later on I completed the assembly with all the final detail parts as well as the tilt over the driver's cab:

WIP_FWD_3_Ton_Ammo_Carrier_XVI.jpg


WIP_FWD_3_Ton_Ammo_Carrier_XVII.jpg


Now all I have to do is complete the detail painting and then weather this and it'll be done. The next pics you see of this will be completed pics.

Okay, that's all there is happening at Maddog Manufacturing; I hope you enjoyed the factory tour. Thanks all for looking in, comments are welcome.

Stay tuned, more to come.
 
Wow Jeff, sorry to hear you have been so busy and not feeling well. :zen :zen

My weekend went completely south starting tursday night. My PCP sent me to the ER friday afternoon for a CAT scan. Had not felt good all last week and thursday night had some medium discomfort in my stomach area after having some ice cream.

Turned out I have Pancreatitis. With some other things I have figured out this has probably been coming on for a very long time. Figured out all the upper back pain I have had for a long time seems to be related. While I was in the hospital my back didn't hurt even a little bit.

Anyway spent late Friday and most of Sat in the hospital. The nursing staff Sat during the day (at least the one I had) were so inept and incompetent they finally pushed my I am POed button. Had to get out of there.

Have beenkeeping hydrated and trying to eat very little of the positive stuff that doesn't hurt me but it has been difficult these last few days.

They also found something else, but won't go into that now. Let's just say Iam going to have a lot more hospital time in my future. :bang head After all the crap I went through with my late wife years ago I have minimal trust and respect for most medical people. My experience Saturday did nothing to change that.
Consequently there hasn't been ant bench work in a while either.
 
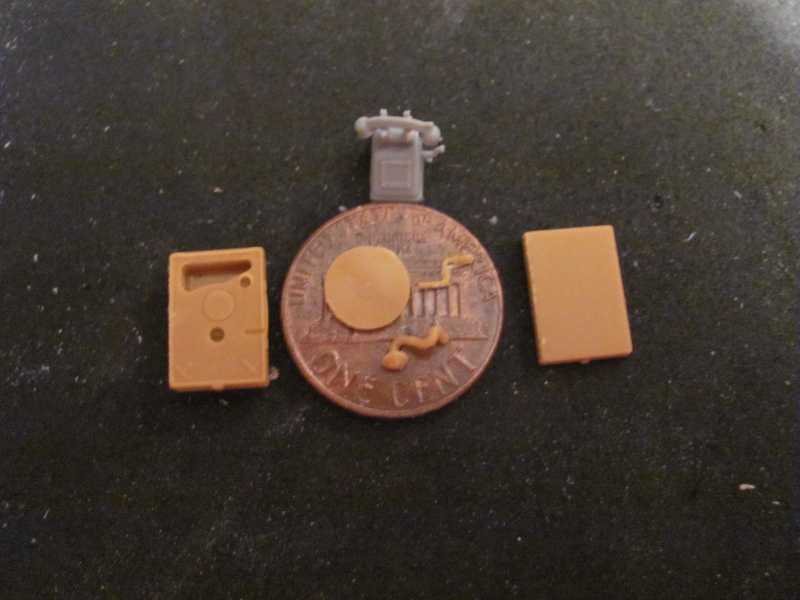
Assembled one of my MiniArt Office Furniture & Accessories Set desktop telephones.

I also got the parts for the ICM phonograph off the parts tree and ready to paint. WOW! but that crank is EXTREMELY delicate.

The ICM phonograph is from the ICM Soviet Military Servicewomen Set. It's a fantastic set and is a vignette in a box with nothing else needed but line for the clothesline.

Here's the telephone and the phonograph parts with an American one cent coin to show their sizes.


h906bcc2.JPG


Cheers
 
Back
Top