• Modelers Alliance has updated the forum software on our website. We have migrated all post, content and user accounts but we could not migrate the passwords.
    This requires that you manually reset your password.
    Please click here, http://modelersalliance.org/forums/login to go to logon page and use the "Forgot your Password" option.

All Righty ... What's on the bench today?

A little something that is wandering around my bench when the Super Sabre is drying or setting...

h8e8ae2b.jpg


h3935376.jpg


h120c618.jpg


Airfix's new(ish) 1:48 Spit Vb. Quite a complex build, the pit is especially fiddly very reinicent of Hasegawa's Spitfire family. I think I scr*w*d-the-pooch with the wing/fuselage joint as nobody else who's built it seem to have got that bl**dy big step that I have !!

AFN

Ian.
 
Working on ICM and MiniArt furniture and accessories.

Got the ICM Soviet Military Servicewomen table and benches assembled. These are extremely close to the ones shown in the Russian television series, THE DAWNS HERE ARE QUIET.


h683316c.JPG


h920f680.JPG


I've also assembled the buffet and hutch from MiniArt and then did the bottom of the extra buffet. I'm using the econd buffet as bedroom drawer set. I modified the second hutch and turned it into a lingerie cabinet or wardrobe with drawers.

The three pieces of furninture

h43f3832.JPG


The second lower unit built as a set of drawers.
hf1bf649.JPG


The completed hutch.

h3e955b8.JPG


The modified hutch. It was turned 90 degrees and extended and then two doors were added to make the wardrobe section. That's where things would be hung up.

h19fb887.JPG


These are great little sets and becausethey are styrene they're very easy to convert or modify.

Cheers
 
Today I was able to find some time to get something done again. This time, I was able to fire up the compressor so I got a lot of painting done. I also worked a little on my Delta Dagger, but I spent most of my time painting my armor.


I'll start with the Dagger. I pulled it out and installed the canopy on this:

WIP_CDS_Meng_F-102_Dagger_XII.jpg


Those twist ties work perfectly for holding something in place that a clamp would be too strong for.

The next thing to do is get the wings installed on the fuselage:

WIP_CDS_Meng_F-102_Dagger_XIII.jpg


Everything fit so well again. Now I can prepare this for paint:

WIP_CDS_Meng_F-102_Dagger_XIV.jpg


Moving on to my armor, I fired up the compressor and started to shoot some paint. The first things I shot were the three 1/48 scale Shermans being built for the local game convention. I shot a coat of Olive Drab on these:

WIP_Game_Sherman_48_II.jpg


While these were drying, I shot a coat of dark Green on my Russian fuel truck after the window masking dried:

WIP_Russian_Truck_XIV2Cjpg.jpg


As that dried, I applied the first Silly Putty masking on the T-14 Armata:

WIP_CTA_III_T-14_Armata_Tank_XIX.jpg


Once that was on, I shot the small black parts of the camouflage pattern and let it dry. Once it was dry enough, I pushed most of the Silly Putty over it to mask the black, and added more Silly Putty where I needed:

WIP_CTA_III_T-14_Armata_Tank_XX.jpg


For some reason I forgot to shoot a pic of the black on the tank before I masked it. Oh well. Once I had that masked, I shot the third color on the tank:

WIP_CTA_III_T-14_Armata_Tank_XXI.jpg


Now that was set aside to dry again. Meanwhile, I decided to try and practice more of my color modulation. I pulled out the Shermans again, loaded up some Panzer Dunklegelb and went to work:

WIP_Game_Sherman_48_III.jpg


Some parts are a little stark and the brush also spat a few times but overall these look okay. The colors will blend a little more once I weather these.

While those were drying, I decided to wrap things up by adding the wheels to the Russian fuel truck:

WIP_Russian_Truck_XV.jpg


WIP_Russian_Truck_XVI.jpg


Now this is ready for gloss coat and decals. While I was at it, I also pulled all the Silly Putty from the Armata tank:

WIP_CTA_III_T-14_Armata_Tank_XXII.jpg


WIP_CTA_III_T-14_Armata_Tank_XXIII.jpg


This one is also ready for gloss coat and decals. I'll be marking it as a Guards tank.

That's all I was able to get done this time. I can see the end of the line for a couple of these. Making this kind of progress sure feels great!

Thanks all for looking in, comments are welcome!
 
As mentioned in the Latest Acquisitions, I started some more models recently since they were easiest to work on at my friend's house as well as at my IPMS meeting Build Night.

At my friend's house while coaching him on one of the models I got for him, I started my Airfix USAAF set. I decided to start with something simple, so I turned to the back and assembled the little Cushman:

WIP_USAAF_Resupply_Set_I.jpg


After that I started on the bomb trailer. I somehow managed to break the main axle without knowing when or how, so I only got this far on it:

WIP_USAAF_Resupply_Set_IV.jpg


Moving on; I started on the bomb tractor, assembling the chassis and floor:

WIP_USAAF_Resupply_Set_II.jpg


This model has some very nice detail in the chassis and suspension:

WIP_USAAF_Resupply_Set_III.jpg


Later on I assembled the hood, most of the cab and added the bomb crane to the read bed:

WIP_USAAF_Resupply_Set_V.jpg


At my IPMS meeting Build Night, I assembled the main hull and turret of the Type 89 Early tank:

WIP_Japanese_Type_89_Early_I.jpg


I wasn't ready to tackle all the tiny wheels that night so I started the Type 89 Late; building the hull and turret again:

WIP_Japanese_Type_89_Late_I.jpg


Again, not ready for the wheels on this one either.

This may not seem like much progress, but I was doing a lot of socializing as well as coaching my friend whom I brought with me so he could get out of the house again. Anyway, I should be able to get more progress done later this week. I might even finish something too, so stay tuned.

Thanks all for looking in, comments are welcome.
 
Yesterday, my friend Harmon needed someone to sit at the Knights of Columbus Hall where we hold Hobby Day so that the gas company can get in there and inspect the gas lines and read the meter. He asked me to do this saying that I was free to bring something to build and stay as long as I like. I agreed and invited two friends to join me at the hall since the area is not the best, and I brought a lot of things to work on. We spent the whole day there at the Hall into the evening. This is all the progress I made yesterday on all my models.

I'll start with my F-14 Tomcat that I'm doing for the review on another Forum. It was the only aircraft I worked on yesterday and here is the progress I made. First off, I assembled the second fuselage for the F-14B since I'd already done the F-14A fuselage some time ago. Once that was done, I assembled all four of the engine intake trunks. There were six parts to each one and when you assembled the inside truck tube and inserted it inside the intake you need to clamp it shut since the sides of the intake part are slightly separated:

WIP_F-14_Tomcats_SPAM_Review_XIa.jpg


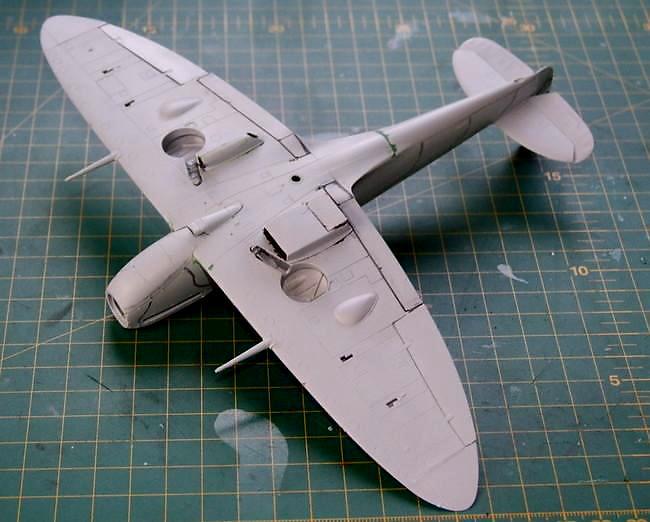
The intake trunks were designed to snap right into place in the fuselage assemblies and they do go in fairly well as you can see here on Tomcat B:

WIP_F-14_Tomcats_SPAM_Review_XIb.jpg


However, installation on each of these fuselages revealed a couple issues. I don't know whether it was because I mixed up sprues when building these or what, but when I installed the intake trunks to the Tomcat B, I had a gap on the inside of the fuselage where the trunks joined to the fuselage:

WIP_F-14_Tomcats_SPAM_Review_XIc.jpg


That gap did not occur on the outside and the intake trunks were installed on the correct sides; otherwise they would have never snapped right in due to the shape of the intake trunks. When I installed the trunks to Tomcat A, I had a different set of issues. The trunks didn't snap all the way in and the intake openings curved inward. I had to press down the front of the intake to cement them in place; as well as clamp the sides of the intake to conform properly to the fuselage:

WIP_F-14_Tomcats_SPAM_Review_XId.jpg


Yet despite all this, the intakes on Tomcat A had no gaps at the joint; even after all that clamping:

WIP_F-14_Tomcats_SPAM_Review_XIe.jpg


Just some extra things to look out for when building these models.

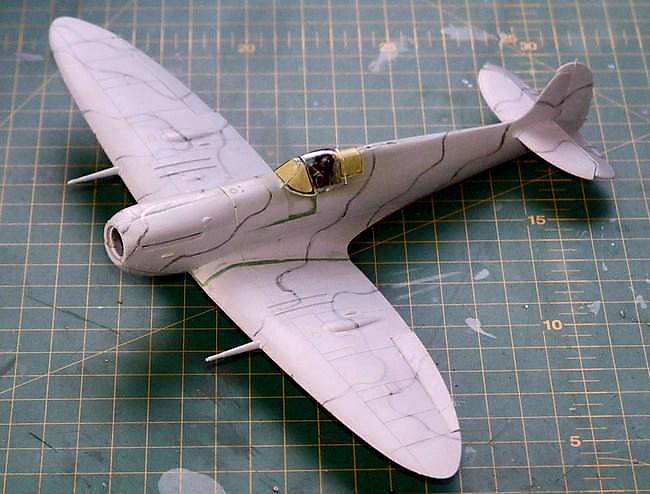
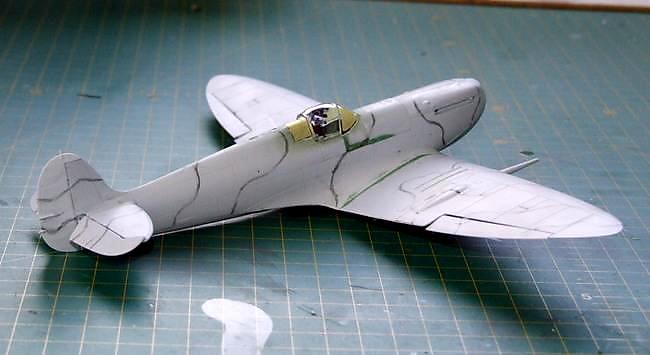
These last two pics show the cockpit modules dry-fit to the fuselage sections to get an idea how they will fit. On the underside, they seem to fit smoothly with a flush joint:

WIP_F-14_Tomcats_SPAM_Review_XII.jpg


However, if you flush out the bottom, you have a step along the joint on top. I apologize that it isn't seen too well here in this pic:

WIP_F-14_Tomcats_SPAM_Review_XIII.jpg


Right now, I'm not sure what is the best way to fix that issue, so I put these away to figure it out another day. I should have some ideas in a future update.


Moving along, I was getting tired of my Russian aircraft carrier languishing on my workbench. It was time to get the rest of the decals laid down on the deck. After two and a half hours, I finally succeeded in getting 98% of the deals laid down on this deck:

WIP_ShipbuildersSquaredCampaign_XI_.jpg


There are still a few more that need to go on. Since the last decals need to be placed on top of existing decals, I need to let these dry and clearcoat them to seal them before I finish this deck. More to come on that later; once these decals are done, this model will start to move a lot faster.


Finally, here is my latest progress on a lot of the armor I've started.

I'll start with this crazy Sherman from UM. I managed to install that bolt strip on the forward hull over the strip styrene parts I glued in to hold it:

WIP_Sherman_Mineroller_IX.jpg


Gator Grip Glue is perfect for this. After that it was time to do the photo-etch on the bogies. Fortunately, this kit gives you a plastic template piece to use to bend the photo-etch into shape. This is one of the smartest and only good thing about this kit:

WIP_Sherman_Mineroller_Xa.jpg


I was told afterward that if I had annealed these parts, they would have bent better. Oh well, lesson learned. They still turned out well and were simple to do:

WIP_Sherman_Mineroller_Xb.jpg


Finally all the photo-etch parts were installed and this was ready to close up:

WIP_Sherman_Mineroller_XI.jpg


In this pic you can still see one of the shortcomings of this kit yet again. When I dry-fit the top hull onto the lower hull; it showed that the P/E bolt strip was too narrow so I'll have to do some fancy filling there above it:

WIP_Sherman_Mineroller_XII.jpg


After that I'd had enough of this so I moved on. It was time for something easy. The decals for the Military Wheels Russian Fuel Truck were unmitigated crap that shattered into tiny shards, so I had to find alternates from my spares box. These new decals look quite good in my opinion:

WIP_Russian_Truck_XVIII.jpg


WIP_Russian_Truck_XIX.jpg


I just have to dullcoat this and weather it and this truck will be done.

Speaking of easy, I added the decals I wanted to use on the T-14 Armata:

WIP_CTA_III_T-14_Armata_Tank_XXVII.jpg


After that, I added the machine gun on the top of the turret and then installed the photo-etch bar armor to the hull:

WIP_CTA_III_T-14_Armata_Tank_XXVIII.jpg


WIP_CTA_III_T-14_Armata_Tank_XXIX.jpg


I'll be brush painting the camouflage pattern on that bar armor once it is fully set. After that will be some light weathering and then this tank will be done.

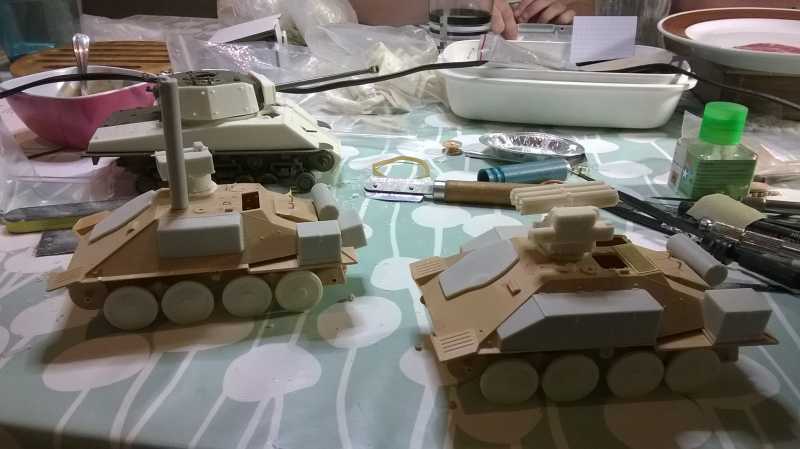
Finally, it was time to buckle down and get the roadwheels done on at least one of my Type 89 Japanese tanks. Here you can see two of the bogie assemblies. These go on only one side of the tank. The Exacto blade is there to show you how truly small those 16 little wheels are that I had to install one at a time on the suspension parts:

WIP_Japanese_Type_89_Early_II.jpg


Once all 32 wheels were cemented to the suspension parts, I installed the completed bogies and the completed rear sprocket wheel in place:

WIP_Japanese_Type_89_Early_III.jpg


Later I had to build the drive sprocket and add it to the outside suspension cover. These were then installed on the tank:

WIP_Japanese_Type_89_Early_IV.jpg


WIP_Japanese_Type_89_Early_V.jpg


These are some funky little tanks. That's where I stopped on this to prevent myself from getting permanently cross-eyed. One down, one to go.

Last but not least, I wanted something simple and fun to build. Out came the USAAF re-supply set. Even though the axle on the bomb trailer is still broken, I decided to finish off the bomb trailer assembly. That way I can just fix the axle and get it painted. Here it is fully assembled:

WIP_USAAF_Resupply_Set_VI.jpg


Next I moved on to the Tanker tractor. I assembled the suspension, engine, drive train and other parts onto the chassis. This is incredibly detailed:

WIP_USAAF_Resupply_Set_VII.jpg


I finished off with some of the parts on the top of this chassis:

WIP_USAAF_Resupply_Set_VIII.jpg


Next I finished up the cab and hood to the extent that I could before painting:

WIP_USAAF_Resupply_Set_IX.jpg


The rest of this will be finished once the interior is painted up. Now that I had the cab finished, it was time to build the tank trailer:

WIP_USAAF_Resupply_Set_X.jpg


WIP_USAAF_Resupply_Set_XI.jpg


I'll be leaving the doors open to show that nice hose and pump assembly inside. This is one big truck:

WIP_USAAF_Resupply_Set_XII.jpg


Finally I had all the vehicles in this set almost all ready for paint. I do still need to add a few more parts to the bomb tractor. I hope to get that done soon and be shooting some paint this coming week:

WIP_USAAF_Resupply_Set_XIII.jpg


Okay, that's all I managed to get done yesterday. It's amazing what I can do when I have a whole day to myself just to build; especially when I also have the room to spread out. What a great, productive day!

Thanks all for looking in, comments are welcome.
 
Nice Mark, but I want to see what you've done with the Sotar :popcorn

Thanks, but if you want to see that, you need to go back a few posts. I used the Sotar on the FWD 3-ton ammo carrier to paint the camouflage. I also used it on the T-14 Armata to add the black thin stripes on that camo pattern too. The green is so dark you can barely see them, but I did paint them with the Sotar. I also used the Sotar to spray on the weathering on the FWD to finish it off. I should be posting that finished model soon. On the F-15E, I used the Sotar for color modulation of the grey. I also modulated the OD color on the three 1/48th scale Shermans with the Sotar. Check all those out and you'll see it, I'm really thrilled with how everything turned out.

My apologies for not specifying it earlier my friend. Stay tuned for more.
 
Been too nice to do modeling what with a garden to put in and all ;) Here's progress on my Vietnam Patton:

IMG_20170528_095240584_HDR-800x450.jpg

IMG_20170528_095311766_HDR-800x450.jpg

IMG_20170528_095257491_HDR-600x1067.jpg


So some feedback on the weathering-- too much?
 
Not too much, but could use some texture, it seems too flat for it's opaqueness if that makes any sense.


I'm ready to prime the Moebius Bride kit.

It's a great sculpt, but since it's styrene, it could use some attention, mostly seams and adding depth to the ears. I added some sleeve and neckline work on the Bride and redid the Monster's suit to reflect the film more (this was the sequel, so his suit was ripped when he crashed through the windmill).


h0c6f692.jpg


hf2cca78.jpg


ha9412d7.jpg
 
Top Secret

he2775f4.JPG


Will be back with more info after the official reveal this weekend at Paper Panzer Productions stand in Samour, France.
:soldier
Greetings
Mats
 
Back
Top