
-
Modelers Alliance has updated the forum software on our website. We have migrated all post, content and user accounts but we could not migrate the passwords.
This requires that you manually reset your password.
Please click here, http://modelersalliance.org/forums/login to go to logon page and use the "Forgot your Password" option.
You are using an out of date browser. It may not display this or other websites correctly.
You should upgrade or use an alternative browser.
You should upgrade or use an alternative browser.
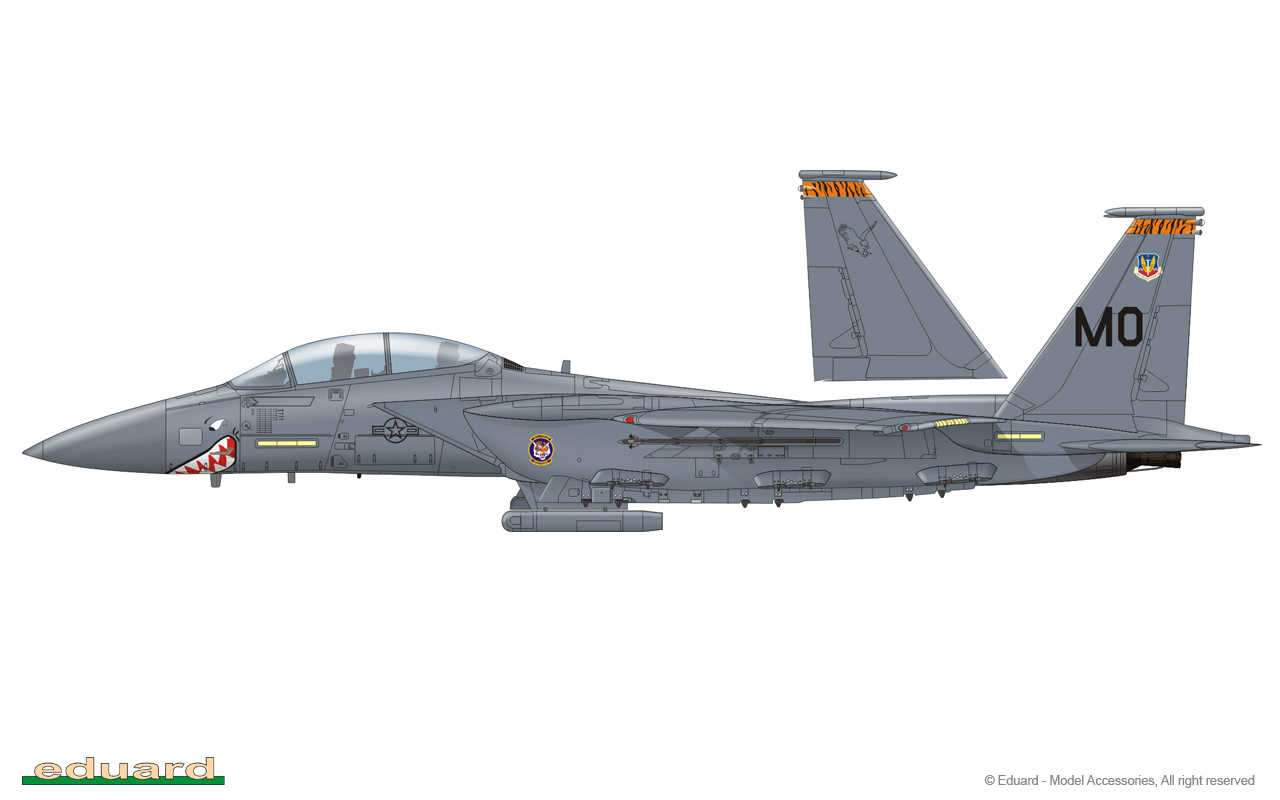
1/48 Hasegawa F-15C Aggressor
- Thread starter Skinny_Mike
- Start date
See most of those things would be long gone after I got done with it...great eye for details. 
Lovely details!
I await Great Wall Hobby's F-15E and hope it will include these decals (although I can hopefully trade or buy them from someone's left over schemes from Eduard's sheet where this profile comes from):
Regards,
I await Great Wall Hobby's F-15E and hope it will include these decals (although I can hopefully trade or buy them from someone's left over schemes from Eduard's sheet where this profile comes from):
Regards,
Nothing says Air Superiority better that the silhouette of a F-15 (I know it's obsolete nowadays). 
Skinny_Mike
Well-known member
Lovely details!
I await Great Wall Hobby's F-15E and hope it will include these decals (although I can hopefully trade or buy them from someone's left over schemes from Eduard's sheet where this profile comes from):
Regards,
This looks like it might be right up your alley Saul! :geek
Skinny_Mike
Well-known member
Beautiful work my friend.")
Thanks Gator! I'm doing my best!
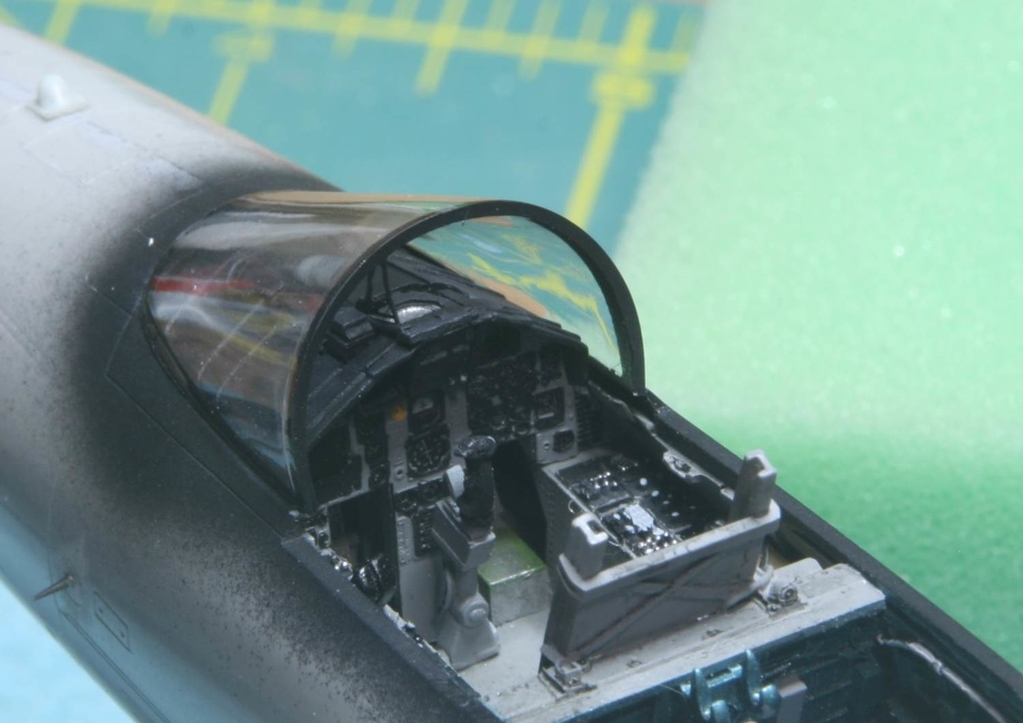
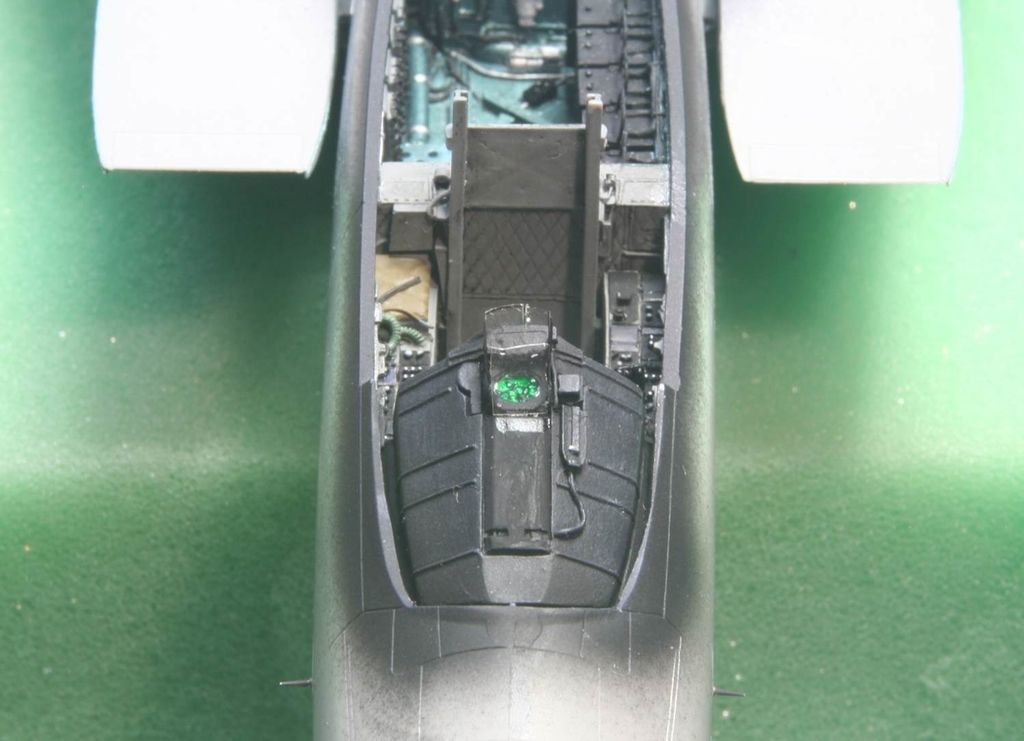
I have run into a bit of a dilemma. I am working on the front windscreen and according to the Aires cockpit instructions I am supposed to attach the mirrors and the compass to the front windscreen part of the kit. All the reference photos I could find however show that part of the real aircraft to be empty. I found a cool video looking over the pilot's shoulder in flight and it looks like the mirrors and the compass are maybe on the canopy itself? Anyone know for sure?
Thanks for the help! Next update will be soon!
Mike
Skinny_Mike
Well-known member
I have made some time this week to work on my F-15. Let’s get right to the progress!
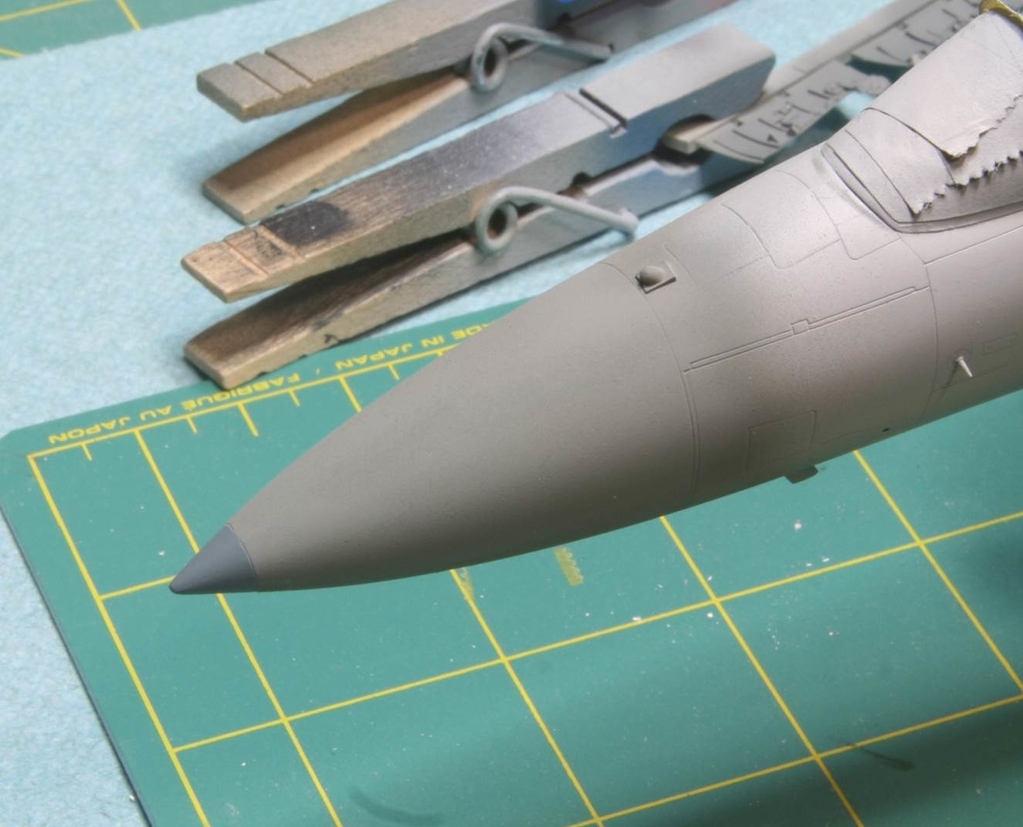
As I alluded to in my last build post, fitting the front windscreen was looking to be a challenge. The clear part was just too small to fit the fuselage. I’m not sure if the pictures show the problem very well.
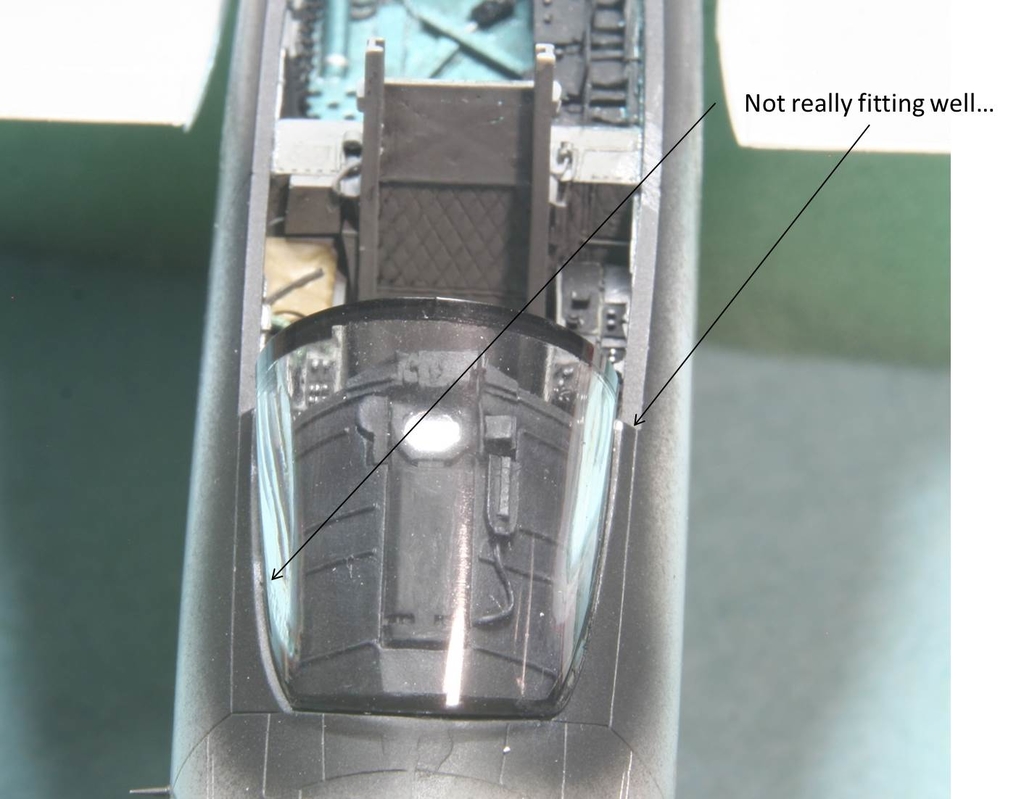
I had this same problem on an F-18 I build a few years ago and I didn’t do anything to fix it. The front canopy is kind of a focal point and now every time I look at it I see the misaligned canopy and it bothers me. So this one I am going to fix. The first step was to measure the inner dimension of the fuselage, right at the end of the glare shield, sort of in the cockpit, using a set of calipers. Then I cut a piece of tooth pick to the right length and forced the canopy to the right dimension.

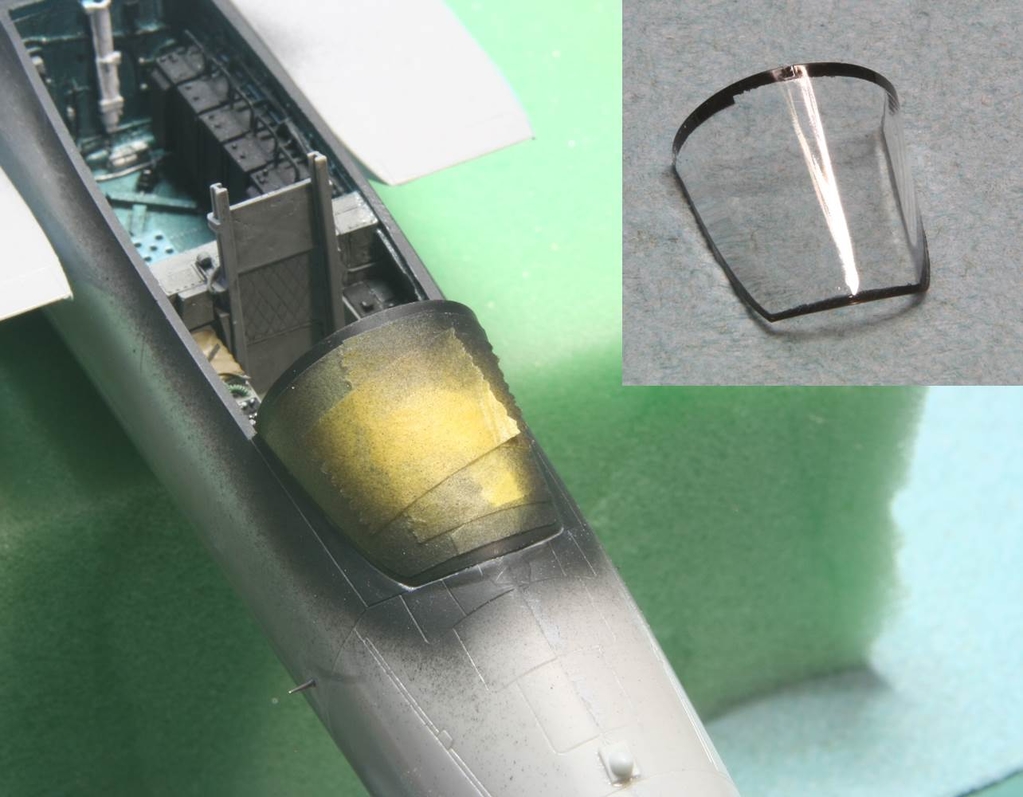
Next I went to the stove and boiled a small pot of water. After getting the water to a good boil, I shut off the heat and quickly dipped the windscreen into the hot water. I was terrified it might melt into a gooey mess, so I dipped it several times and didn’t leave the plastic in the water very long. When I was done, I had a steamed up window, but one that was the proper size to fit the fuselage!
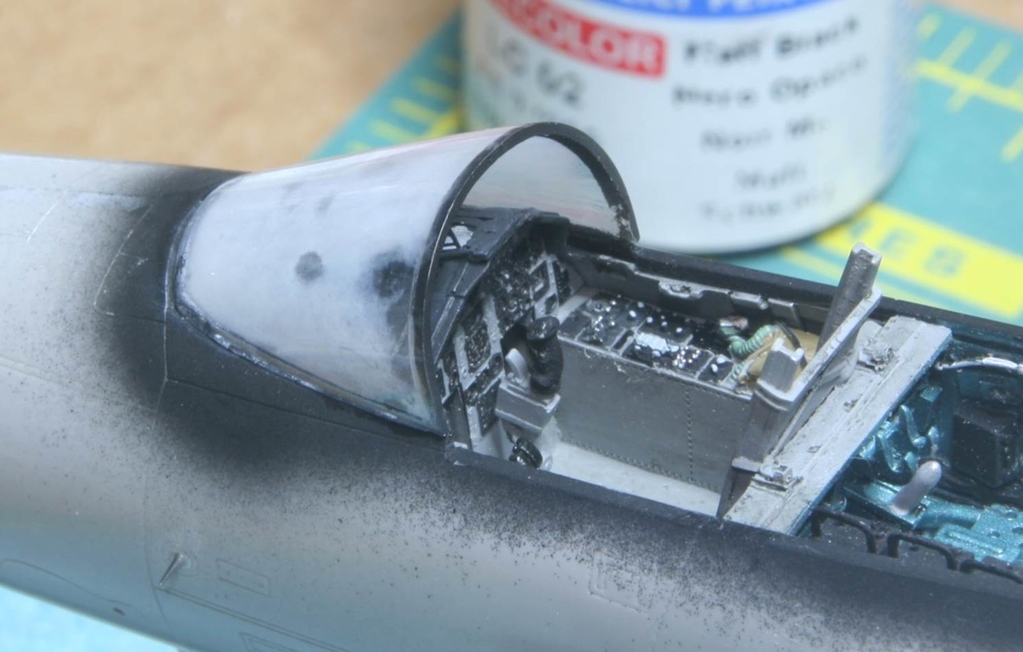
So the fogging…. I wasn’t really sure what happened there, but I guessed that because I had already futured the plastic, after I removed the mold seam, that it was just a reaction between the future in the hat water. I was a little nervous that I had just wrecked the stupid thing, so I cleaned it all off with some Windex and then I dipped it in future again. The result – was a clear canopy! I’m really happy that this all worked.
While the future was drying, I finished up the glare shield. First was a dry brush with MM RLM 66 dark gray, I painted the HUD projector with MM Chrome Silver followed by Tamiya clear green and finally attached the HUD glass from the Aires cockpit.
Once the future dried on the canopy, I masked it using the Eduard mask set and sprayed the inside and outside frames in MM acryl interior black, and attached it to the fuselage. The fit is so much better now.
Then I added the vertical and horizontal tails which completed assembly of the airframe.
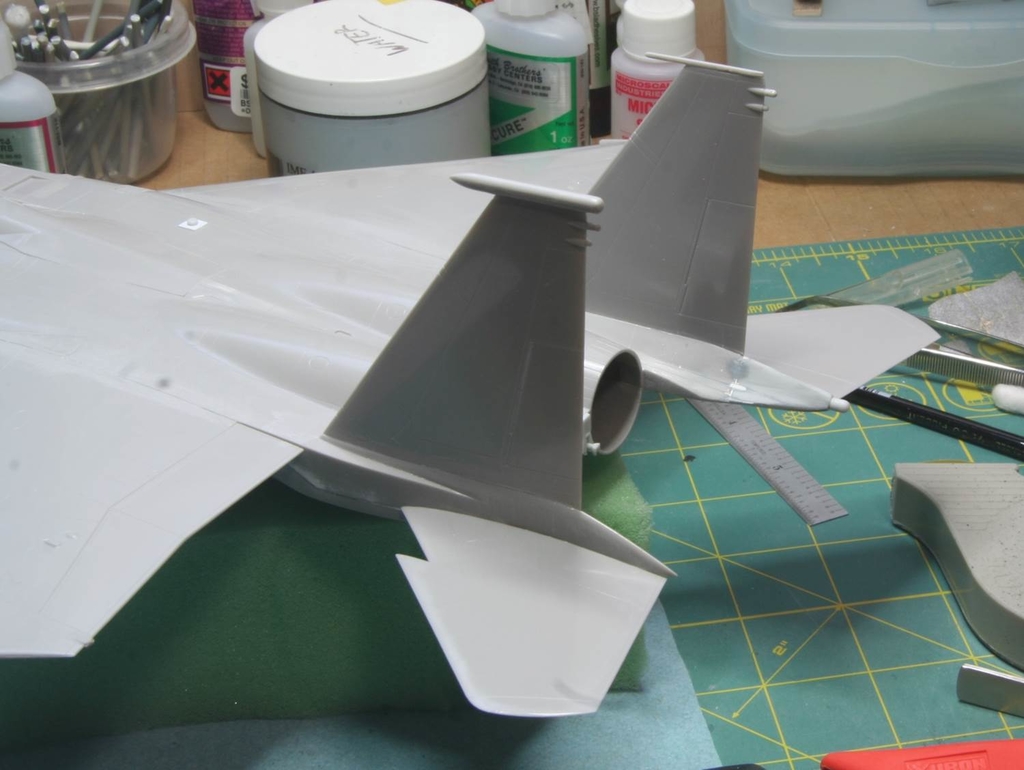
Next step is to mask the cockpit and the intakes and we are on to primer!
Thanks for watching, and as always comments and critiques are welcome.
Mike
As I alluded to in my last build post, fitting the front windscreen was looking to be a challenge. The clear part was just too small to fit the fuselage. I’m not sure if the pictures show the problem very well.
I had this same problem on an F-18 I build a few years ago and I didn’t do anything to fix it. The front canopy is kind of a focal point and now every time I look at it I see the misaligned canopy and it bothers me. So this one I am going to fix. The first step was to measure the inner dimension of the fuselage, right at the end of the glare shield, sort of in the cockpit, using a set of calipers. Then I cut a piece of tooth pick to the right length and forced the canopy to the right dimension.
Next I went to the stove and boiled a small pot of water. After getting the water to a good boil, I shut off the heat and quickly dipped the windscreen into the hot water. I was terrified it might melt into a gooey mess, so I dipped it several times and didn’t leave the plastic in the water very long. When I was done, I had a steamed up window, but one that was the proper size to fit the fuselage!
So the fogging…. I wasn’t really sure what happened there, but I guessed that because I had already futured the plastic, after I removed the mold seam, that it was just a reaction between the future in the hat water. I was a little nervous that I had just wrecked the stupid thing, so I cleaned it all off with some Windex and then I dipped it in future again. The result – was a clear canopy! I’m really happy that this all worked.
While the future was drying, I finished up the glare shield. First was a dry brush with MM RLM 66 dark gray, I painted the HUD projector with MM Chrome Silver followed by Tamiya clear green and finally attached the HUD glass from the Aires cockpit.
Once the future dried on the canopy, I masked it using the Eduard mask set and sprayed the inside and outside frames in MM acryl interior black, and attached it to the fuselage. The fit is so much better now.
Then I added the vertical and horizontal tails which completed assembly of the airframe.
Next step is to mask the cockpit and the intakes and we are on to primer!
Thanks for watching, and as always comments and critiques are welcome.
Mike
phantom II
Master at Arms
What a great technique . Thanks for sharing with us 
Wish you had let it sit to see if the Future would have returned to normal :coolio Anyhow, a second dunking in Future fixes a lot of woes.
Glad this worked out for you.
Cheers, Christian B)
Wish you had let it sit to see if the Future would have returned to normal :coolio Anyhow, a second dunking in Future fixes a lot of woes.
Glad this worked out for you.
Cheers, Christian B)
Skinny_Mike
Well-known member
Thanks guys! I am really happy that the canopy turned out as it did. That could have been a real disaster!
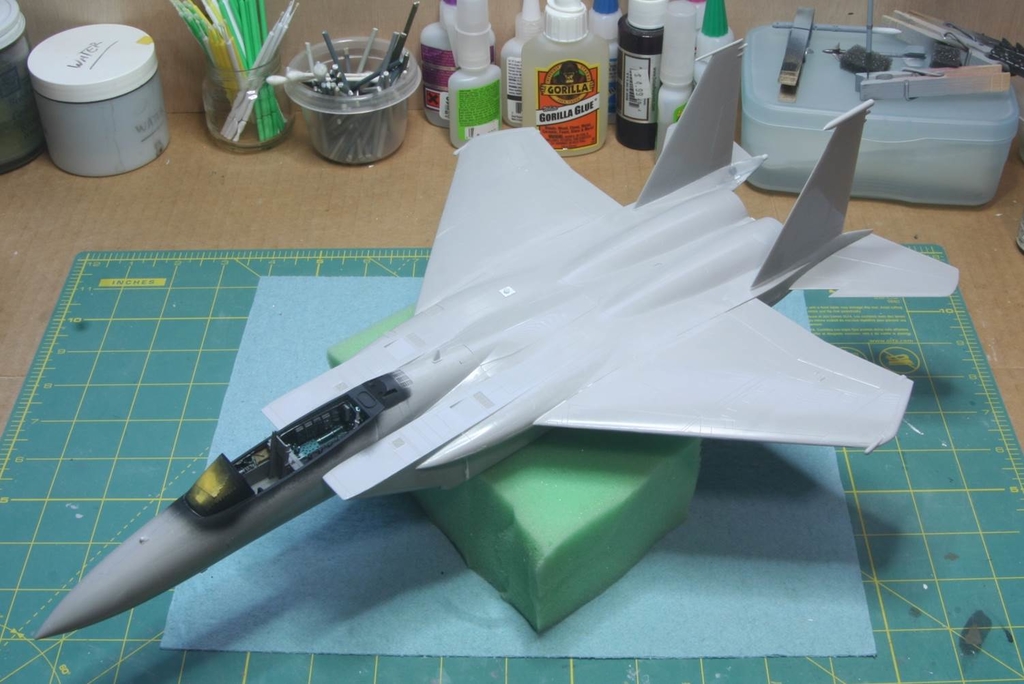
Here is a quick update, and a plea for some feedback!!!
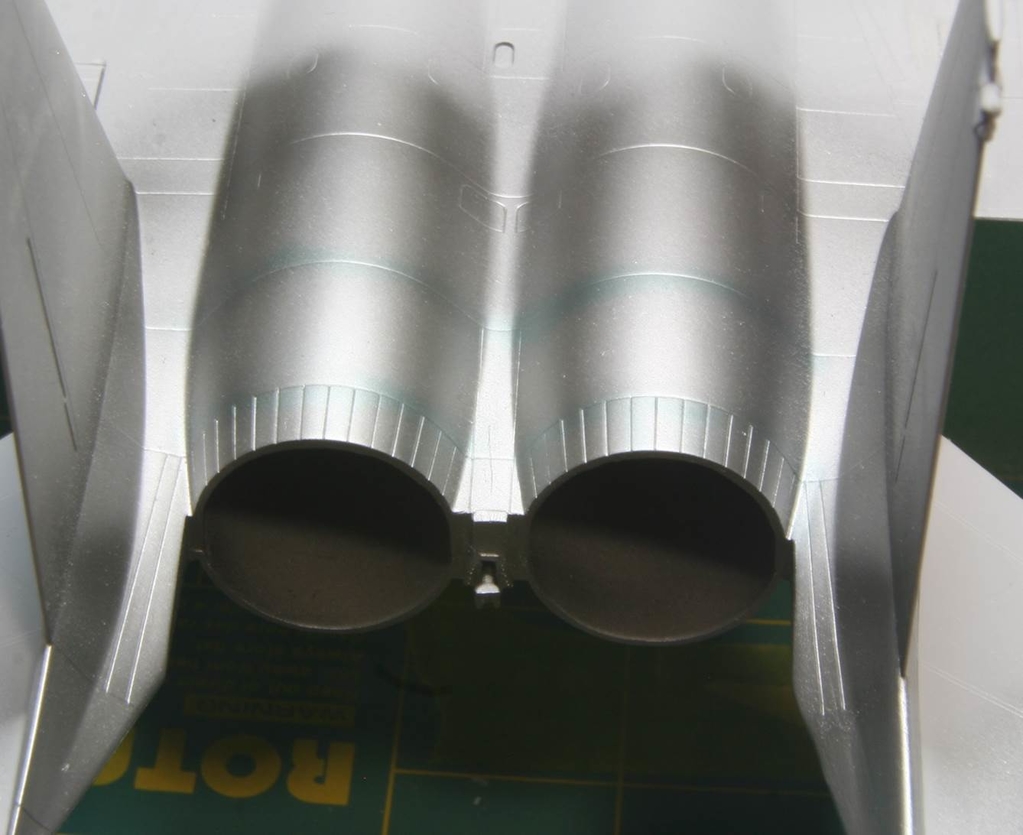
The model was primed with Tamiya Primer straight from the rattle can. Then I painted the radome. I used Model Master Enamels for it. FS36176, F-15 Dark Gray, and FS36251, Navy Aggressor Gray.
Next I painted the metallic areas near the engines. I used Alclad Duraluminum For the base Titanium color and then I post shaded that with a 2:1 mix of Alclad Duraluminum and Jet Exhaust.
Top:
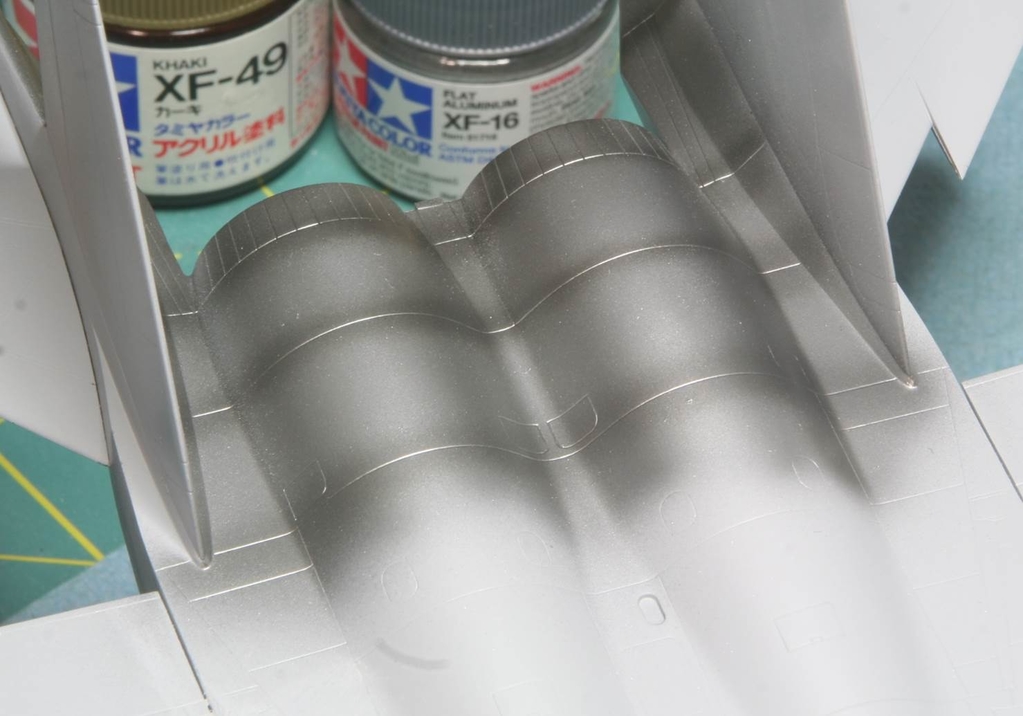
Bottom:
I’m not entirely sure of the look. I wanted to get some feedback from the masses before I masked it off to start painting the blues. So what does everyone think? Look good or is the post shading too dark? Thoughts?
Thanks for the help! Talk to you all soon
Mike
Here is a quick update, and a plea for some feedback!!!
The model was primed with Tamiya Primer straight from the rattle can. Then I painted the radome. I used Model Master Enamels for it. FS36176, F-15 Dark Gray, and FS36251, Navy Aggressor Gray.
Next I painted the metallic areas near the engines. I used Alclad Duraluminum For the base Titanium color and then I post shaded that with a 2:1 mix of Alclad Duraluminum and Jet Exhaust.
Top:
Bottom:
I’m not entirely sure of the look. I wanted to get some feedback from the masses before I masked it off to start painting the blues. So what does everyone think? Look good or is the post shading too dark? Thoughts?
Thanks for the help! Talk to you all soon
Mike
Looks really good Mike, the only thing I would think about is darkening the low area between the two engine outlets. Kinda forcing a shadow you know?
phantom II
Master at Arms
Thanks guys! I am really happy that the canopy turned out as it did. That could have been a real disaster!
Here is a quick update, and a plea for some feedback!!!
The model was primed with Tamiya Primer straight from the rattle can. Then I painted the radome. I used Model Master Enamels for it. FS36176, F-15 Dark Gray, and FS36251, Navy Aggressor Gray.
Next I painted the metallic areas near the engines. I used Alclad Duraluminum For the base Titanium color and then I post shaded that with a 2:1 mix of Alclad Duraluminum and Jet Exhaust.
Top:
Bottom:
I’m not entirely sure of the look. I wanted to get some feedback from the masses before I masked it off to start painting the blues. So what does everyone think? Look good or is the post shading too dark? Thoughts?
Thanks for the help! Talk to you all soon
Mike
Could not find any better pictures at a quick peak
Personally I think your dark line make it look like a patch quilt while the real thing does not look like that.
I also agree with what Bob said about the shadows.
Nice and clean though .
Cheers, Christian B)
Skinny_Mike
Well-known member
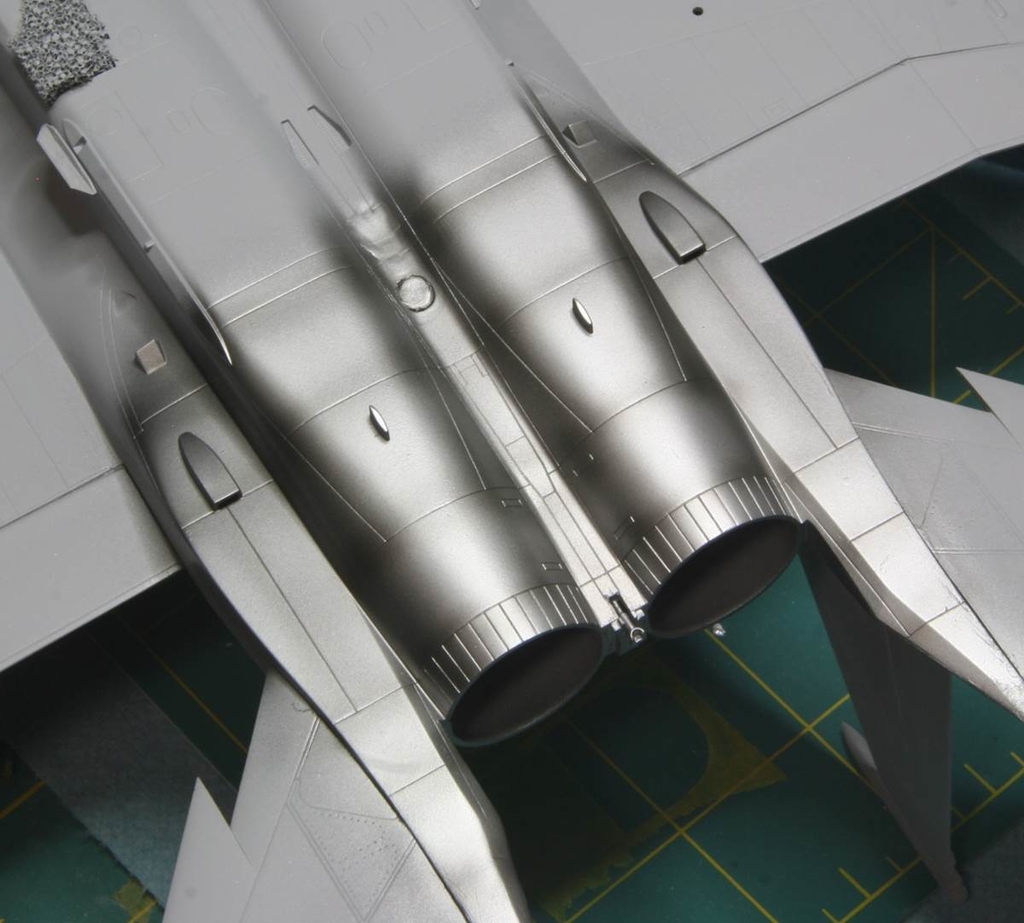
Thanks or the advice guys! I wasn't really sold on the dark post shading and that just cemented my opinion. So I tried again, this time with a little blue/duraluminum mix.
Top:
Bottom:

I think its better, and will blend in with a bit of a wash. Thoughts?
Top:
Bottom:
I think its better, and will blend in with a bit of a wash. Thoughts?
I like it!
ij001
Well-known member
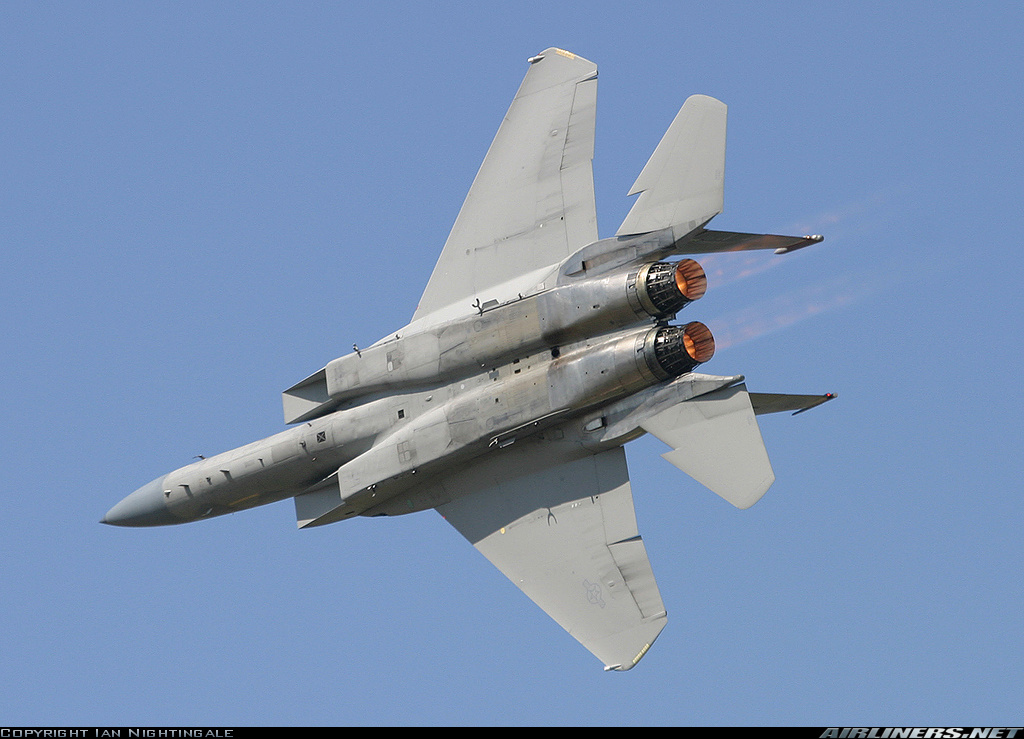
Yep I like it more now, but you'll need a good 'polishing' session to really bring-out the high reflection like in the pic. Here's another of a 'J', just as a counter-point: (just happens to be my all-time favourite F-15 photo !!  )
)

Really like where this is heading !!
Ian
)
Really like where this is heading !!
Ian
phantom II
Master at Arms
Yep I like it more now, but you'll need a good 'polishing' session to really bring-out the high reflection like in the pic. Here's another of a 'J', just as a counter-point: (just happens to be my all-time favourite F-15 photo !!
Really like where this is heading !!
Ian
Oooooh, I like this picture better ! It looks more like the grubby McDonnell Douglas airplanes that I know and Love.
Cheers, Christian B)