
-
Modelers Alliance has updated the forum software on our website. We have migrated all post, content and user accounts but we could not migrate the passwords.
This requires that you manually reset your password.
Please click here, http://modelersalliance.org/forums/login to go to logon page and use the "Forgot your Password" option.
You are using an out of date browser. It may not display this or other websites correctly.
You should upgrade or use an alternative browser.
You should upgrade or use an alternative browser.
1/35 scale Takom Mk IV Male Tank - COMPLETED
- Thread starter Skinny_Mike
- Start date
Skinny_Mike
Well-known member
Hey folks! Time for an update.
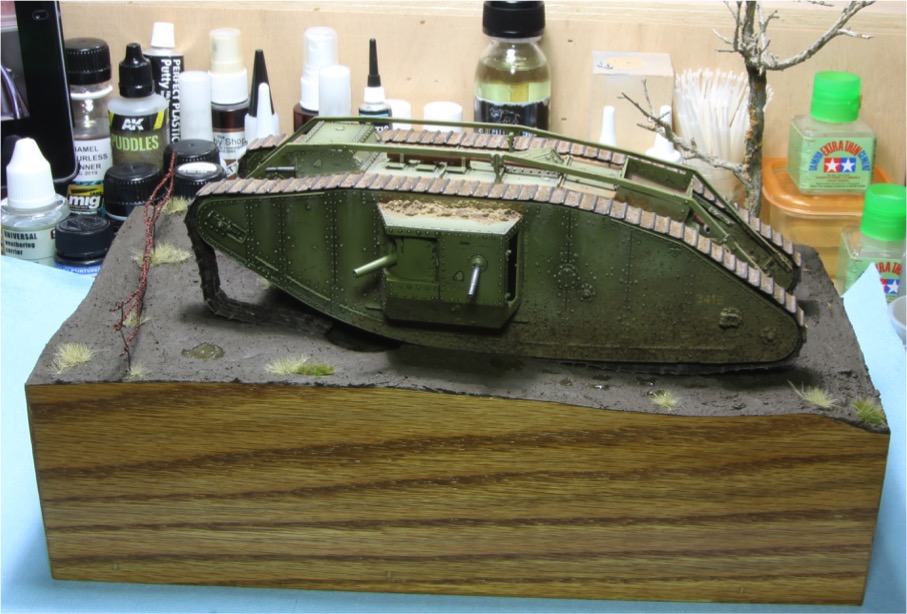
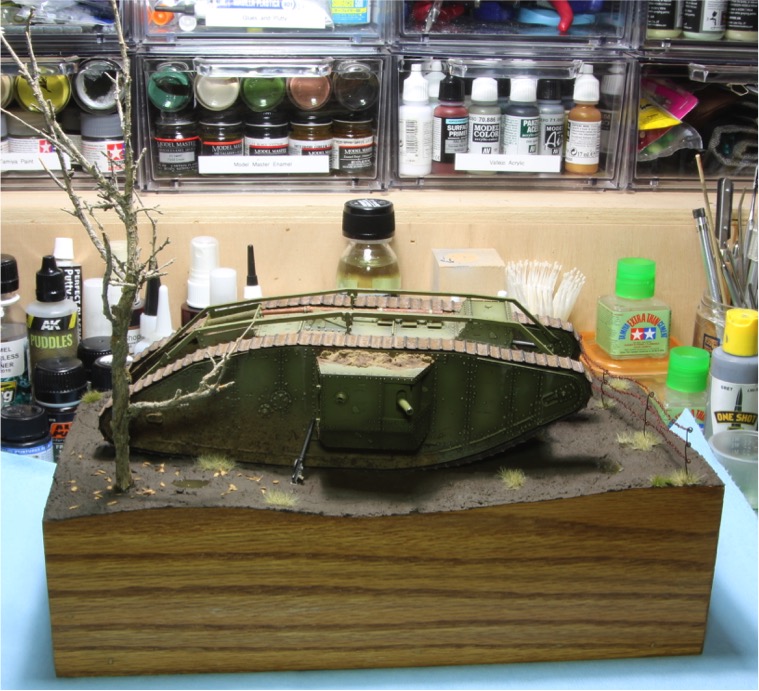
The focus this week was the base. The idea for the vignette is the tank has struck a small mine as it approached the German positions, The anti-personnel mine hasn’t done much damage other then to the tracks which has disabled the tank. At some point the crew has abandoned the tank and retreated back to friendly lines.
I had already put together a base for the MK I build using some wood I had on hand and filled the inside with Styrofoam. I laid out where I planned to put some of the features, in this case a mine crater and the barbed wire fence.

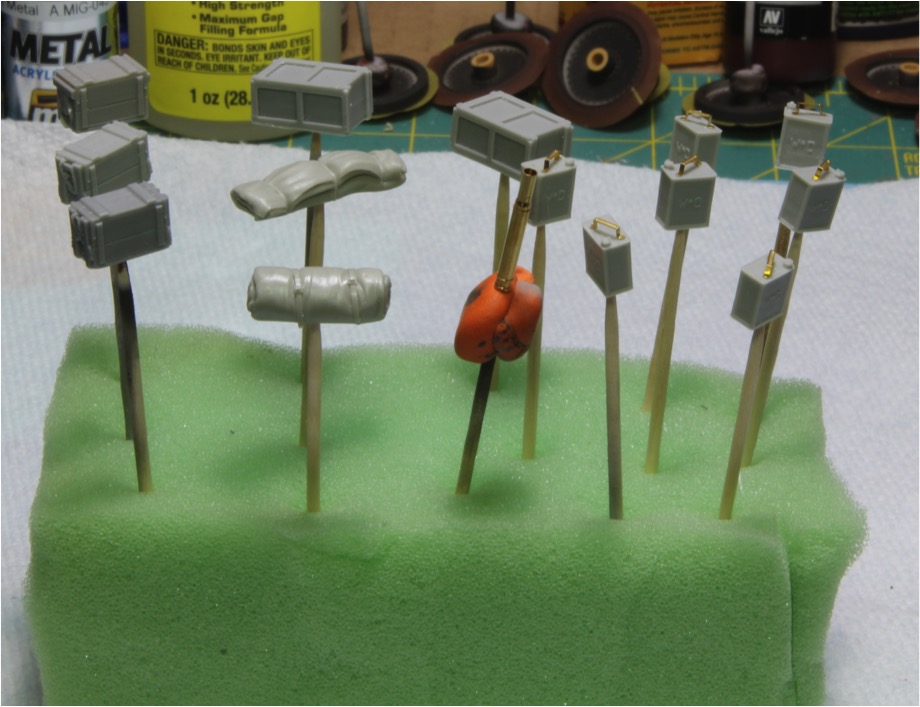
Once I had this all laid out, I created the fence pickets. I built a jig following some instructions I found online and then used .5mm brass wire to make the pickets.
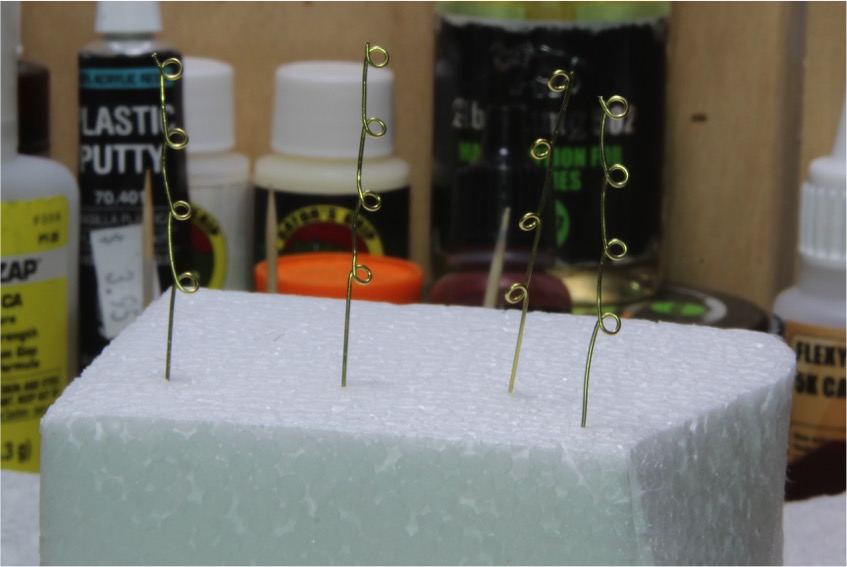
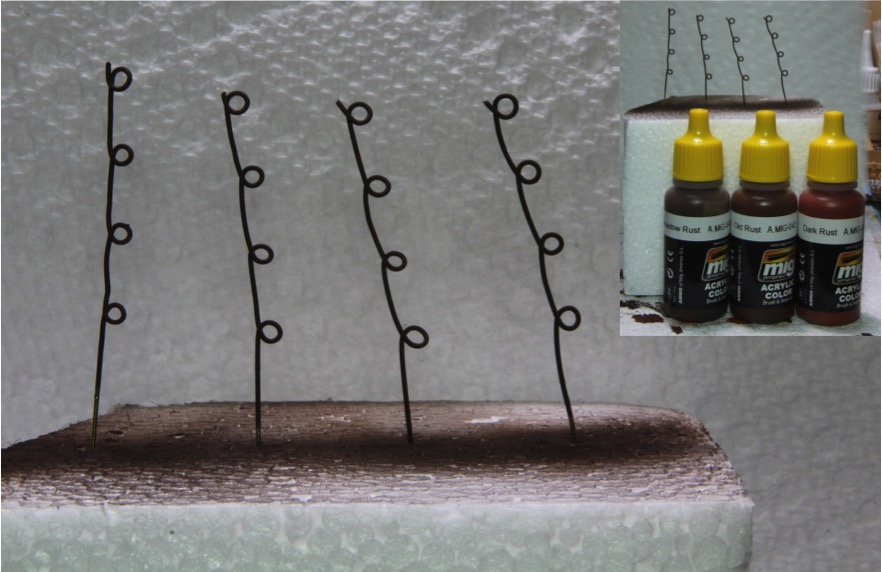
They turned out ok but next time I’ll anneal the brass before bending it or maybe use a different material. The pickets got painted in rusty tones using Mig Paints. Base coat is shadow rust followed by splattering with Old Rust and Dark Rust. They turned out very well, unfortunately the picture is very dark so its hard to see the variations in color.
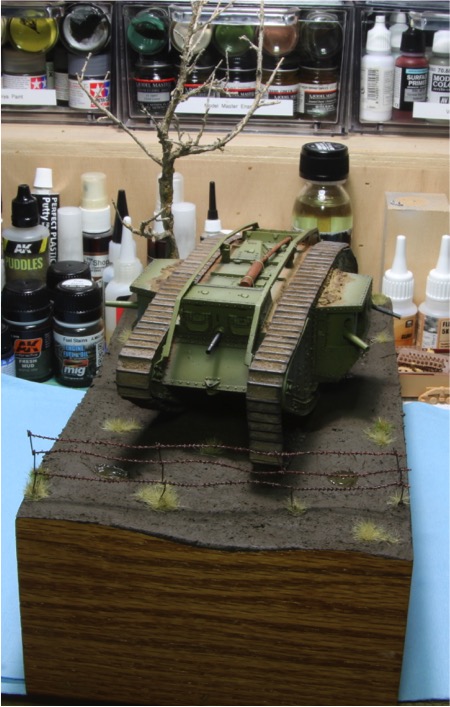
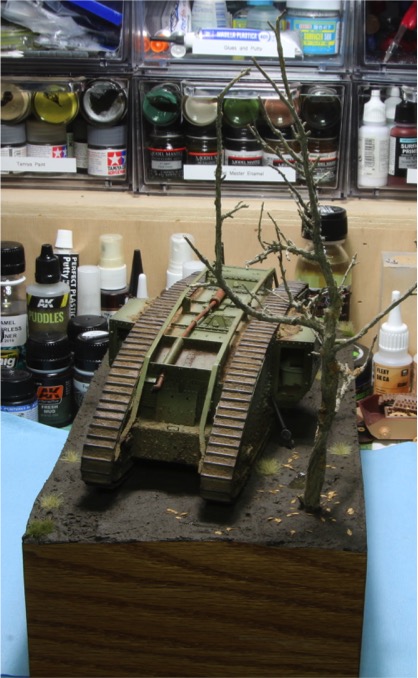
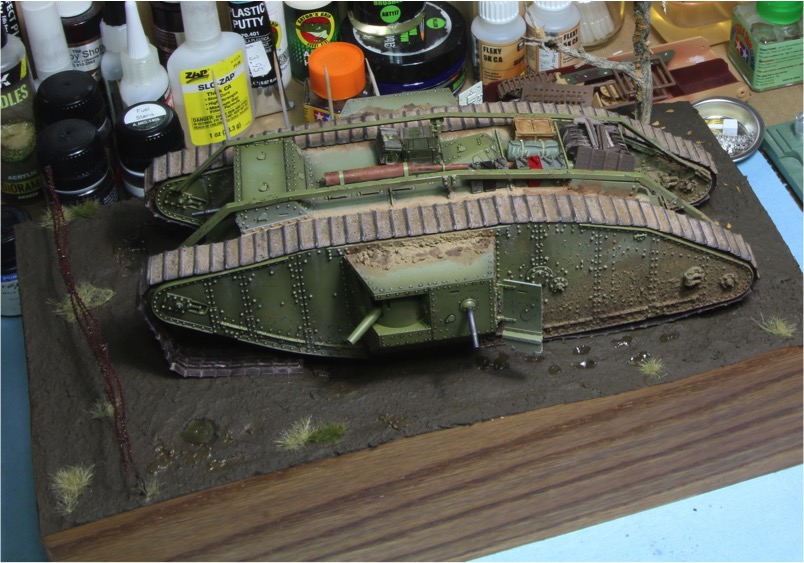
Once the pickets were done the base was assembled and the tank wiat placed so the groundwork would serve as the glue to hold it to the base. The dirt is AK’s Diorama Terrain Muddy Ground, the puddles came from AK’s product called – Puddles. The pickets were installed and the barb wire strung through. This is a product from Hudson and Allen Studios. I thought it would look better as 3D barb wire, instead of traditional etched stuff, but in the end I think its out of scale. The grass are little stick on clumps from Scenic Express and the tree is a sage brush armature from the scenic factory. Leaves are from Ammo by Mig
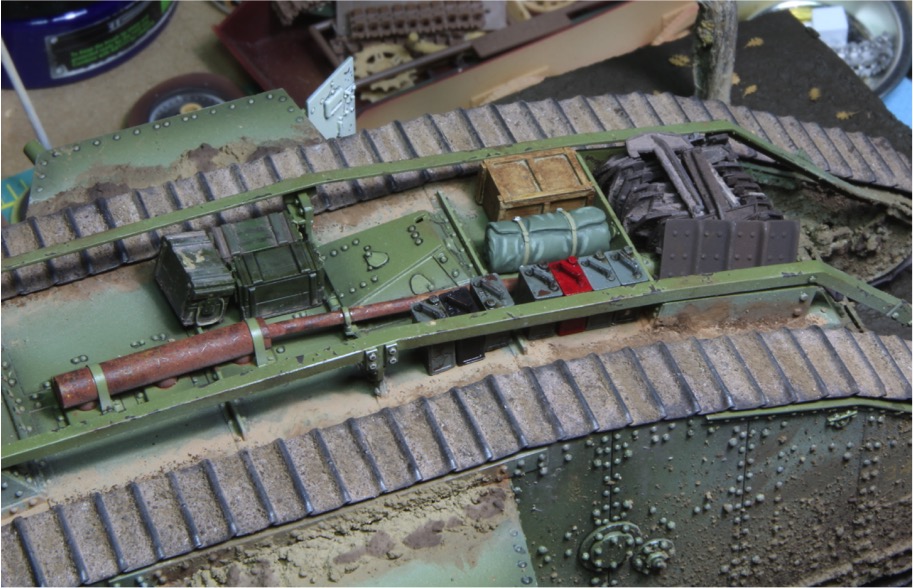
Once I had the base set, I started on the stowage. Its hard to find WW1 specific equipment but fortunately most of the British equipment used in the very early part of WW2 was similar to their stuff from 1917. I ended up with 2 gallon fuel containers, Ammo boxes (on the left side of the picture) and some food ration boxes all from Panzer Art. The rolled up tarps came from the spares box. The brass gun barrel for the Vickers machine gun is for the forward firing position and is from Aber.
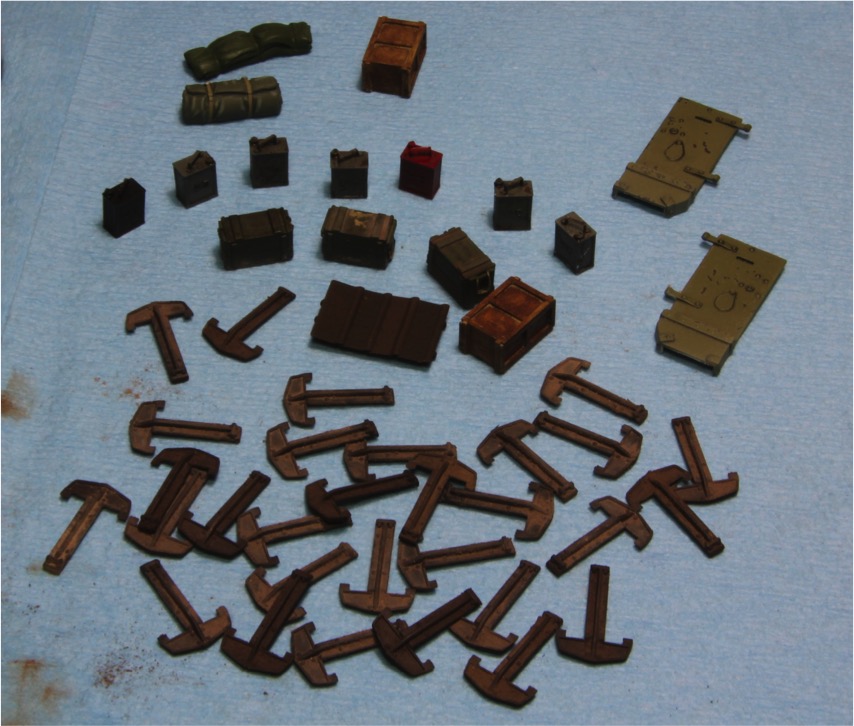
All the stowage was painted and weathered to match the vehicle. I had a hard time finding info on the colors of these things so I generally went with what made sense. The ration boxes were painted to mimic wood (not well) using oil paints. The ammo boxes were painted a light wood color under green. I used chipping fluid to put some scratches in paint. Followed this up with a dark wash and some dust using pigments.
The fuel cans, which typically were carried inside the tank when full and then placed up top once empty, were the one thing I did find some reference material on. Those produced by the War Office were generally gray-green. There were a lot of the cans though that remained in the original manufacturer’s civilian colors. Panzer Art does have a set with civilian patterns but I only have the War Department versions. I painted mine in a custom gray green mixed with Vallejo paints and one in red and another in black. They received different amounts of chipping and washes to vary the finish and age of the cans. Then I added some fuel effects around the caps.
I also finished the sponson doors and the track spuds at this point. The track spuds were given a dried dirt effect using pigments. The doors were painted to match the tank.
Once the stowage was ready I added it to the roof of the tank. I ended up leaving a few things off once I started trying to add it all in and went with what looked right.
After that I did a few touch ups to the ground work and I’m ready to call it done.
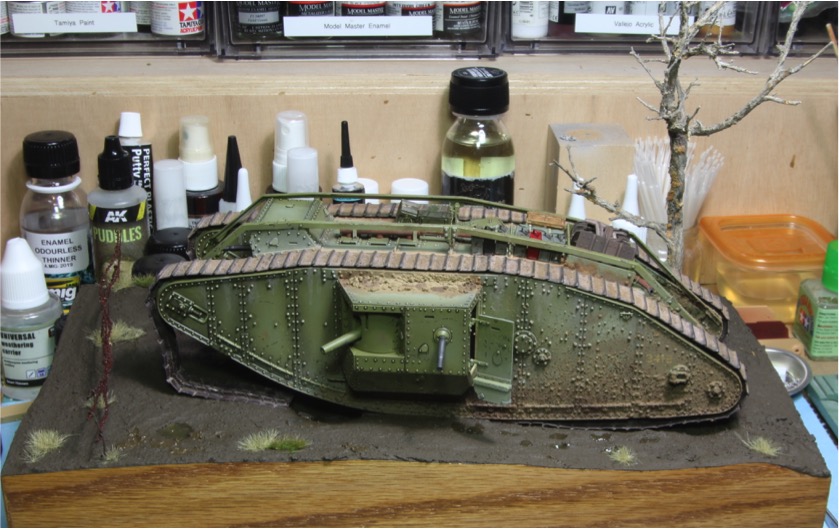


Overall I am satisfied with the end result. The base is probably too tall for the overall composition and there are some other things I am not happy with, but I’ve learned some stuff for next time.
Thanks for following along. As always questions and comments are welcome!
Mike
The focus this week was the base. The idea for the vignette is the tank has struck a small mine as it approached the German positions, The anti-personnel mine hasn’t done much damage other then to the tracks which has disabled the tank. At some point the crew has abandoned the tank and retreated back to friendly lines.
I had already put together a base for the MK I build using some wood I had on hand and filled the inside with Styrofoam. I laid out where I planned to put some of the features, in this case a mine crater and the barbed wire fence.
Once I had this all laid out, I created the fence pickets. I built a jig following some instructions I found online and then used .5mm brass wire to make the pickets.
They turned out ok but next time I’ll anneal the brass before bending it or maybe use a different material. The pickets got painted in rusty tones using Mig Paints. Base coat is shadow rust followed by splattering with Old Rust and Dark Rust. They turned out very well, unfortunately the picture is very dark so its hard to see the variations in color.
Once the pickets were done the base was assembled and the tank wiat placed so the groundwork would serve as the glue to hold it to the base. The dirt is AK’s Diorama Terrain Muddy Ground, the puddles came from AK’s product called – Puddles. The pickets were installed and the barb wire strung through. This is a product from Hudson and Allen Studios. I thought it would look better as 3D barb wire, instead of traditional etched stuff, but in the end I think its out of scale. The grass are little stick on clumps from Scenic Express and the tree is a sage brush armature from the scenic factory. Leaves are from Ammo by Mig
Once I had the base set, I started on the stowage. Its hard to find WW1 specific equipment but fortunately most of the British equipment used in the very early part of WW2 was similar to their stuff from 1917. I ended up with 2 gallon fuel containers, Ammo boxes (on the left side of the picture) and some food ration boxes all from Panzer Art. The rolled up tarps came from the spares box. The brass gun barrel for the Vickers machine gun is for the forward firing position and is from Aber.
All the stowage was painted and weathered to match the vehicle. I had a hard time finding info on the colors of these things so I generally went with what made sense. The ration boxes were painted to mimic wood (not well) using oil paints. The ammo boxes were painted a light wood color under green. I used chipping fluid to put some scratches in paint. Followed this up with a dark wash and some dust using pigments.
The fuel cans, which typically were carried inside the tank when full and then placed up top once empty, were the one thing I did find some reference material on. Those produced by the War Office were generally gray-green. There were a lot of the cans though that remained in the original manufacturer’s civilian colors. Panzer Art does have a set with civilian patterns but I only have the War Department versions. I painted mine in a custom gray green mixed with Vallejo paints and one in red and another in black. They received different amounts of chipping and washes to vary the finish and age of the cans. Then I added some fuel effects around the caps.
I also finished the sponson doors and the track spuds at this point. The track spuds were given a dried dirt effect using pigments. The doors were painted to match the tank.
Once the stowage was ready I added it to the roof of the tank. I ended up leaving a few things off once I started trying to add it all in and went with what looked right.
After that I did a few touch ups to the ground work and I’m ready to call it done.
Overall I am satisfied with the end result. The base is probably too tall for the overall composition and there are some other things I am not happy with, but I’ve learned some stuff for next time.
Thanks for following along. As always questions and comments are welcome!
Mike
Great job on the base Mike ")
Skinny_Mike
Well-known member
Thanks guys!
Tankbuilder
Active member
I really like the way you weathered those spuds. Put them on some asphalt or fine-grain concrete and take an image of them and I bet people would think they were the real thing.
A lot of time full fuel cans were carried on top of the tank too. I've read where tanks were lost because the fuel cans on top were punctured and the fuel drained down into the tank and then caught fire from a hot engine or something.
Btw, not a criticism though, red fuel cans unless they were the original colour of a civilian manufacturer were reserved by the British (British regulations for fuel can colours) for aviation fuel.
I really like the way your model and base turned out. I'm looking forward to my Takom kit arriving.
That's a fantastic idea to make the steel posts from wire. I'll do that with mine and use the Italeir posts as a guide/template for the hole size.
Cheers
Btw, not a criticism though, red fuel cans unless they were the original colour of a civilian manufacturer were reserved by the British (British regulations for fuel can colours) for aviation fuel.
I bet those fly boys are still wondering what happened to that fuel can.
Jeeves
Well-known member
Great work Mike! Makes me want to start up my hybrid kit
On the pickets for another idea since you mentioned...when I did mine for my FT-17, I used small paper clips that I was able to bend in a similar way and thought it worked.pretty well. Yours look great though- as does your barbed wire.
On the pickets for another idea since you mentioned...when I did mine for my FT-17, I used small paper clips that I was able to bend in a similar way and thought it worked.pretty well. Yours look great though- as does your barbed wire.