• Modelers Alliance has updated the forum software on our website. We have migrated all post, content and user accounts but we could not migrate the passwords.
    This requires that you manually reset your password.
    Please click here, http://modelersalliance.org/forums/login to go to logon page and use the "Forgot your Password" option.

The latest Something I 've been doing.........2x WW1 Planes finished 22nd April '23

Well my latest 'off topic ' thingo is a 120mm figure. :blink.
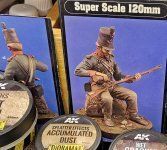
Yeah, well I'm certainly not a figure guy, so this was an interesting challenge for me. It came to me as a commission - a Napoleonic figure from the Russian campaign in December of 1812, done by Andrea. It is one of their classic white metal castings and is quite well detailed but being white metal and in many parts it needed a lot of cleanup to match up the pieces.
I started with gluing the main body minus the small detals, base coating in black Tamiya acrylic, then giving it lighting from the top with airbrushed Tamiya white acrylic.
View attachment 157737View attachment 157734View attachment 157733View attachment 157736
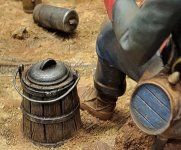
Then used acrylics from Vallejio with an AK Wet Pallet and paint retarder to lay down all the basic colors in very thin semi transparent coats (glazing) to achieve the basic shadows and highlights. I then added some textures to the coat and the base, then moved on and painted the smaller details in a more traditional way and attached them, finishing with weathering effects using artists oils and pigments.
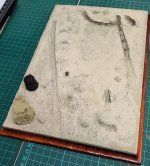
I screwed the metal base to a wooden figure base I had handy and used Tamiya and AK products to create the ground effects

View attachment 157735View attachment 157738
It's no figure comp. winner but I did enjoy it and it was a pleasant change from my other projects.
View attachment 157739View attachment 157742View attachment 157740View attachment 157743View attachment 157744View attachment 157741View attachment 157745View attachment 157746
He lost a staggering of men during this campaign so I have included a classic graphic that shows just how bad it was for Napoleon during his 'Retreat from Moscow'.
View attachment 157747

My next commission is a Napoleonic cannon in the Spanish campaign earlier the same year. This will be a much dryer and warmer scene so we will see what becomes of that.
I have that one. Still one I really want to do as it is so poignant and well cast.
 
History is always interesting. Thanks for the graphic though it is a little hard to understand.
Hi Paul, not sure whats hard to understand with the graphic. :hmm:
Let me clarify it...the top thick bluish-green line is (left to right) Naps' starting point into Russia, with the number of troops represented by the thickness of the line. Follow that line to the end(on the right) and you can see it is only a quarter of the thickness it was. He has lost 75% of his troops, the return (graphic) line, sand brown, then heads back again from right to left(the retreat) to his starting point where the line is extremely thin. He has lost very close to 98% of his troops by the time he returned.
The bottom section with the graph shows the relative temp at the different stages of his progress. Just follow the red line and compare upwards, using the dates as a guide for the sequence.
:good:
I wasn't sure if it was a map or what which was a little confusing. It makes sense now. I saw the 2 colors and the temperature part, but wasn't sure what I was looking at.
 
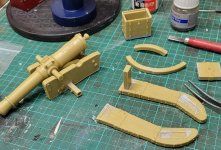
Another Napoleonic customer build 120mm Napoleonic cannon and British foot soldier 1812 Spain from VLS. I have had this sitting in the wings for some 30 years. Its now nearly completed finally.
cannon cover.jpgfig cover.jpg
I modified the cannon to give the scene some drama by damaging one of the wheels as though a cannonball had bounced through it or was damaged by a close impact. The British foot soldier will be sitting on a rock cleaning his rifle after they have overrun the French gun.
wheel 1.jpgbody 1.jpg
THE IDEA
Air dry clay on top of foan base sheet.

cannon 1.jpgcannon 2.jpgcannon 3.jpg
Basecoating Paint and damage

cannon bits.jpgcannon wheel.jpgcannon body.jpg20230315_182226.jpg

Base coated with dry earth and wet crackle on top of the clay.
base 1.jpgbase 3.jpgbase 2.jpgbase 4.jpg
Waiting for the glue to dry.
cannon body2.jpgcannon body3.jpg
 
Really interesting build Ian! It is really going to be nice once finished!

I have a curiosity question, why the green paint on the wood?
Hi Paul, thanks, glad that you like it. It certainly feels like something different for me but I always learn something when doing a project that is 'out of my comfort zone'.
The green is a mix to match the green used on Napoleonic cannons - French Artillery Green. This color was painted on the wooden sections of his armie's, guns. I had to search the net for info on this and the British footsoldier, because of the misleading cover photos on the boxes of these kits.
cannon cover.jpgfig cover.jpg
The cover shot for the gun seems to show it all as just brown, even the metal framing. The figure pic tells me nothing- he actually has a dark green jacket and dark blue pants according to refs for this . Hard to see on the box pic.
 
Finally finished.
Napoleonic stuff is definately out of my scope and confort zone but it did allow me to experiment with some new groundwork products.
I also found it during my research that this infantry unit was made up of American 'Merc's'
Before Paint and stuff.....
cannon 1.jpgcannon 2.jpgcannon 3.jpg

After paint and stuff....
20230326_085927.jpg

20230326_085949.jpg20230326_090010.jpg20230326_090042.jpg20230326_090421.jpg20230326_090123.jpg20230326_090143.jpg20230326_090201.jpg20230326_090309.jpg20230326_090314.jpg20230326_090327.jpg20230326_090221.jpg20230326_090448.jpg20230326_090509.jpg20230326_090438.jpg20230326_090257.jpg20230326_090233.jpg
 
No, I also looked this over but didn't have time to post a reply until now. I find this stunningly realistic and amazing weathering. You captured the image of a broken artillery piece perfectly! With the exception of the brass barrel, this looks just like the cannon I fired at Fort Snelling so many decades ago. Thanks for the memories!
 
No, I also looked this over but didn't have time to post a reply until now. I find this stunningly realistic and amazing weathering. You captured the image of a broken artillery piece perfectly! With the exception of the brass barrel, this looks just like the cannon I fired at Fort Snelling so many decades ago. Thanks for the memories!
Thanks Duke, its OK though if you hadn't.
I wasn't sure whether to post this as I thought it would probably have a low interest level. It takes time to setup, take, crop, then post these so I have to make some considered choices sometimes as my time is quite limited at present.

Bob wanted to see some progress on some other commission work around some WW1 plane kits, so this bit is for you Bob..............
Up to the putty stage and they both need plenty of putty. The Roden kit's fit is so bad that I had to leave out the framing inside the front section because it was stopping the 2 halves fitting together. I also had to grind out the prop shaft hole in the backing plate so that the engine would sit back far enough to fit the cowling over the top and meet the fuselage.
The Academy model fit is better but bothe kits are super basic in the detail dept.
Not recomended.
20230404_002949.jpg20230404_002854.jpg20230404_002830.jpg
Just as a quick review, both of these kits are very basic, with the Roden DR1 not even providing a dashboard. The Camel kit is a little better in fit than the Dr1, as the Roden kit is like building a plane model from the late 70's from Revell.
It's no wonder WNW kits sold out.
 
Thanks Duke, its OK though if you hadn't.
I wasn't sure whether to post this as I thought it would probably have a low interest level. It takes time to setup, take, crop, then post these so I have to make some considered choices sometimes as my time is quite limited at present.

Bob wanted to see some progress on some other commission work around some WW1 plane kits, so this bit is for you Bob..............
Up to the putty stage and they both need plenty of putty. The Roden kit's fit is so bad that I had to leave out the framing inside the front section because it was stopping the 2 halves fitting together. I also had to grind out the prop shaft hole in the backing plate so that the engine would sit back far enough to fit the cowling over the top and meet the fuselage.
The Academy model fit is better but bothe kits are super basic in the detail dept.
Not recomended.
View attachment 158881View attachment 158880View attachment 158879
Just as a quick review, both of these kits are very basic, with the Roden DR1 not even providing a dashboard. The Camel kit is a little better in fit than the Dr1, as the Roden kit is like building a plane model from the late 70's from Revell.
It's no wonder WNW kits sold out.
I have a Roden Dr.1 and their Siemens Schuckert D.III. The Siemens is one that I work on for a while then set it aside for a while until I get some inspiration to go at it again. It is a . . . . kit. Once done it should be quite a build, but it is definitely not for even moderate modelers.
 
Thanks Duke, its OK though if you hadn't.
I wasn't sure whether to post this as I thought it would probably have a low interest level. It takes time to setup, take, crop, then post these so I have to make some considered choices sometimes as my time is quite limited at present.

Bob wanted to see some progress on some other commission work around some WW1 plane kits, so this bit is for you Bob..............
Up to the putty stage and they both need plenty of putty. The Roden kit's fit is so bad that I had to leave out the framing inside the front section because it was stopping the 2 halves fitting together. I also had to grind out the prop shaft hole in the backing plate so that the engine would sit back far enough to fit the cowling over the top and meet the fuselage.
The Academy model fit is better but bothe kits are super basic in the detail dept.
Not recomended.
View attachment 158881View attachment 158880View attachment 158879
Just as a quick review, both of these kits are very basic, with the Roden DR1 not even providing a dashboard. The Camel kit is a little better in fit than the Dr1, as the Roden kit is like building a plane model from the late 70's from Revell.
It's no wonder WNW kits sold out.
I've got a bunch of resin and PE for that Roden thing. Can't remember what it was but it was from Aviattic. Maybe when things settled down a bit i"ll take a swipe at it, or buy the Meng offering.
 
Ok, Ian, a couple of points, if I may. I'll be brief.

You said you're not a figure guy, and you said you were out of your comfort zone on the canon vignette. My thoughts on the matter,......... you're a natural figure painter, you just didn't know it. You already had all the basics for creating a dio/vignette nailed to a "T", so stepping out of your comfort zone has been a rewarding experience, to say the least. I'm betting you would agree.

Very fine work, and I am certain your customer will be ecstatic to receive this vignette. Awesome work, Buddy!

P.S. Hey, what's up with the sub kits, or did I miss something?:oops:
 
Back
Top