• Modelers Alliance has updated the forum software on our website. We have migrated all post, content and user accounts but we could not migrate the passwords.
    This requires that you manually reset your password.
    Please click here, http://modelersalliance.org/forums/login to go to logon page and use the "Forgot your Password" option.

PART 1 INTRO (Build 1) U9 - WW1 UBOAT [DAS WERK - 72001 1/72] UPDATE 20th Nov 2022

Das Werk Uboat.jpg


This new release will be build 1 from my list, as it stands at this time. This is the new release kit from Das Werk and the first time a WW1 UBoat has been done in this scale. The first edition release also has a nice surprise (only available with this edition), an additional softcover book being included with the history of the sub and information on the model creation.
I have also purchased a few extras -

  1. RC SUBS PE set
  2. DAS WERK Saddle Tank painting stencils
  3. WW1 U-Boat Badge (repro)
  4. Custom wooden base with gloss black perspex top sheet (currently covered with a protective cover layer).
boxweb.jpg

I have rearranged my workspace again over the last week, moving my computer hardware and artworks into a new office area in the next room.

deskweb.jpg

This now enables me to utilise my long bench space that I built 4 years back specifically for large builds.......
 
Last edited:
Thanks Mike , MP, Paul, Eric and James. :)
James, good luck with the PE and Resin, its not cheap but it does make a big difference to the details on the sub. :good:

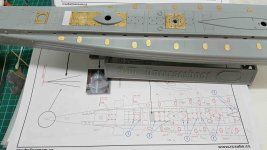
I will have another update shortly. I am trying to get all the PE done on the deck and its slow going cutting it out, filing and gluing etc. The real 'slow down' is the measuring of the right place on the ballast tanks for the multiple manhole covers. The Instructions from RC subs have no location measurements whatsoever and you are left with comparing the diagram location with the actual model.
The diagrams in the instructions are not given any scale either, even though they look as though they would have to have been drafted to scale. see images
I have been trying to use the deck panels where possible but I may have to work out how much smaller the diagram is than the model and get it reprinted at 1/72 scale.
Any ideas?
1.JPG

2.JPG
 
Last edited:
I don't get to checkout all the modeling that's happening on the forum as I wish I could, but glad I was able to catch this build. Looking good!
 
Well, I scaled the numbers via a ratio comparison between a deck section measurment.
Turns out the drawings printed at A4 are 5/8 of the size of the model, so now I can just divide the A4 distance by 5 then multiply the result by 8 and I will have the equivalent distance on the model. :dance:
 
Thanks Mike , MP and Paul for your help/ suggestions.
At this point the main issue is the horizontal seam between the bolt heads. The two large ridges are meant to be there and the majority of the seam is OK and actually looks worse and more pronounced in the photos due the the light. Scraping may work on the last small piece of seam in each segment and the horizontal seam between the bolt heads I will have a go with Paul's idea.
I might go with some liquid putty in a light layer to finish. Anyway thanks and see the photo for a little more explanation.
View attachment 140283
It's at this point it becomes a waterline model for me...lol. Great work Ian👍
 
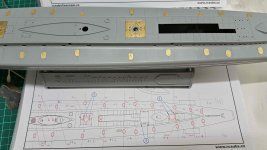
Well, the ballast tank covers are finally done. What a job!
The really hard part was getting them to glue straight and in the exact position with super glue( yes that right , i don't have any super glue retardent to slow it down)- oh the joy.:doh::facepalm:
I am thinking of making an image with my measurements in 1/72 so others won't have the same trouble.
Here is the result.
There is one at the rear that is slightly off centre but to remove it will damage the PE, so I can live with it. If you look closely at the instructions and on the model's ballast tanks, you can see my mark-ups.
20210905_212816.jpg

20210905_213013.jpg20210906_005043.jpg
 
Last edited:
Something I do is use OLD superglue and mix it with NEW thin superglue. Depending on the brand, it can give nice crossover on how the mix works. Usually it ends up "almost" like thin, but sets up just a bit slower. It can also be bled into cracks and seams quite nicely. Of course when it is so old that it becomes real thick, then it is time to toss it.
 
Something I do is use OLD superglue and mix it with NEW thin superglue. Depending on the brand, it can give nice crossover on how the mix works. Usually it ends up "almost" like thin, but sets up just a bit slower. It can also be bled into cracks and seams quite nicely. Of course when it is so old that it becomes real thick, then it is time to toss it.
Thanks for the tip Paul. I will remeber that one!:good:
 
Back
Top