Brokeneagle
Master at Arms
I HAVE MOVED THIS THREAD ACROSS FROM THE PREVIOUS POST TO KEEP IT PURELY T-80U AND KEEP THE ORIGINAL POST AS A REFERENCE AND INFO THREAD.

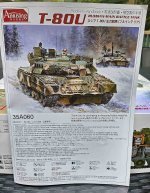
My progress on the RFM T-80U..

This is my first RFM kit experience even though I have a number in my stash.
I will treat this build as an overall review at the same time as building so that this may help others decide on whether they want to purchase the RFM T-80, as there are a number of other companies offerring this kit. Amusing Hobby are about to release one with a full interior which has me thinking of purchasing that as well [just because I could leave the hatches open and a knockout with an engine would have been good for this one as the rear deck is slightly up in the photo].
I will have to do a little bit of a plastic card mock-up or present this scene just before the photo with the Engine deck completely shut. I can't use a T-72 engine as the T-80U had a different motor, powered by the 1,000 hp 6TD-6-cylinder opposed-piston, multi-fuel, two-stroke turbo-piston diesel engine to assist it with better range and speed and reduce the engine problems of the T-72 and T-90 models.
I am pretty excited about building some modern Russian tanks for a number of reasons, not the least being the excellent HD photos available on these subjects from the War in Ukraine . Up to now I have had a keen interest in the Russian armour in the Middle East but these euro cammo tanks have really grabbed me. Up to now they ere always on parade in Moscow and pretty boring and some of the other conflicts in Eastern Europe just hadn't grabbed me but the weathering and use of captured armour in Ukraine has pushed my button - finally some bent and battered new Russian stuff!
The other exciting feature is the amount of detail on these compared to the WW2 stuff and once it gets beaten-up a bit its gold!
Chassis stuff


The kit starts with constructing the chassis, which is a bit of a pain as it comes in 3 parts. I have only ever built tanks with a 1 piece chassis. The fit was good but it was difficult making sure both ends stayed in position. I also start with putting a hook in the bottom of the tanks so I can mount it in a holder.
The chassis has a number of large flash posts which need to be cut (circled in red) and these are across the model in general but at least they are always in hidden areas. I then built the suspension arms and springs which are very fiddly and time consuming. The front lower plates has some very nice mounting details and very realistically molded rubber armour mats that need to be removed carefully from the sprue. Great to add some exrea shape to though as they are a feature of the T-80U.


The engine deck is set-up so that you can have it open or closed with some PE detail added. I would like to show the engine deck slightly raised as in the photo but it all depends on how much engine detail I need to add.

So I thought I should also show the hook set-up so it doesn't seem so mysterious.........just fits in the AK vice.

Wheel time...........
I filed-off the tread pattern on the tyres to varying degrees to simulate wear and tear. I will put the most worn ones up front, next to the front wheel. I also collapsed the suspension on the leading left wheel as in the photo.


The next steps will be on the superstructure/ upper chassis and the turret.
I have made a start on the side plates and will be detailing these a little more by cutting sections out, adding scratches and replacing some of the molded latch pins and matching mounts so some are missing etc.
A start.....


Moving on to the upper chassis details....
more PE attached and body details........drilled out the small holes where the clips for the front rubber sheets are joined.

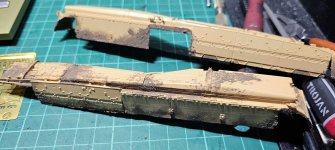
The mud guards are provided as seperate pieces, which is just the way I like it as it allows for much better control and application of dirt/mud. It is also better when attaching tracks, which has to happen before the guards and as they are seperate I didn't have to wait for the hull to be completed. So on with the dirt......applied with a brush and a bit of water using the excellent Tamiya dark earth. I also modified the front and rear mud guards to match the photos.

My progress on the RFM T-80U..

This is my first RFM kit experience even though I have a number in my stash.
I will treat this build as an overall review at the same time as building so that this may help others decide on whether they want to purchase the RFM T-80, as there are a number of other companies offerring this kit. Amusing Hobby are about to release one with a full interior which has me thinking of purchasing that as well [just because I could leave the hatches open and a knockout with an engine would have been good for this one as the rear deck is slightly up in the photo].
I will have to do a little bit of a plastic card mock-up or present this scene just before the photo with the Engine deck completely shut. I can't use a T-72 engine as the T-80U had a different motor, powered by the 1,000 hp 6TD-6-cylinder opposed-piston, multi-fuel, two-stroke turbo-piston diesel engine to assist it with better range and speed and reduce the engine problems of the T-72 and T-90 models.
I am pretty excited about building some modern Russian tanks for a number of reasons, not the least being the excellent HD photos available on these subjects from the War in Ukraine . Up to now I have had a keen interest in the Russian armour in the Middle East but these euro cammo tanks have really grabbed me. Up to now they ere always on parade in Moscow and pretty boring and some of the other conflicts in Eastern Europe just hadn't grabbed me but the weathering and use of captured armour in Ukraine has pushed my button - finally some bent and battered new Russian stuff!
The other exciting feature is the amount of detail on these compared to the WW2 stuff and once it gets beaten-up a bit its gold!
Chassis stuff
The kit starts with constructing the chassis, which is a bit of a pain as it comes in 3 parts. I have only ever built tanks with a 1 piece chassis. The fit was good but it was difficult making sure both ends stayed in position. I also start with putting a hook in the bottom of the tanks so I can mount it in a holder.
The chassis has a number of large flash posts which need to be cut (circled in red) and these are across the model in general but at least they are always in hidden areas. I then built the suspension arms and springs which are very fiddly and time consuming. The front lower plates has some very nice mounting details and very realistically molded rubber armour mats that need to be removed carefully from the sprue. Great to add some exrea shape to though as they are a feature of the T-80U.
The engine deck is set-up so that you can have it open or closed with some PE detail added. I would like to show the engine deck slightly raised as in the photo but it all depends on how much engine detail I need to add.
So I thought I should also show the hook set-up so it doesn't seem so mysterious.........just fits in the AK vice.
Wheel time...........
I filed-off the tread pattern on the tyres to varying degrees to simulate wear and tear. I will put the most worn ones up front, next to the front wheel. I also collapsed the suspension on the leading left wheel as in the photo.
The next steps will be on the superstructure/ upper chassis and the turret.
I have made a start on the side plates and will be detailing these a little more by cutting sections out, adding scratches and replacing some of the molded latch pins and matching mounts so some are missing etc.
A start.....

Moving on to the upper chassis details....
more PE attached and body details........drilled out the small holes where the clips for the front rubber sheets are joined.
The mud guards are provided as seperate pieces, which is just the way I like it as it allows for much better control and application of dirt/mud. It is also better when attaching tracks, which has to happen before the guards and as they are seperate I didn't have to wait for the hull to be completed. So on with the dirt......applied with a brush and a bit of water using the excellent Tamiya dark earth. I also modified the front and rear mud guards to match the photos.

Last edited:


