/gallery/albums/userpics/10065/Turbine252520480044800548006a.JPG
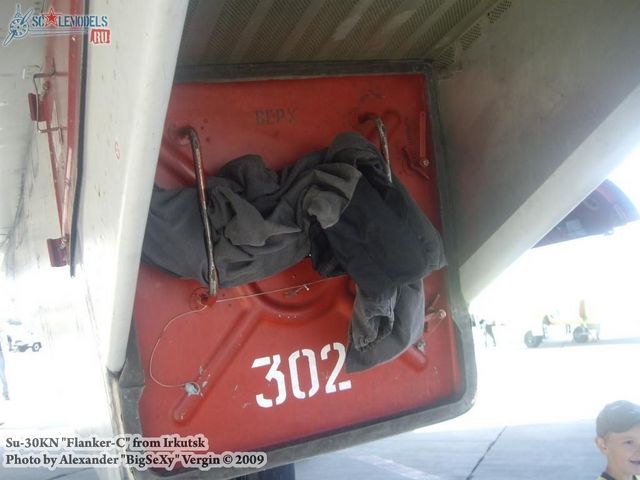
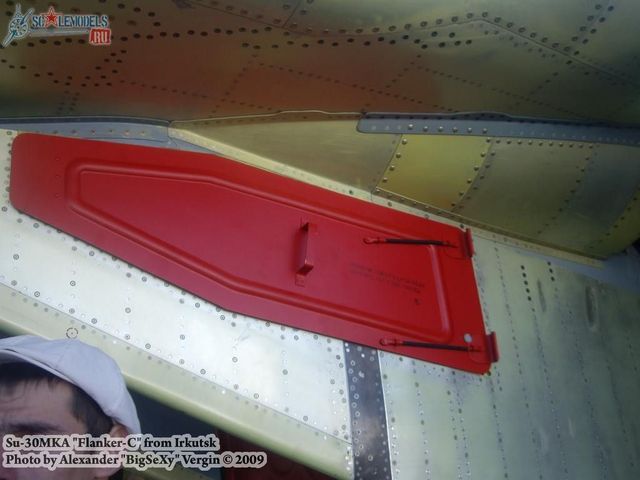
While looking up some aftermarket goodies for my Academy Flanker, I decided to visit some other sites where I knew of some fabulous builds I hope one day to emulate. While there I saw references made to Turbine Modelling Products from "the Baltic States." This state turned out to be Estonia and within ten days, a package had arrived with several items. The one reviewed here is a combination set of earlier items which are no longer available separately. However, the compilations do make sense. This set offers intake and exhaust covers.
------------------------------------
/gallery/albums/userpics/10065/Turbine252520480044800548006e.JPG
Set 48004 includes a pair of intake trunk FOD covers. These prevent Foreign Object Damage protection to the engine's turbine blades. It is a small sheet of photo-etched brass and instructions. The fret includes the covers as well as a painting stencil for BEPX (Cyrillic for Top) to be painted along the top edge of the red covers. The instructions are to be read right to left, not the usual left to right.
/gallery/albums/userpics/10065/Turbine252520480044800548006f.JPG
The first step is to emboss the details. for this I used a pen on a cutting surface covered with a few sheets of paper. I did not remove the cover from the fret so that the fret helps maintain the part from curling as the cover is embossed. I began with the center circle and then the corner which I embossed from the outer edges inwards. Once happy with the embossing, I cut the part free and flipped it over. I burnished it down with the end of a paintbrush to that it was flat again.
/gallery/albums/userpics/10065/Turbine252520480044800548006g.JPG
Folding begins with the extensions which will become the rubber lined lips of the cover. I used Hold-n-Fold's The Bug to make the bends needed.
/gallery/albums/userpics/10065/Turbine252520480044800548006h.JPG
At the top of the photo above, you see the lower edge of the cover has been folded up. also note the etched in the center which represent a placard found on the actual cover. The concentric etched circles around the four holes, which are vertically aligned into pairs, are representative of the welds for the handles. These are represented in flat PE and are best replaced with wire.
/gallery/albums/userpics/10065/Turbine252520480044800548006i.JPG
The bottom edge is then folded downwards. On the real cover, this seats and limits the covers entry in the intake.
/gallery/albums/userpics/10065/Turbine252520480044800548006j.JPG
To complete the cover, bend the sides in and glue or solder. I plan to do the latter. As mentioned, it is best to replace the handles with wire and use the flat PE parts as a template. There are also two locks to add which I will again replace with wire and plastic tube while using the PE parts as a template.
Here is an image, provided by Turbine in an e-mail, to show it on Academy's Flanker:
/gallery/albums/userpics/10065/Covers.jpg
Here are some images from the Internet to allow you to see the covers:

/gallery/albums/userpics/10065/image0047.jpg
/gallery/albums/userpics/10065/Su_32FN_014.jpg
Note the different design of the handles and locks.
/gallery/albums/userpics/10065/Su-27K_28Su-3329_fuselage_underside2C_nose_gear_and_intake_covers_2827k-1129.jpg
Herein is a third design.
/gallery/albums/userpics/10065/Turbine25252048005a.JPG
Set 48005 are the side auxiliary air intake covers. Again, a small fret of PE is provided for four covers (one on each side of the intake trunks).
/gallery/albums/userpics/10065/Turbine25252048005b.JPG
While the part is still on the fret, I emboss the design which simulates the strengthening stamping. I use a ballpoint pen atop of some cardboard to allow deeper relief of the embossing.
/gallery/albums/userpics/10065/Turbine25252048005c.JPG
It is then flipped over and the tassels are then bent to shape. Note the recessed squares which help locate the handles which are the only things needed to complete these covers.

/gallery/albums/userpics/10065/Turbine252520480044800548006b.JPG
Set 48006 are the exhaust covers. As before, we read from right to left and begin with the embossing.
/gallery/albums/userpics/10065/Turbine252520480044800548006c.JPG
Then we fold over the lip over the cover. I plan to solder them but they can just as well be glued with cyano-acrylate cement.
/gallery/albums/userpics/10065/Turbine252520480044800548006d.JPG
Note the squares to help locate the handles to be folded and added. Again, there is an etched rectangle to show where a placard , which is not included, would be placed.
These are really nice items to add some individuality to your Su-27 models and to avoid dealing with the intake and exhaust trunking. The only let down are the instructions as they were designed for a small market so I have posted images of the sequence as well as the actual items. Clicking on the images of the actual items above wil take you to the walkarounds at ScaleModels.Ru, a great site to visit.
While looking up some aftermarket goodies for my Academy Flanker, I decided to visit some other sites where I knew of some fabulous builds I hope one day to emulate. While there I saw references made to Turbine Modelling Products from "the Baltic States." This state turned out to be Estonia and within ten days, a package had arrived with several items. The one reviewed here is a combination set of earlier items which are no longer available separately. However, the compilations do make sense. This set offers intake and exhaust covers.
------------------------------------
/gallery/albums/userpics/10065/Turbine252520480044800548006e.JPG
Set 48004 includes a pair of intake trunk FOD covers. These prevent Foreign Object Damage protection to the engine's turbine blades. It is a small sheet of photo-etched brass and instructions. The fret includes the covers as well as a painting stencil for BEPX (Cyrillic for Top) to be painted along the top edge of the red covers. The instructions are to be read right to left, not the usual left to right.
/gallery/albums/userpics/10065/Turbine252520480044800548006f.JPG
The first step is to emboss the details. for this I used a pen on a cutting surface covered with a few sheets of paper. I did not remove the cover from the fret so that the fret helps maintain the part from curling as the cover is embossed. I began with the center circle and then the corner which I embossed from the outer edges inwards. Once happy with the embossing, I cut the part free and flipped it over. I burnished it down with the end of a paintbrush to that it was flat again.
/gallery/albums/userpics/10065/Turbine252520480044800548006g.JPG
Folding begins with the extensions which will become the rubber lined lips of the cover. I used Hold-n-Fold's The Bug to make the bends needed.
/gallery/albums/userpics/10065/Turbine252520480044800548006h.JPG
At the top of the photo above, you see the lower edge of the cover has been folded up. also note the etched in the center which represent a placard found on the actual cover. The concentric etched circles around the four holes, which are vertically aligned into pairs, are representative of the welds for the handles. These are represented in flat PE and are best replaced with wire.
/gallery/albums/userpics/10065/Turbine252520480044800548006i.JPG
The bottom edge is then folded downwards. On the real cover, this seats and limits the covers entry in the intake.
/gallery/albums/userpics/10065/Turbine252520480044800548006j.JPG
To complete the cover, bend the sides in and glue or solder. I plan to do the latter. As mentioned, it is best to replace the handles with wire and use the flat PE parts as a template. There are also two locks to add which I will again replace with wire and plastic tube while using the PE parts as a template.
Here is an image, provided by Turbine in an e-mail, to show it on Academy's Flanker:
/gallery/albums/userpics/10065/Covers.jpg
Here are some images from the Internet to allow you to see the covers:

/gallery/albums/userpics/10065/image0047.jpg
/gallery/albums/userpics/10065/Su_32FN_014.jpg
Note the different design of the handles and locks.
/gallery/albums/userpics/10065/Su-27K_28Su-3329_fuselage_underside2C_nose_gear_and_intake_covers_2827k-1129.jpg
Herein is a third design.
/gallery/albums/userpics/10065/Turbine25252048005a.JPG
Set 48005 are the side auxiliary air intake covers. Again, a small fret of PE is provided for four covers (one on each side of the intake trunks).
/gallery/albums/userpics/10065/Turbine25252048005b.JPG
While the part is still on the fret, I emboss the design which simulates the strengthening stamping. I use a ballpoint pen atop of some cardboard to allow deeper relief of the embossing.
/gallery/albums/userpics/10065/Turbine25252048005c.JPG
It is then flipped over and the tassels are then bent to shape. Note the recessed squares which help locate the handles which are the only things needed to complete these covers.

/gallery/albums/userpics/10065/Turbine252520480044800548006b.JPG
Set 48006 are the exhaust covers. As before, we read from right to left and begin with the embossing.
/gallery/albums/userpics/10065/Turbine252520480044800548006c.JPG
Then we fold over the lip over the cover. I plan to solder them but they can just as well be glued with cyano-acrylate cement.
/gallery/albums/userpics/10065/Turbine252520480044800548006d.JPG
Note the squares to help locate the handles to be folded and added. Again, there is an etched rectangle to show where a placard , which is not included, would be placed.
These are really nice items to add some individuality to your Su-27 models and to avoid dealing with the intake and exhaust trunking. The only let down are the instructions as they were designed for a small market so I have posted images of the sequence as well as the actual items. Clicking on the images of the actual items above wil take you to the walkarounds at ScaleModels.Ru, a great site to visit.
