• Modelers Alliance has updated the forum software on our website. We have migrated all post, content and user accounts but we could not migrate the passwords.
    This requires that you manually reset your password.
    Please click here, http://modelersalliance.org/forums/login to go to logon page and use the "Forgot your Password" option.

Wildcat F4F-4 the sequel

Cheyenne wrote:
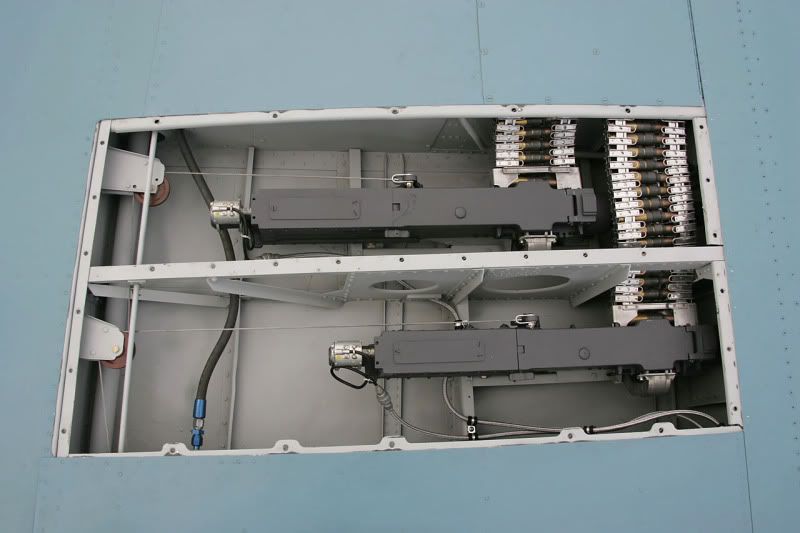
M.P. this is a fully restored F4F - 3 elec. fired manually cocked .

1-k-1280.jpg

Even though I still can't see photobucket and SOMEONE hasn't made use of our free online gallery I do appreciate the info. Can't wait to see the picture when I get home..

Thank... ;) Will have to make a couple more cocking handles. shouldn't be too hard to do since I have something to work with.
 
Hey MP if you havent added the seat belts yet take a look at these.
http://www.radubstore.com/index.php?main_page=product_info&cPath=89&products_id=200
http://www.radubstore.com/index.php?main_page=product_info&cPath=89&products_id=201

Eagle Editions has them here http://www.eagle-editions.com/raduseatbelts.htm

I've used the German late war ones in a 109-G10 and they add so much to the cockpit. I've just ordered the Sutton harness for my Spit also. Just in case your interested.
James
 
jknaus wrote:
Hey MP if you havent added the seat belts yet take a look at these.
http://www.radubstore.com/index.php?main_page=product_info&cPath=89&products_id=200
http://www.radubstore.com/index.php?main_page=product_info&cPath=89&products_id=201

Eagle Editions has them here http://www.eagle-editions.com/raduseatbelts.htm

I've used the German late war ones in a 109-G10 and they add so much to the cockpit. I've just ordered the Sutton harness for my Spit also. Just in case your interested.
James

Oops dopey me. Just relooked at your pics. Ignore me.
James
 
Mulligan , .......... I mean Laura , ......... I've got thousands of ref pics .
The sad part is they are not organized .

At least it's fun looking at everything else while looking for what I need :laugh:


Edit : It's official , I've taken my air force outta the closet and am now storing them in my modeling room , maybe being within sight I'll get around to building some of them !!!

montanaspics.jpg
 
I can see now, good shot of the guns. But being a restored bird I stop to wonder if what they have is correct. I got some pictures somewhere of down in the gunwells. Just got to figure out what I did with them.

Let's see, if that were my stash, I think I would have to pull out that Catalina. Saw one in flight ones. We were down in McCormick Co looking for some grave yards (another hobby) and the site we were at is on Clarks Hill (Thurmond) Lake. I was up on a ridge that overlooked the water on three sites, looking at a hiking map and trying to figure out how much further done the ridge when I heard the DRONE of those PW Wasp going full power. I looked up in time to see the Cat pulling up and away, I don't know if she had come off the water or just buzzed the surface. She was about 2 or more miles down the lake and pulling out and away from me heading back down towards Augusta. What impressed me most was just how big it was, even at that distance. Closest I've been to one that day. And while watching that Cat I stumbled on the markers I was looking for.
 
jknaus wrote:
Hey MP if you havent added the seat belts yet take a look at these.
http://www.radubstore.com/index.php?main_page=product_info&cPath=89&products_id=200
http://www.radubstore.com/index.php?main_page=product_info&cPath=89&products_id=201

Eagle Editions has them here http://www.eagle-editions.com/raduseatbelts.htm

I've used the German late war ones in a 109-G10 and they add so much to the cockpit. I've just ordered the Sutton harness for my Spit also. Just in case your interested.
James

James those are some nice belts, I may have to get some for the other birds I got coming up. USAAF versions though.
 
OK guys, worked a couple of different push rod tubes (looked it up, that's what they are)
wildcat112.jpg

looking from left to right the first one is a .8mm rod with a 1.2mm rod sleeve for the oil port (I've been calling these things oil ports, they are actually pushrod tube nuts)
The second one is just a .5 rod blah..
the third is the kit pushrod
and the last is .5mm rod with..oh shoot, forget what size that one is.

And here's the real one just for ref:thanks to ARC
05.jpg

You know, I think I like number 1 best. How about ya'll?

Also make note of the ignition ring, go back and look at the kit part, that's next.
 
Saddly this is all the work I got done this weekend. the Silly Season is upon us you know..

After trying to figure out how to best cut the tube for the end caps/nuts on the end of the push rod covers I found that inserting the .8mm tube inside the 1.0mm tube, the wall of the tube is supported and does not crush, making it easy to slip the sleeve over the .8mm tube when building up the part.

wildcat113.jpg

I used a metal ruler with the cork no slip to help hold the ruler in place as I roll the stock back and forth under the knife edge, making a clean crisp cut and fairly uniformed length.

wildcat114.jpg

The Result, a mess of stock.

wildcat115.jpg

Well I'm half way there, on the front side. Getting easier as I go. Notice the inconsistency with the top two over the bell housing. I should have started on the back side so it not be so visible. I'm going to finish this out, but if it's not to my liking I'll pull a mulligan and take another shot. I have the engine from the other kit that I used parts off from previous build.

Thanks for looking.
 
MP, another trick for you is to put a wrap of tape around the tube. Measure and cut. The tape stops burrs and slippage. Better still get yourself a tube cutter. I think Sprue Brothers sells them also (AB<?> company, the one who makes the tubing makes these).
James
 
Thanks James, Yeah I've read about the trick of the tape, but it would get a bit tedious having to move the tape after each cut, only had 56 of these little buggers to make. 2 for each push rod cover. Also the pipe cutters I have only go down so far, and 1mm diameter ain't on that scale. Now if Abner has one that goes down real small I'll have to take another look. But for me and with the tools I have, this is about the quickest and most consistent.
 
I've got it bad, I got it real bad. AMS that is.

The Pratt and Whitney Twin Wasp R1830 has a lot more plumbing than what is represented in this kit. Not that there's anything really wrong with the Trumpeter supplied engine, there's just some things that has to be added if the cowl is going to be off.

First thing is the heat shields to protect the spark plug wires from the cylinder head heat. Edward's supplies these in their external set for the F4F-3. There's also a piece of tubing that connects the cylinder head on either side. I have no idea what this tube it but it deserves a little more attention than a flat piece of PE that's attached to the heat shield from Eduards.

R-1830.jpg

Here we see what the original looks like. There are better pictures to be found by google, just have to check them all out to see what I mean.


wildcat116.jpg

.5mm rod bent with .8mm pipe cut really really small. (I hate that I have learned how to do this ..I have to do it to everything now. OK I have to work on that heat shield.

wildcat117.jpg

Hey, only got 13 more of these to make then i get to figure out the spark plugs.
 
Congratulations Moon , you now have Felix Unger syndrome :laugh: :laugh: :laugh:

Beauty work on the P/W , after seeing the real one I'd say you've got your work cut out for ya ......... but you're doing a great job tricking it out !!!!
 
After sleeping on this, I don't like it. That plumbing has to attach to the value cover, not the head itself...I think I need to start drinking instead.
 
Not sure what you are not liking. I thought you were doing the push rods there to me they looked in the right place. So what I'm saying it looks great.
 
Sherm, there's some plumbing that connects at the cylinder head that I'm working on, I'm not sure what they are but I have a guy at Swanny's who would know. I like what I have now, well have pictures later. It's a little more work but I think it'll be worth it.

There is a picture I have found of the F4F-4 assembly line. Workers are attaching the engine to the firewall, thing is, the assembly is motor mounts, supercharger, cowling and everything bolting directly to firewall. That's sort of what line of thinking I have about building this since access panels will be completely removed.

Next up, spark plugs....there is no help for me now.
 
Cheyenne wrote:
Yeah what Sherman said , in the ARC pic , it looks the same ?

Looks more the same now.... :mpup


Just figured out that Trumpeter has no provision for the intake manifold. The exhaust is aligned in the center of the cylinder head, this is incorrect also. it should be off center to allow the intake to attach to the other side of the cylinder head.

ARC reference picture
01.jpg

Notice the two tubes coming in and out of the back of the cylinder? One is exhaust and the other is intake. Trumpeter only has exhaust.

I ain't doing it..no really, the voices are telling me to do it, to move the exhaust and build the intakes... I ain't gonna do it...how much time does those voices expect me to spend on just the engine???? MAKE THEM STOP!! :gogo :gogo
 
Back
Top