• Modelers Alliance has updated the forum software on our website. We have migrated all post, content and user accounts but we could not migrate the passwords.
    This requires that you manually reset your password.
    Please click here, http://modelersalliance.org/forums/login to go to logon page and use the "Forgot your Password" option.

PART 6 COMPLETED BUILD Mk7c/41 U-Boat Diorama 1945 [Revell #05045 - 1/72]

Great job Ian,

You've captured the look and feel of the drama. The marbling on the blue with the white is dead on!

Fantastic! (y) (y) (y) (y) (y)

Bob
 
Wow all I can say is wow. I came into this build late and it looks spectacular. I can almost smell the salt in the air. Makes me want to go watch Das Boot.Great Job
 
:)
STAGE 10 UPDATE - WATER AND RIGGING

Hello again,
i have been working further on the water effects for my UBOAT hoping that I can finish before the Australian Model Expo in June but i think I have missed that boat. :(

I have added the rigging in wire, and cotton for the lower side rails, to help them look saggy on one side as I have seen this effect in a number of u-boat photos (I think due to wear and damage).
The water was further improved with layers of Tamiya clear acrylic mixed with MIG white pigment - in between this I used white oils. I finished with Tamiya white gloss acrylic and touch ups with white oil paint.

IMG_0991bigger.jpg


I used various mixes of blue and white with clear to achieve soft and hard white water with depth.

I also added all the water streaking and crazing on the wooden deck, around the rails and pouring down the sides. I then added the water spilling from the deck overflow outlet along the top length of the ballast tanks and hand streaked all of the crazy water patterns as the last of the water empties out after a large wave has crashed over the wooden deck.

IMG_1000.jpg


IMG_1039.jpg

IMG_1049.jpg


IMG_0989.jpg


I have started work on the barrels for the weapons as all of the barrels are bent or broken.
* Please also note that when building this kit you must be very careful cutting away the elevation wheels for the guns. I have included a photo above of how I cut them from the sprue to stop the distortion effect when trying to trim them on both sides (on the sprue). I found that I had to cut at the end where the wheel touched the sprue, then cut away the other end with the sprue and trim later - something to do with the Revell plastic.

My final detail effects were the 'wind blown' froth on the forward nose decking, simulating small amounts of white water that is being blown by the wind as the U boat travels forward through another wave. As well as this I have tried to simulate the spidery froth paterns that are left at the edges of the churned -up white water. I have painted these over the cloudy white clear ares but as I stated earlier the photos really don't capture my work properly so I am disappointed that I can't get them to photograph properly.

streamimng1.jpg


IMG_1038.jpg

The water was extremely difficult to photograph and kept reflecting the light so that my overall photos just show the white water as brilliant white and hide the subtle water effects. Please refer to the detail photos for water effects but even these do not capture it correctly.
Where the water is so white that you can't see any detail the light has blown out that part of the shot.
The water looks 50 % better when you can see it in person. I will have to correct this for my finished photos.
I hope you can see the difference since my last post, as I have spent another 3 weeks adding this stage of paint with a detailed brush.

We have to come up with a new word to describe the level of awesomeness this reaches.

Ian-Awesome? :notworthy :notworthy :notworthy
 
:)
Thank you everyone for your feedback - I am really happy that you think the ocean effect has worked, as I am very happy also :eek:hyeah and feel the time has been well spent.
:geek

I need to finish off the boring bits now so it's on to the barrels and BEAUFIGHTER. There is also the most difficult part, the explosion to the right of the boat - I also need to get over my fear of this and finish - that will be a very hard effect to get right.
The overall scene should come up as a nice contrast once the model is mounted on an attractive piece of timber.

Ian.
 
Hey Ian,

Everybody knows that fire, smoke and explosions are the most difficult tricks in modeling to pull off that exist. I'm really interested in your solution. One of my upcoming projects is a Pacific island diorama I promised Dave Harper I would do. It will be a combat scene and include all the above. As for now, I'm a sponge for techniques.

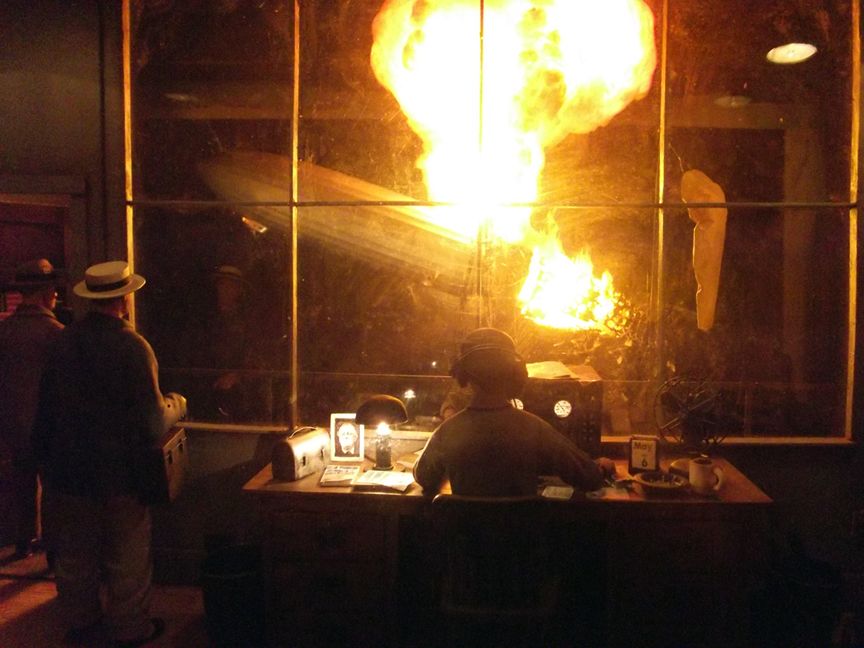
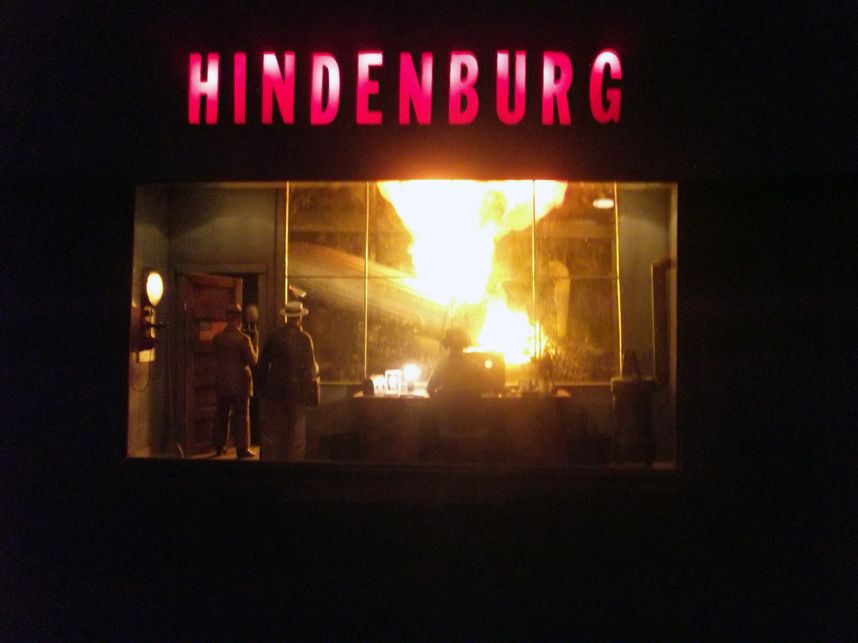
I know that it is a different kind of explosion than you are planning, but my buddy, Lewis Pruneau really pulled off the fiery explosion thing with his "Hindenburg" shadowbox diorama. Maybe you can get some inspiration from these pics.

Hindenberg1-1.jpg


Hindenberg2-1.jpg


Bob
 
Hey Ian,

Everybody knows that fire, smoke and explosions are the most difficult tricks in modeling to pull off that exist. I'm really interested in your solution. One of my upcoming projects is a Pacific island diorama I promised Dave Harper I would do. It will be a combat scene and include all the above. As for now, I'm a sponge for techniques.

I know that it is a different kind of explosion than you are planning, but my buddy, Lewis Pruneau really pulled off the fiery explosion thing with his "Hindenburg" shadowbox diorama. Maybe you can get some inspiration from these pics.

Bob

Hey Bob,
I am happy to pass across what I find works for the water explosion. I am thinking cotton soaked in white water and suspended upside down. The gravity will allow me to work with it and let it sustain a very thin and light shape. I might then add a touch of Modelling paste where needed then paint in a pure white gloss finish once it's hard. I'll see how it goes and add photos as I progress!
Lewis' Shadow box is quite remarkable
- how did he capture the explosion so well ?
- it looks real!
Lewis' work is always inspiring - he takes chances and pulls them off so well.

Thanks for the pics Bob.

Ian.
 
Thanks James MLP and Andy. I appreciate your kind comments.

I hope that I don't bugger -up the water explosion and ruin it!


I am watching that B-25 James - what a beauty.

Ian.
 
I do not think I can say anything that has not been already said. :idonno
It's because of modelers like yourself and Bob and many other's that produce marvel's like this that make plastic cracker's like myself smile in awe,then grab a kit and have fun.

I tip my glass to you. :notworthy :notworthy :notworthy
 
:v
Hello all,
just a brief update on my progress. Work has been busy so I have been slow of late.
I completed the Archer flag, made the attaching wire, weathered it a bit and folded it like it was blowing in the sea breeze - this is why Archer make the best flag decals.
IMG_1138.jpg
IMG_1140.jpg
Andrea figures.
box cover.jpg
box back.jpg
Figures (even in silver) really bring a model to life.

IMG_1133.jpg

IMG_1135.jpgIMG_1141.jpgIMG_1143.jpg
I got my figures assembled but not 'puttied-up' or painted as yet. One draw back to these great poses is that do not seem to fit the Beau fighter flying over idea as I originally intended, so I might need to drop that - well see :(

Also started work on the water expolsion. This is the first time I have done this so lets see how this goes....:bm:
IMG_1126.jpg
 
Last edited:
Hey, cool! Chrome crewmen!! :rotf :drinks :drinks

The flag looks great, so does the flagpole!
 
:laugh:
I was expecting a 'Silver surfer' comment but I like 'Chrome crewman' nearly as much :rotf .
Thanks Mike (y)

Ian.
 
Back
Top