• Modelers Alliance has updated the forum software on our website. We have migrated all post, content and user accounts but we could not migrate the passwords.
    This requires that you manually reset your password.
    Please click here, http://modelersalliance.org/forums/login to go to logon page and use the "Forgot your Password" option.

Panzer IV...Ausf.J, I guess

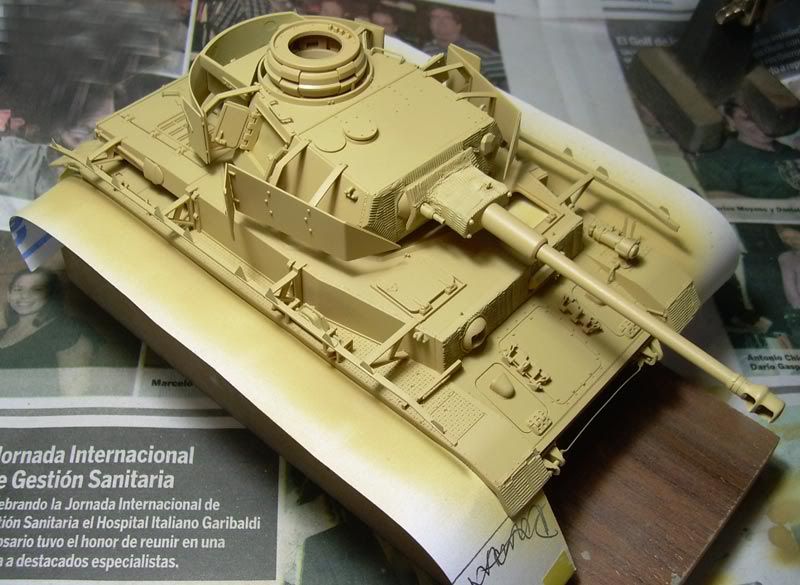
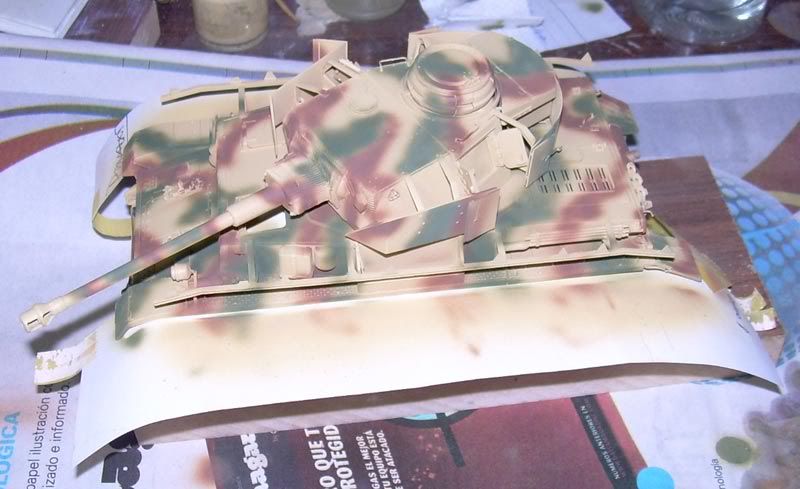
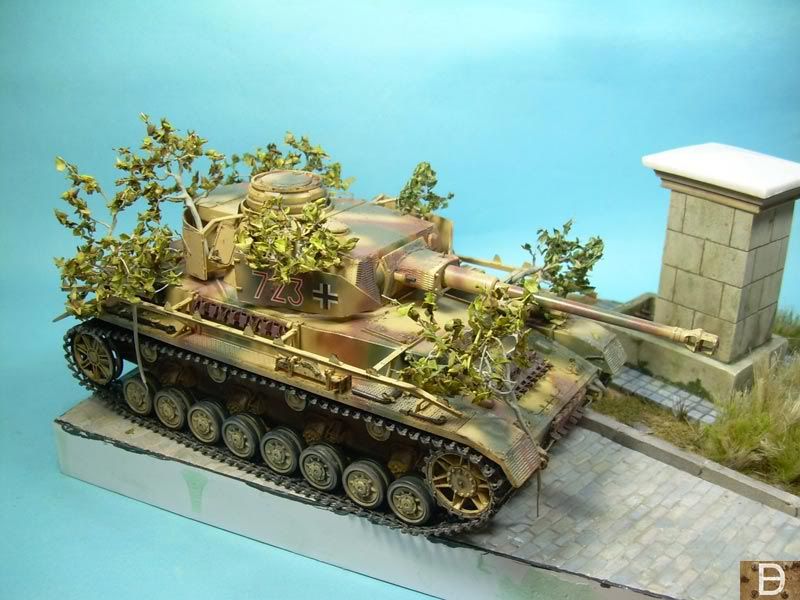
Re: Panzer IV...Ausf.J (early), I guess

Thanks guys!
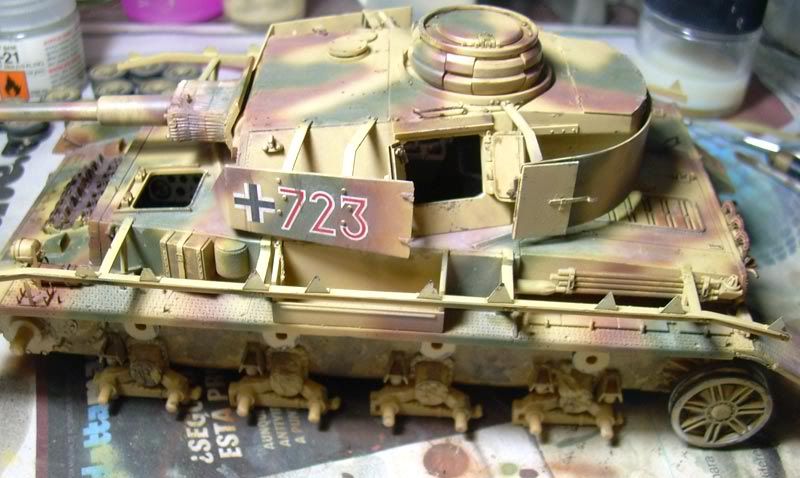
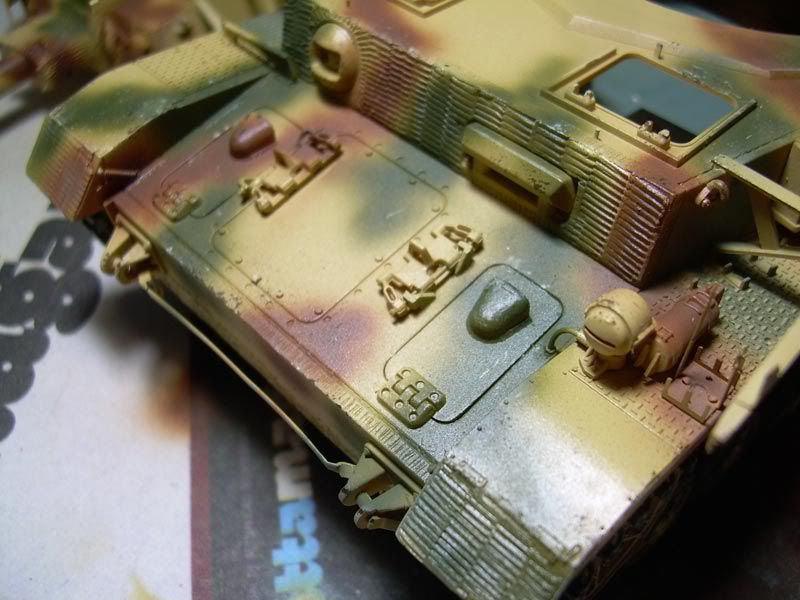
Here is a list of the modifications I've made to the kit; of course it doesn't means this is the "right way" to do it, is just "my way" :D
DSCN7079b.jpg


DSCN7082in1.jpg


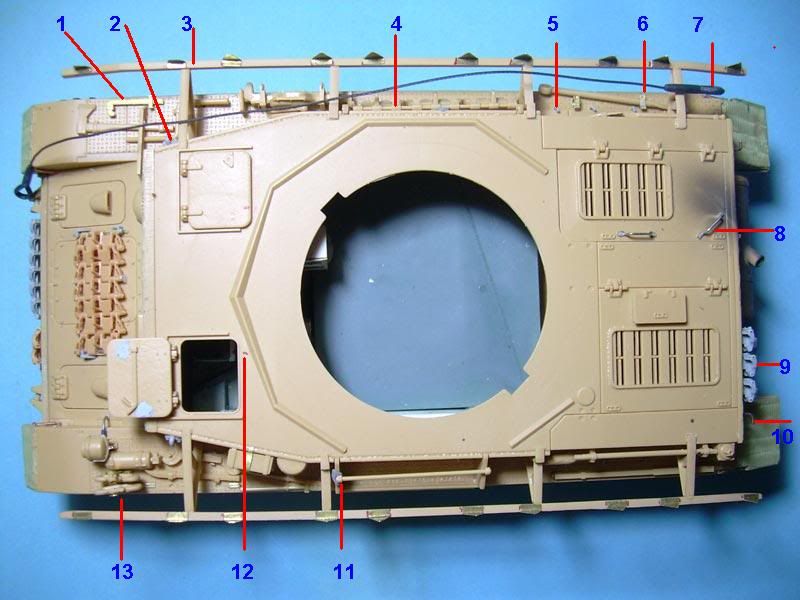
1 - Track tension tool in P.E.
2 - Lifting hook (all gray parts are from other Dragon kits)
3 - Rails and brackets thinned, adding brass triangles; drilling the fender where the side guides were.
4 - Drilling of the side spare links
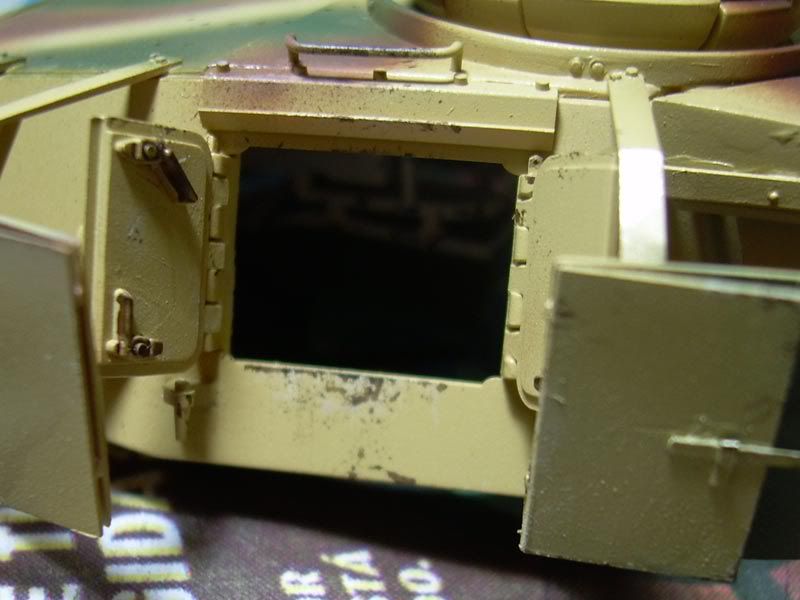
5 - Clips of the flaps that close the vents
6 - Tool clamps made of brass sheet
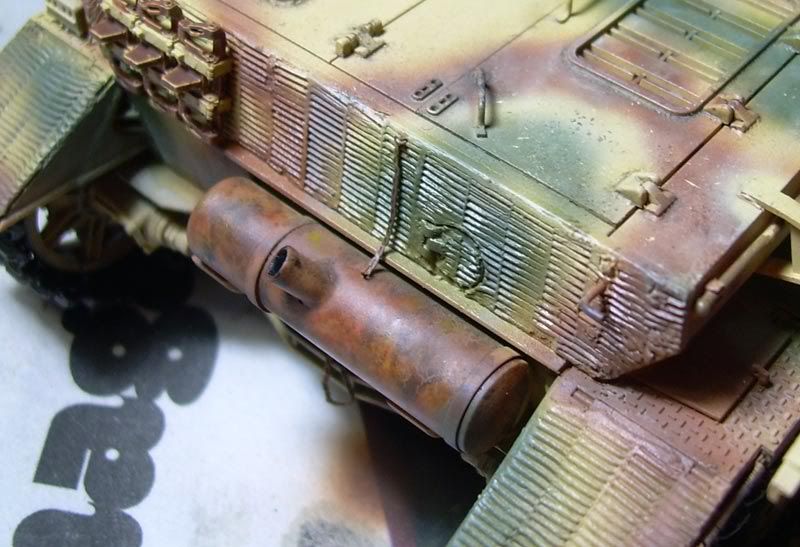
7 - Tow cable made of annealed steel fishing line
8 - Wire copper handles
9 - Spare track links
10 - Tow cable supports made with copper wire
11 - Spare wheel bar clamp hollowed; need to add the chain and pin
12 - Need to make the hatches ..er...locks? (25)
13 - C hooks bracket in FG (21)

DSCN7083c.jpg


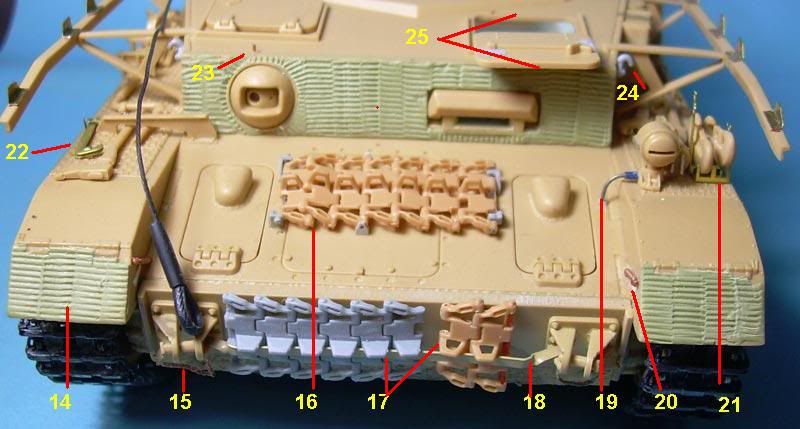
14 - Zimmerit made with Milliput y AFV Club or Modelkasten tools
15 - Copper wire chain
16 - Spare tracks (Tristar) and holders
17 - Spare tracks
18 - Spare tracks hold bar, made with brass sheet
19 - "Bosch lightyear" wire
20 - Copper wire springs
21 - Idem 13
22 - Idem 1
23 - Hatch stop in copper wire
24 - Lifting hooks
25 - Idem 12

DSCN7084c.jpg


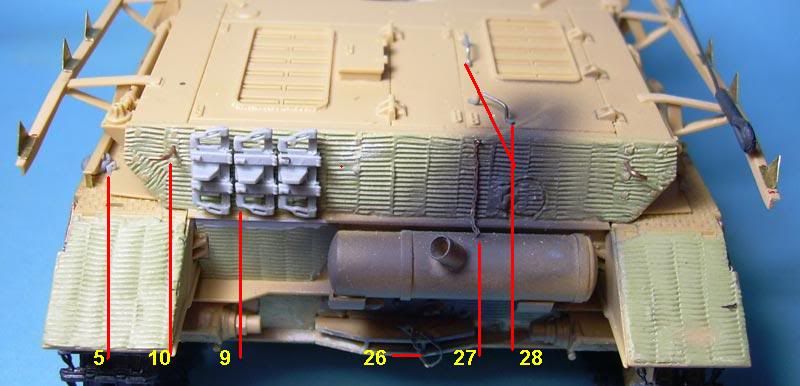
26 - Copper wire chains and stretched sprue pin
27 - Towing cable chain
28 - Telephone wire hand holds

DSCN7087c.jpg


29 - Dragon Rommelkiste with plasticard brackets and Dragon nuts
30 - Schürzen doors in plasticard with locking bar in copper sheet
31 - Turret ring holder and nuts
32 - Upper part of each hinge on plasticard
33 - Telephone wire hand holds
34 - Cover for the hole where later the close defense weapon will be located
35 - Schürzen brackets thinned; bolts added
36 - Lifting hooks
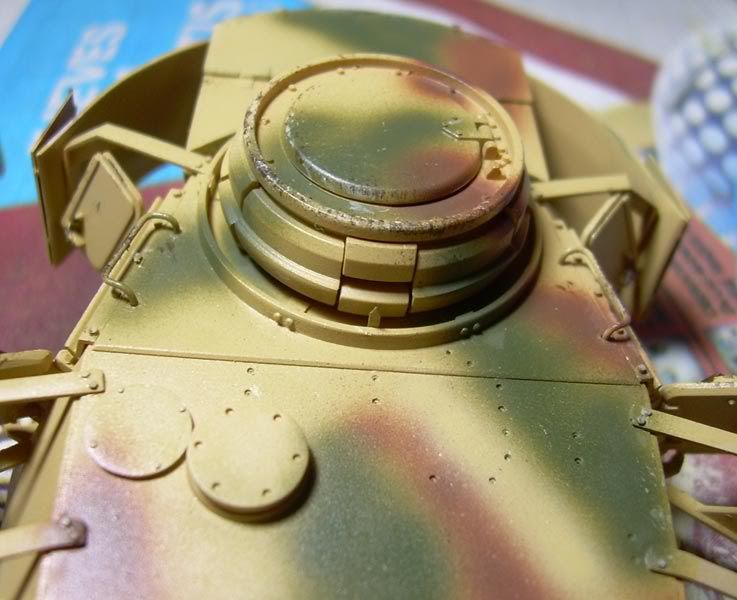
37 - Screws on the turret roof (single holes, half covered with putty, a fudge)
38 - Copper wire ring
39 - Replaced gun muzzle

Cheers
Darío
 
Wow! Very comprehensive list. Here's the advantage of knowing your subject and the shortcomings of production kits.

Dario, the darkened spot above the muffler, is that preshading for the paint job?

These two small holes,
DSCN7082in1.jpg
What is that for?
 
Danke Herr Air Marshall!
The black paint is just paint that remains in the airbrush when I paint the wheels and I use to cover the copper chains, because those parts usually chip easyly :huh:

The serie of 2 holes on the fenders was the attachments point od the side brackets for the schürzen; you can see those bracket in this Brussels Pz IV H/J:


I've see some Panzer IV didn't carries those bracket

Cheers
Darío
 
I've started the base: I surround a wood (actually called MDF) plate with plastic, glued with rubber cement, forming a box to pour plaster

DSCN7124.jpg


The plaster should be a little more liquid, so that spills out better, but it was not bad

DSCN7125.jpg


After about 30 min. I started working the cast to do the cobblestones, before it hardens, ignoring the sarcastic comment of my wife: "finally something gets hard in this house :laugh:

I draw parallel lines 4 mm apart each from other

DSCN7127.jpg


Then I scribed the line with an old ballpen

DSCN7128.jpg


After drawing lines separated 8 mm., I scribbed with the ballpen the other side of the cobblestones, this can be done without the help of ruler, as the stones do not have to be perfectly straight. Dust caked seen in the pic is because the plaster is still not dry, which facilitates the work, being softer.

DSCN7129.jpg


DSCN7130.jpg


With pieces of Styrofoam from a tray of cake, I made the edge of the sidewalk.

DSCN7131.jpg


I painted the cobblestones with artistic acrilics, diluted with glasscleaner

DSCN7132.jpg


Any errors in translation, it's Google's fault :laugh: .

Darío
 
Google did just fine! The awesome pictures helped out too, excellent work, Dario!! (y)
 
After about 30 min. I started working the cast to do the cobblestones, before it hardens, ignoring the sarcastic comment of my wife: "finally something gets hard in this house :laugh:
Darío

google must have really screwed up cause it looks like you just said....nevermind....

(y) (y) :notworthy :notworthy Outstanding updated. Love it!
 
Thanks guys!
After a couplke of acrilic filters and washing with oils diluted in white spirit, the chipped paint was toned down, simulating old chipping covered by dust.

DSCN7118vs06.jpg


The muffler worked with oil pints

DSCN7116.jpg


After 2 coats of floor polish, the decals received filters too

DSCN7120.jpg


The street, after washing with a mix of oils and pigments

DSCN7137.jpg


And, finally.... the well! Base with Tamiya acrilic (57 + 60(, then drybrush with artistic acrilics and washing with oils. The ...lions? heads received a coat of Gold acrilic and an oil wash in green (a mix of yellow + blue + white)

DSCN7134.jpg


Regards
Darío
 
Thanks Mike!
Sorry, guys, I forget the first part of my update :blush:
First coat of paint, dark yellow
DSCN7103.jpg


Then XF-64 and XF-58, both tonned down with 10-20 % of XF 60

DSCN7105.jpg


After 2 coats of acrilic floor polish, I started the paint chipping, using a brush and a sponge, with a light yellow color

DSCN7106.jpg


DSCN7109.jpg


The same as above, but with a dark brown color

DSCN7110.jpg


DSCN7112.jpg


DSCN7113.jpg


Darío
 
I just take over your post Dario, excellent :woohoo: ,(my next Panzer IV), I can not wait to see more !:)
 
Thanks guys!
I added some moss or whatever that green thing that grows when humidity is high.
Also I'm testing the branches, I would build some smaller branches, because the ones I have left me to mask a full panzer squad :laugh:

DSCN7141.jpg


DSCN7143.jpg


DSCN7139.jpg


DSCN7142.jpg


Cheers

Darío
 
I have to agree with you, those branches are a bit thick, more like small trees...The leaves would be great for trees like our Magnolias but I really don't think you'd find a Magnolia in Normandy. I think you'd be spot on with something more fine. There rest just looks great! I still can't get over the cobblestone...
 
Hi Dario, throughout your diorama is good :) , but you should just slightly dirty tone panzer with pigments, then for the sheets that you should try tea (yes I know sacrilege for English :laugh: :laugh: ), stuck on branches wire should do it!;)
As for Magnolia yes why not, there are many in my city and town in the Alps!
 
Like how this is turning out Dario.
I'm a bit late and just got caught up. The plaster cobble stones are awesome.
It's abit late for it, and not to be too picky but the radios over the trans. should be on the other side of the instrument panel, not to the rear of it. No big deal though, just for future ref.

The ground work looks fantastic and very realistic.

Rob
www.scratchmod.com
info@scratchmod.com
 
As for Magnolia yes why not, there are many in my city and town in the Alps!

:huh:

You have Magnolias in Europe??

:woohoo:

Yes in France!:) , The rest of Europe I do not know. In Spain it seems to me that there are many like eucalyptus in Australia. In my town there are cedars of Lebanon and mimosa!. Unfortunately in the properties and in some streets, have substituted the damn palm tree:unsure: , a visual horror!!:sick:
 
Back
Top