
-
Modelers Alliance has updated the forum software on our website. We have migrated all post, content and user accounts but we could not migrate the passwords.
This requires that you manually reset your password.
Please click here, http://modelersalliance.org/forums/login to go to logon page and use the "Forgot your Password" option.
You are using an out of date browser. It may not display this or other websites correctly.
You should upgrade or use an alternative browser.
You should upgrade or use an alternative browser.
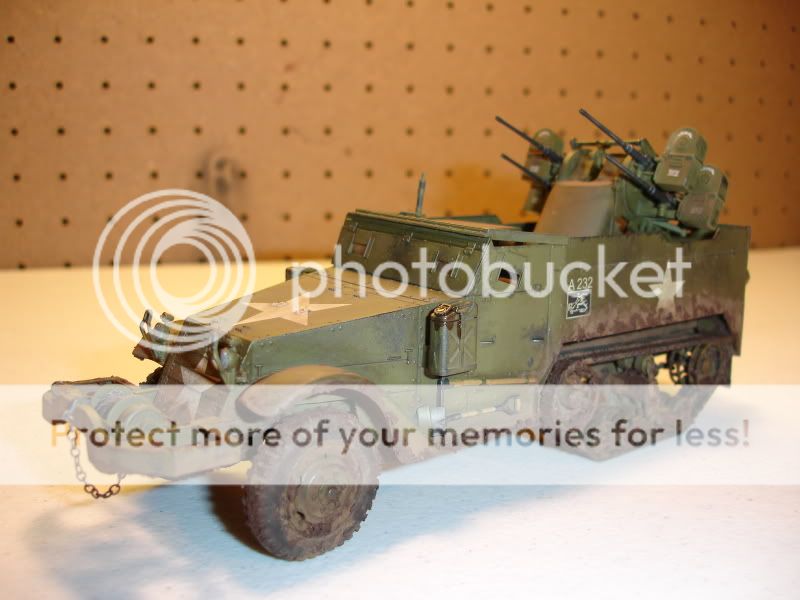
Dragon M16 Gun Carriage
- Thread starter Tojo72
- Start date


Re rago M16 Gun Carriage
Only your second...I hope my second turns out this nice. Jenny that's a neat tip there. May give it a shot this weekend.
rago M16 Gun CarriageOnly your second...I hope my second turns out this nice. Jenny that's a neat tip there. May give it a shot this weekend.
Kreighshoer
Active member
that's cool looking! good work!
Ken Abrams
Well-known member
This is a very nice build. For your second one you should be quite happy with how it came out. I know from building one of these dragon M16's myself how fidgety that quad mount is to assemble and get all lined up, yours looks great.
One thing that you may find useful in a future build, the top frame on your cab is a little off. The two back sections should be glued on the inside of the cab armor and the front section gets glued a bit lower on the windshield and not directly on the top.
I can take some pictures of what I mean if my explanation is less than clear.
Nice job all around.
Tojo72
Well-known member
Ken Abrams wrote:
thank you Ken for your comments,just to clarify my 2nd halftrack,not 2nd build,and yes I was lost as what to do with that piece as the instruction pictures were pretty useless and I had no photo refrences,but I knew something wasn't quite right.
This is a very nice build. For your second one you should be quite happy with how it came out. I know from building one of these dragon M16's myself how fidgety that quad mount is to assemble and get all lined up, yours looks great.
One thing that you may find useful in a future build, the top frame on your cab is a little off. The two back sections should be glued on the inside of the cab armor and the front section gets glued a bit lower on the windshield and not directly on the top.
I can take some pictures of what I mean if my explanation is less than clear.
Nice job all around.
thank you Ken for your comments,just to clarify my 2nd halftrack,not 2nd build,and yes I was lost as what to do with that piece as the instruction pictures were pretty useless and I had no photo refrences,but I knew something wasn't quite right.
Well bubba, let me introduce to you the walking encyclopedia of halftracks, Mr. Ken Abrams. He is always ready to offer advice or comment, not to mention a coldbeer at the ready.
Ken Abrams
Well-known member
raiderfan2779 wrote:
Yeah that's what I thought you meant and still, you should be stoked with the results. As you mentioned, the instructions have some really vague bits here and there that leave you guessing. Getting the whole cab to come together neatly takes a bit of finesse and getting the cab to line up with the crew compartment can be a chore.
Seriously, it's a sharp build. B)
moon puppy wrote:
Yup.
And take my wife...
please! :p
just to clarify my 2nd halftrack,not 2nd build
Yeah that's what I thought you meant and still, you should be stoked with the results. As you mentioned, the instructions have some really vague bits here and there that leave you guessing. Getting the whole cab to come together neatly takes a bit of finesse and getting the cab to line up with the crew compartment can be a chore.
Seriously, it's a sharp build. B)
moon puppy wrote:
not to mention a coldbeer at the ready.
Yup.
And take my wife...
please! :p
Raiderfan, Nice job! I am working on the same kit now! The instructions on some items are not as good as they could be.
Bob
Ken Abrams wrote:
Hey Ken,
I am nearing the part you are talking about. If you have the pics, I could sure use them!
Bob
Bob
Ken Abrams wrote:
One thing that you may find useful in a future build, the top frame on your cab is a little off. The two back sections should be glued on the inside of the cab armor and the front section gets glued a bit lower on the windshield and not directly on the top.
I can take some pictures of what I mean if my explanation is less than clear.
Hey Ken,
I am nearing the part you are talking about. If you have the pics, I could sure use them!
Bob
I hope Ken doesn't mind me following up on this, I'll find some pictures later but the leading edge of the upper frame should be below the windshield frame highest point instead of on top. the result would be the top of the windshield frame being even with the top of the rail or what ever that over head frame is.
I don't have Ken's resources but I think I can find a picture that shows what we're talking about.
I don't have Ken's resources but I think I can find a picture that shows what we're talking about.
Ken Abrams
Well-known member
Well 'Moonpup Bob' sent me an e-mail earlier this morning asking about my absence as of late, so as I told him I'd pop in for a bit today. Things on the home front have been rather distracting and I apologize for being MIA. Hopefully I will be able to get out of this funk soon. (and of course I don't mind you speaking in my absence brother, anything helpful would be greatly appreciated I'm sure)
Bob 'Sr.',
I took some pictures of the kit parts to show where the frame part should attach to the windshield part, as well as where the frame part should attach to the inner cab wall. I hope these are clear enough and are helpful. Sorry for taking so long to respond.
*

*

*

Bob 'Sr.',
I took some pictures of the kit parts to show where the frame part should attach to the windshield part, as well as where the frame part should attach to the inner cab wall. I hope these are clear enough and are helpful. Sorry for taking so long to respond.
*
*
*
I knew it, as soon as I said something Ken makes time to come in and clear things up. Oh well, glad to see ya Ken!
Ken Abrams
Well-known member
moon puppy wrote:
Sorry man, I started working on these pictures and stuff after responding to your e-mail, well not right after, my son had a two hour delay for school this morning due to the snow so I was hanging out with him until the bus came.
You can copy the photos to your post and delete mine if you like, I wont tell anyone.
I knew it, as soon as I said something Ken makes time to come in and clear things up. Oh well, glad to see ya Ken!
Sorry man, I started working on these pictures and stuff after responding to your e-mail, well not right after, my son had a two hour delay for school this morning due to the snow so I was hanging out with him until the bus came.
You can copy the photos to your post and delete mine if you like, I wont tell anyone.
Ken,
Thank you so much. If you hadn't mentioned this, I'm sure I would have screwed it up!
On M-16s, you da man! Or are all the M-2s and M-3s your thing?
Bob.
Oh yeah, thanks to you as well, MP!
Thank you so much. If you hadn't mentioned this, I'm sure I would have screwed it up!
On M-16s, you da man! Or are all the M-2s and M-3s your thing?
Bob.
Oh yeah, thanks to you as well, MP!
I think Ken has the info on anything that had half a track in the U.S. Inventory. He's a walking encyclopedia on those bad boys. That's how I ran into him when I was building that Lions' Roar HT.
Ken, I yield to my better on this. I just saw the question hanging out there and didn't know if you're going to have time to catch it.
Ken, I yield to my better on this. I just saw the question hanging out there and didn't know if you're going to have time to catch it.