It's an incomplete mono so I'll guess it's a nucleosis. VBEG LOL
Spirit of St. Louis?
Cheers
Ding ding ding!

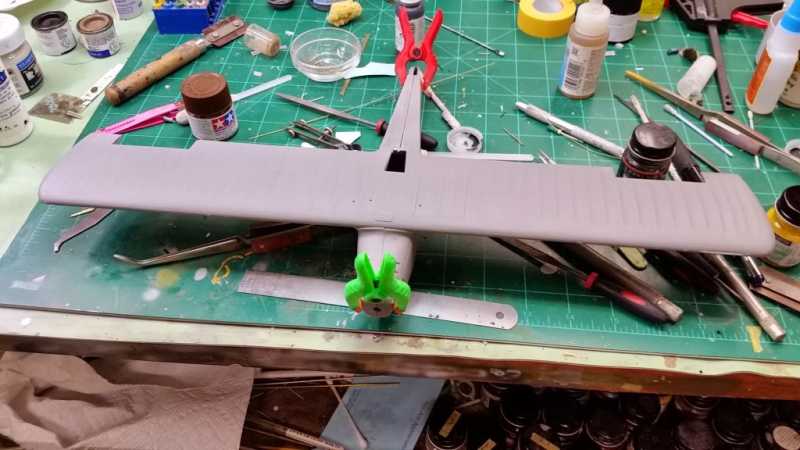
Steve that clamp is just for dry fit. It's the 1:32 scale Aerotech kit.
The only review I can find on it said that it only took a couple of days to build. I can sort of see that, if I had all day to build it.
Ian, that is clean... :idonno
Ha! You think that is dirty, you should see my workbench! :frantic
Speaking of my workbench, here's what's been happening on it lately....
This week was good to me so now I have a not-so-small update.
I'll start out with the model of the Italeri Italian Heavy artillery piece made from soft plastic. I found a Plastic Primer spray similar to one recommended by someone else. I couldn't find the Krylon brand. I shot a coat of this primer on so that I could move on and paint this thing:
Here is a shot of the crew that I also primered:
Another small thing I did: I filled a lot of the seams and other issues on the C-46 Commando and set it aside for sanding later:
Moving on to other models, I figured that I should move on with that little FT-17 now that it is fully built. I shot a coat of Olive Drab over it first:
Next I took the tracks and dry-brushed some Humbrol Gun Metal paint over them:
It is a dark grey metallic that looked pretty good on this. It looked so good, I dry-brushed some on the flat-black exhausts on the F-4 Phantom:
Getting back to the FT-17, I added the tracks to this little model. I was quite surprised at how well they looked; at least to me:
Just for fun, I tucked it into the back of the Mack truck that will be holding it:
Now all I have to do is decal that and weather it and it'll be done.
Now back to the Phantom. I had shot a gloss coat over it in preparation for decals. On Friday last, I spent 3 and 1/2 hours applying all the stencils and other decals. Here it is after I shot a dullcoat and removed the masking from the canopy:
I also dry-brushed a little copper paint on the exhaust to give it a bit more of a burnt metal effect.
This Phantom is now done; you can see the finished pics in the Aircraft Forums.
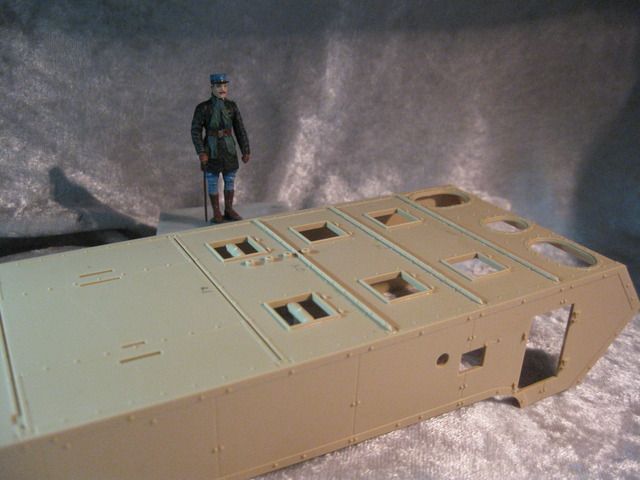
Moving along again, I decided to start one of my Russian armored trains for a couple railroad-themed Group Builds I joined. This model is gonna be a tough one.
First of all, they have you assemble all the wheels to the axles. So, to make sure they lined up, I put them between two thick sanding sticks that were set parallel to each other:
I competed the two sets of wheels and set them aside to dry. Meanwhile, I figured I'd build the turrets that go on this car. Trouble struck from the start. Trying to remove two parts from the sprues resulted in them, breaking. The gun barrel end snapped off and flew into oblivion, and the mantlet section snapped in half. You can see them indicated by the two arrows:
This is going to be a long build.....
I cut a section of plastic rod that was closest to the size of the third part of the gun barrel; cut the broken part off and replaced it with the styrene rod:
Eventually I got the two turrets assembled that go on this car:
Finally, a fun shot of the car as it will mostly look like with the turrets on. the top half is only snapped in place and the turrets are also just placed in place:
I'd had enough of that so I called it a day by then. Hopefully soon I'll have more to show. Until then, comments are welcome, thanks for looking in.

 :snoopy
 hmy:
hmy: 

 :evil:


