• Modelers Alliance has updated the forum software on our website. We have migrated all post, content and user accounts but we could not migrate the passwords.
    This requires that you manually reset your password.
    Please click here, http://modelersalliance.org/forums/login to go to logon page and use the "Forgot your Password" option.

All Righty ... What's on the bench today?

little BIG man

17342887_1540269779319622_2458676686542437949_n.jpeg
 
Well, I`m working on a small 8.5`x 6.75`diorama base just forthe fun of building it. I`m not sure what`s goin to go on it yet. Here are few images.
h7439935.JPG


h4d9d572.JPG


h0e1820c.JPG


h5f42b09.JPG


h4b5ea52.JPG


The slightly green tinge is regular moss ground up to an ultra-fine powder in mky small electric coffee bean grinder.

I added this 1/35 scale Jeep just to show scale.

hf7381fd.JPG


Cheers
 
Here's the same base with a bit of coarse moss ground to a finer size.

hfd10cf1.JPG


h0fbac53.JPG


h14d1b03.JPG


The 1/35 scale Jeep again to show the scale.

hbe084e8.JPG


I removed some small dead branches from a tree in the park. It turned out that some of those small branches were hoolw. I thought they'd make a fantastic hollow log or broken fallen tree.


h064fbfa.JPG


h148c72b.JPG


he356dad.JPG
 
Brilliant work Alex! Way to go!

Tankbuilder, that base is amazing! Fantastic!

Thanks Duke. I found that by grinding the regular moss into different sizes and textures really makes a dfifference. The ultra-fine powder moss Is fantastic for simulating the fine moss growth you see on the sides of many trees or on the edges of the ruts on dirt roads or trails.

Cheers from Peter
 
Looking good Mats! I like it.


It's been awhile, but over the course if the last few weeks I've been able to get more done a little bit at a time. Only recently I've been able to get some airbrushing done.

Okay, let me start with some of my aircraft and helicopters.

I shot a coat of OD over my Dragonfly, only to find that one of the grid patterns on the wing root wasn't fully filled in:

WIP_A_37A_Dragonfly_VI.jpg


So I filled it some more, sanded it, smoothed it out and then re-shot the OD green. Looks better now:

WIP_A_37A_Dragonfly_VII.jpg


While I had the OD green out, I shot the two helicopters, first the Israeli Army one...

WIP_AH_1_Israeli_Cobra_V.jpg


WIP_AH_1_Israeli_Cobra_VI.jpg


... and then the US Army one:

WIP_MMM2017_Cobra_IX.jpg


WIP_MMM2017_Cobra_X.jpg


Finally, after a clearcoat I was able to apply the decals to the two Cobras:

US Army:

WIP_MMM2017_Cobra_XI.jpg


For the Israeli Army Cobra, I needed to remove the landing skids, so I took them off and applied the decals:

WIP_AH_1_Israeli_Cobra_VII.jpg


That snake decal was really hard to do. I also noticed that I need to remove that emergency triangle there. I had moved it to get the snake decal on and forgot to move it back into place.

Moving on, I also added a grey basecoat to the F-15E Strike Eagle using Euro Dark Grey first. Then I tried to modulate the color with Gunship Grey but it didn't look good. So, I tried to tone it down and blend it all with a misting of Neutral Grey. I might just have to re-do this whole plane as it doesn't look good at all:

WIP_MMM2017_Eagle_X.jpg


The inside of the tail is not black; that is a shadow. This pic taken in a different locations hows that more effectively; as well as how bad the rest of this looks:

WIP_MMM2017_Eagle_XI.jpg


That is all I got done with my aircraft. I had also tried painting up the engine to the Monkeemobile. I'm not quite done; there's more I want to do to this:

WIP_MonkeeMobile_X.JPG


Moving on, I had also painted my little FWD 3-ton ammo carrier when I had the OD out. Now to mask this and paint the camo pattern on this:

WIP_FWD_3_Ton_Ammo_Carrier_III.jpg


WIP_FWD_3_Ton_Ammo_Carrier_IV.jpg


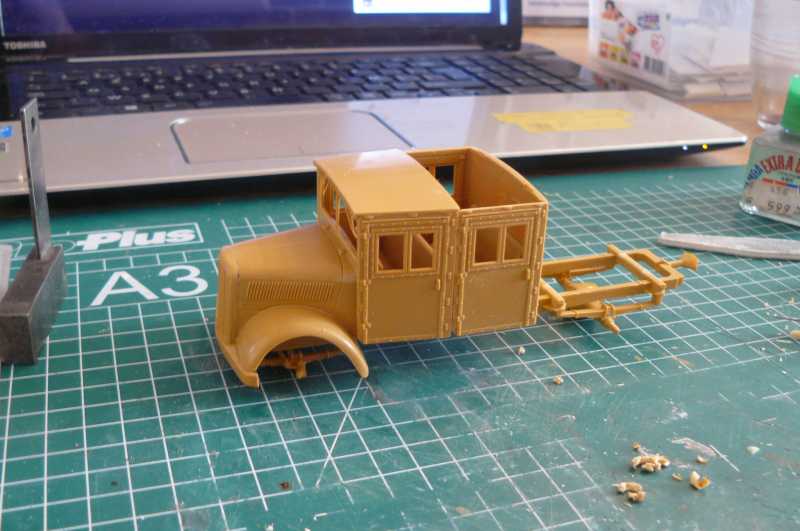
After that I couldn't do much more so I started a short-run Russian fuel truck from Military Wheels. First was the engine and radiator:

WIP_Russian_Truck_I.jpg


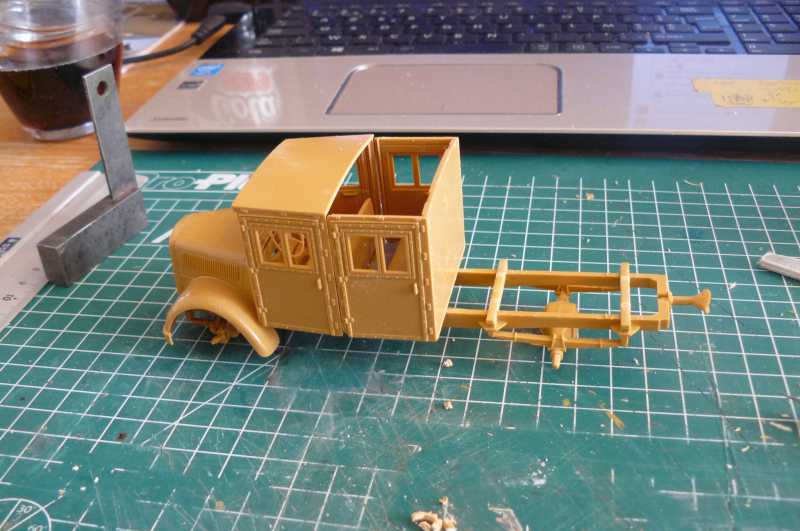
Next I did the upper cab, followed by the lower part:

WIP_Russian_Truck_II.jpg


WIP_Russian_Truck_III.jpg


I dry-fit these together to see how they fit. You can see now how short-run this really is:

WIP_Russian_Truck_IV.jpg


After this I added my Mr. Surfacer 500 to this:

WIP_Russian_Truck_VI.jpg


Gonna try sanding that later.

I started the chassis but didn't get very far at all:

WIP_Russian_Truck_V.jpg


Got tired of that and started the tank. It also had a rough assembly that I'll have to fix:

WIP_Russian_Truck_VII.jpg


Oh well, it was only a $3.00 kit....


That's all I have for now, comments are welcome. Thanks for looking in.
 
all coming along well MD, I.m trying to find a theme in your builds but it escapes me :)

Actually i went from a motorcycle to a F4u to a Ferrari so i cant talk :)
 
Thanks everyone for the great replies. I appreciate them very much.

all coming along well MD, I.m trying to find a theme in your builds but it escapes me :)

Actually i went from a motorcycle to a F4u to a Ferrari so i cant talk :)

I don't really have a theme myself so as SA Dave says, my theme is "what catches my fancy at the time" building. It is certainly more fun that way. Besides, having such a variety like you do; keeps all the builds fresh.


Like the ammo carrier.

I agree! It looks different! I can picture it barreling along a road with the riders hanging on!!

Nice cobras too! Is the F=15 going to be salvageable?

:huh:

Thanks guys! I also love the little ammo carrier. What fun! The F-15 will easily be salvageable. I'll get to it later.

Thanks again guys. Stay tuned, more to come hopefully soon.
 
Back
Top