-
Modelers Alliance has updated the forum software on our website. We have migrated all post, content and user accounts but we could not migrate the passwords.
This requires that you manually reset your password.
Please click here, http://modelersalliance.org/forums/login to go to logon page and use the "Forgot your Password" option.
You are using an out of date browser. It may not display this or other websites correctly.
You should upgrade or use an alternative browser.
You should upgrade or use an alternative browser.
GWH SU27 Finished
- Thread starter paddy
- Start date
jknaus
Administrator
Might be to hide the staining from firing the gun. I know on the Cf-118s it is a cast iron b#$ch to clean off the residue and involves a lot of elbow grease, especially since corrosive cleaners are no longer allowed. Other than that guess I have no idea. Would love to know though.
James
James
What do you suppose is going on here with the dark patch ? it seems to be common on a few aircraft in the fleet ?
View attachment 158308
It is steel. As James stated, it is a blast panel. It is not painted at all and, believe it or not, it is greased by the ground crew to facilitate cleaning! I've seen this on the Su-25 but am sure it applies to all cannon armed Soviet and Russian aircraft where the barrel is near the skin. Also, note that the blast panel is higher on two seaters as it serves to protect from the blast effect (single seaters have electronics in that area).Might be to hide the staining from firing the gun. I know on the Cf-118s it is a cast iron b#$ch to clean off the residue and involves a lot of elbow grease, especially since corrosive cleaners are no longer allowed.
helios
Well-known member
Thanks for that. I probably would've found them eventually, but I'll certainly keep an eye out for them when the time comes. I like the Master pitots...they've found their way on a few of my builds.By the way, I am not insisting anyone gets them but simply stating they exist.
paddy
Well-known member
Sorry this is not a very exciting build for a blog as most of the time is spent on endless coats of paint 
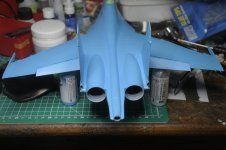
I am really keen on this paint, i love the ultra smooth finish and the way it sprays. Downside is its very thin and i have now used a whole 30ml bottle on the underside of a 1/48 model.
As you can see its very easy to think you have not got good coverage with what appears to be grey primer showing through the Blue but move the model a few inches either way and the apparent thin coat becomes a really strong blue. So what's happening here is the ultra fine pigment is giving such a smooth finish ( not necessarily gloss) that it reflecting colours in the room, This is something i have never achieved before although i have tried with car models. the reason is it gives scale reflections/gloss. IE: this is not gloss, its not Matt, its not even semi gloss which are all manufactured finishes, this is smooth paint.
I hope i have got across what i am trying to say but i doubt it
Heavens Eagle
Well-known member
It is coming along well Paddy!
Heavens Eagle
Well-known member
Also looks like I am going to need quite a number of bottles for my 1/32 scale build from what you are saying.
paddy
Well-known member
Hi Paul If you are using these blue colours the secret will be to get the grey plastic up to white primer first and this MRP seems to go over Tamiya white primer which has a good coverage for less coats. That said i used the MRP primer as its half the price of the top coats but you would need twice as much as Tamiya.
I will give better verdict when its finished.
I will give better verdict when its finished.
paddy
Well-known member
Top coat went on very well and being darker it took half as many coats as the lighter underside Blue which was good.

I have ordered a small heating pad for a coffee cup that runs off a 5w USB socket.
No i dont have a cup of cold coffee This will be an experiment in keeping the water for decals warm.
Warm water is essential to getting decals to work properly, it softens the decal allowing it to sit down better and it softness the glue as well for better adhesion. My problem is if you start with a saucer of warm water its cold in a couple of minutes....This kit has approx. 700 decals... ( yes seven hundred).
as usual i was completely mislead and tricked by Amazon who said 5 days delivery and then on confirmation it turns out this thing is in China and should arrive mid April.
why dont they ever tell you this before you buy.
I have ordered a small heating pad for a coffee cup that runs off a 5w USB socket.
No i dont have a cup of cold coffee
Warm water is essential to getting decals to work properly, it softens the decal allowing it to sit down better and it softness the glue as well for better adhesion. My problem is if you start with a saucer of warm water its cold in a couple of minutes....This kit has approx. 700 decals... ( yes seven hundred).
as usual i was completely mislead and tricked by Amazon who said 5 days delivery and then on confirmation it turns out this thing is in China and should arrive mid April.
why dont they ever tell you this before you buy.
Don't you hate the bait and switch?
paddy
Well-known member
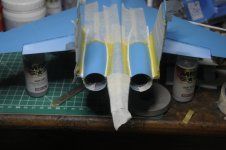
Oh dear.. despite my best attempts i have made my first mistake
I thought looking at the instructions the Engine cases were camo and the tail pipes...well engine colour..............Wrong
Looks like the engine covers are engine colour as well. I can fix but would have been a hell of a lot easier before i put the vertical fins on.


It just occurred to me i have never tried to paint a jet pipe. Seen lots of attempts ion blues and orange and grey and gun metal......hmmmmm
I thought looking at the instructions the Engine cases were camo and the tail pipes...well engine colour..............Wrong
Looks like the engine covers are engine colour as well. I can fix but would have been a hell of a lot easier before i put the vertical fins on.


It just occurred to me i have never tried to paint a jet pipe. Seen lots of attempts ion blues and orange and grey and gun metal......hmmmmm
Last edited:
EAsy fix Paddy. 

Heavens Eagle
Well-known member
Suggestion (If you have not painted yet) take a soft rag and burnish the finish on the paint and then Alclad steel lightly over it. Then add some darker color Alclad for the dark areas. The burnishing takes what little surface flat and polishes it. The blue undercoat can give a slight blue tint to the Alclad.
Nice that it is designed for a two seater as well!also broke my rule about after market today but its an addition not a replacement part so not beating myself up over it
Heavens Eagle
Well-known member
Engines turned out real nice Paddy!

Similar threads
- Replies
- 50
- Views
- 2K

