
razordws
Well-known member
Alrighty, you all know the kit.

Lots of parts just for the interior.

I've been working steadily on this thing but it seems to take forever to get anywhere when you only get an hour here and there. The complexity of the cockpit is amazing for a guy that usually builds 1/72 scale. I've made several blunders that needed fixin' because someone didn't study the instructions thoroughly before applying the glue. However, onward and upward. I'm still picking out details on the interior but I'm inching closer to closing it up soon. I have a few days off before I have to leave for a few weeks before the holidays (Booooo!
  ) and I hope to join the fuse before that happens.
Interior assemblies are proceeding as well as the tail wheel parts. I snipped off the pins that hold the tail wheel in place and drilled holes so that the wheel can be added later.

A shot of the right side of the cockpit which is almost finished painting. (nothings glued to the fuse yet). Not as sexy without the pre-painted, pre-stickum and gold plated PE set but for a 1/72 scaler oob builder like me it'll more than do.

A shot of the mock up shows that I will have very little if any filler to deal with.

OH ya, question for those of you who have this kit. On the decal sheet there is a bunch of dials and thing-a-ma-bobs, #127 to #144, top of the sheet, but I cannot find anything in the instructions that shows where these go! :-? Can anyone help me out here?
Lots of parts just for the interior.
I've been working steadily on this thing but it seems to take forever to get anywhere when you only get an hour here and there. The complexity of the cockpit is amazing for a guy that usually builds 1/72 scale. I've made several blunders that needed fixin' because someone didn't study the instructions thoroughly before applying the glue.
However, onward and upward. I'm still picking out details on the interior but I'm inching closer to closing it up soon. I have a few days off before I have to leave for a few weeks before the holidays (Booooo! ) and I hope to join the fuse before that happens.Interior assemblies are proceeding as well as the tail wheel parts. I snipped off the pins that hold the tail wheel in place and drilled holes so that the wheel can be added later.
A shot of the right side of the cockpit which is almost finished painting. (nothings glued to the fuse yet). Not as sexy without the pre-painted, pre-stickum and gold plated PE set but for a 1/72 scaler oob builder like me it'll more than do.
A shot of the mock up shows that I will have very little if any filler to deal with.
OH ya, question for those of you who have this kit. On the decal sheet there is a bunch of dials and thing-a-ma-bobs, #127 to #144, top of the sheet, but I cannot find anything in the instructions that shows where these go! :-? Can anyone help me out here?
Last edited:


 funky!
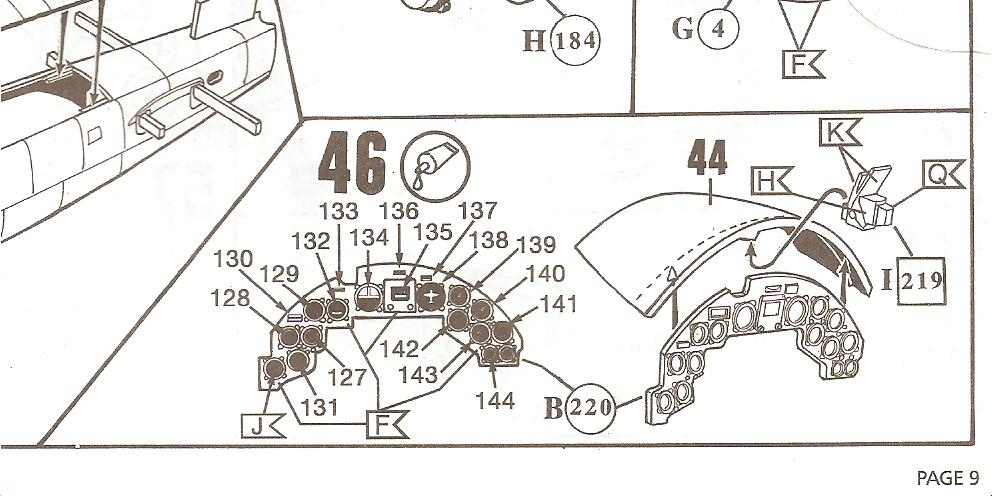
")

