• Modelers Alliance has updated the forum software on our website. We have migrated all post, content and user accounts but we could not migrate the passwords.
    This requires that you manually reset your password.
    Please click here, http://modelersalliance.org/forums/login to go to logon page and use the "Forgot your Password" option.

Question about casting resin parts

Skinny_Mike

Well-known member
Hi guys - I had a quick question concerning molding resin copies of kit parts.

Before anyone gets all up in arms - I'm not planning to sell copies of someone else's work! :bat

What I am looking to do is make a copy of a part in a kit I currently have and then I am going to modify said piece and use it on another build. I've never made resin parts before and I am just wondering if the master part is still usable after making the mold? I just don't want to buy a second kit at $50+ just for a part to use as a master that is then too gummed up to reuse.

Hopefully that makes some sense.

Thanks for the help
Mike
 
Techinically the master should survive intact in most circumstances, but It really depends on the part and how you plan the mold. There isn't any reaction that changes the physical makeup of the master if that's what you are asking. Silicone is a pretty inert material.

If the part is very delicate, like small barrels or fingers, it's possible it could be broken as you demold, there's a good deal of grip and suction that must be overcome the first time the mold is open.

The biggest issue is planning ahead. You'll need to be able to pour the resin and possibly vent air from a different spot. If there are open areas, say a trigger guard, you are better off placing thin styrene to separate the mold instead of tearing it, in that case it depends on now you treat the original part. Finally, when you cut the mold relief seam, you may cut into or scratch the master itself.

If you take a pic of the part, I can give you a better idea of what I'm talking about.
 
Thanks Ausf, sounds like it should work out ok.

I'm looking to cast a set of F-16 conformal fuel tanks from a Kenetic F-16I kit and then modify them for a Tamiya F-16. They are not delicate nor do they really have any intricate detail. I was mostly concerned that they may be covered in some kind of gunk that would make them impractical or undesirable to use later when I build the Kenetic kit. Of course if this works I may never build the Kenetic kit.... :hmmm
 
Not sure what's in mold release, but I have heard of also using Pam cooking spray ... I'd test that theory first
 
You won't want to use any release on the master.

Depending on what type of silicone you use, platinum or tin, there are cure inhibitors, make sure you read the info. Release should only be used for production molds and then only what designed specifically for that product on full cured molds.

Pam, oil, etc will be fine for things like plaster molding, etc. but silicone, RTV, latex molding are all very sensitive.
 
Michael,
I find I have best results if I paint my Master with something shiny. Future works. For myself, I'm fond of Model Master Metalizer Sealer. Sprays nice, flashes off fast, SHINEY! :zen
After you've poured your mold, and removed the master, wash the mold with an old tooth brush, and hand soap. I use Zest. Rinse, let dry. :bat THEN dab in some mold release powder, using an old, dry, clean, paintbrush. (I've never tried cooking spray. :hmmm ) mix your resin thouroughly, and pour it in. Don't HURRY! :smack
I set my poured molds near my airbrush compressor, and happily paint, while the vibration from the compressor's operation helps bring the air bubbles trapped in the resin to the surface. :yipee

Make sure the resin is completely cured before you pop your new parts out of the mold. You're gonna wanna wash the cast parts (Model Cleanliness and Happiness go hand-in-hand in this kind of Op!) and mold after use. My 2-part resin makes an oily residue, that resists even Floquil enamels. :angry: I've poured some resin parts, and some of mine are POOP! Old 2-part resin components, or I hurried, or I didn't clean my mold up properly.


Option B. It may be less expensive & faster to beg/buy/steal another set of conformal tanks, from an F-16 guy who didn't need them. I can't help there. :facepalm I'm stuck in "Teeny Gear"!

Good Luck! Happy resin-ing! :drinks :ro:
 
Hey guys! Sorry I haven't been around much lately but work has started to pick up lately and I just have not been on the computer
at home much as of late. But the good news, I have been at the bench modeling a fair amount! :frantic

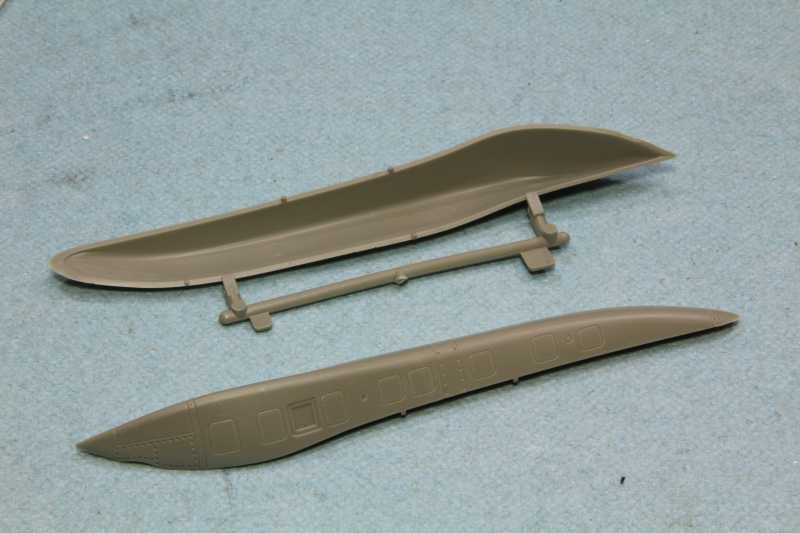
I am going to resurrect this thread a little bit. I was asking for some advice on casting some copies of another kit part. I am finally just about at the point of needing these parts and I was hoping I could get some advice on the best approach to making the molds. So here are the parts, Kenetic F-16 Conformal Fuel Tanks


hbccb5a8.JPG


This is what they look like. I'm not sure what the best method would likely be for laying this out. And do i want to fill them with something to make a more solid piece?

Thanks for the help guys!
Mike
 
I would fill up the inside with some two part epoxy putty not all the way flush with the plastic part but like in the drawing.......and make a two part mold.(Life time fuel tanks )

h21c2546.png


Hope it makes some sense ?

https://www.google.nl/search?q=making+two+part+mold&hl=nl&source=lnms&tbm=vid&sa=X&ved=0ahUKEwj_paf2wIvMAhVH-Q4KHS9SCOkQ_AUICSgD&biw=1920&bih=963

(y)
 
Not a casting guru by any means but most resin parts are full rather than hollow .

If you are going to fill those, you are probably going to spend more casting them then the cost of the new parts.

Cheers, Christian B)
 
You definitely have to fill them, even if you had both vacuum and pressure systems on hand, getting a thin walled cast of a concave part in resin is a quite feat of mold making. You'd need two piece (at least)molds with vents and gates.

If you're just doing this for you, best bet would be to fill it with a nice thick ridge down the center of the side that'll face the kit. Use styrene stock of about an 1/8 of a inch thick. That'll give you a good area to pour. The resin part will need more cleanup regarding the ridge, but the success rate of the cast will be much better.

You can make the ridge the length of the part as long as it's the highest point. When that's done, you invert the whole thing to mount on a flat surface so the part is raised off the surface by the ridge (actual name of it is a gate). If you using styrene stock for the mold walls and gates, you can glue everything together making it a lot easier. Mold making is all about prep and planning. extra work now will pay off in the part.

Build a box around both parts (don't have to go crazy in height of the gate or space around them or above since silicone is expensive) and mix and pour. Use a good quality silicone and resin, specifically for viscosity and not having to vacuum. All should be vacuumed, especially the silicone, but they are starting to market thin stuff that you can get away without if you'll careful. I use both vacuum and pressure, but you'd be into a couple of hundred to get started. Vacuum has to pull 29 inches of mercury (silicone starts to vent around 26 or so), it's not something a shop vac can do. Pressure has to be steady at 60-80 PSI for the entire cure, which can be 24 hrs with some RTV. So shopping for a good thin product will pay off otherwise you just end tossing a lot of bad parts.

Tilt the mold and pour the silicone as slow as possible into one corner and let it raise up from beneath to avoid trapping air. Pouring it from a good height above lets you get a nice small stream. Don't rush the pour and mix well, it's makes a world of difference and absolutely heed all directions regarding inhibitors, especially with platinum based RTV. I know guys who won't go within a mile of platinum based, but it's all I use because it's that much better.

Smooth-On makes the best silicone around. Go to their website to get ideas, they have videos, courses even a classes. They are an industry standard and I've been using their stuff since the late 80's.
 
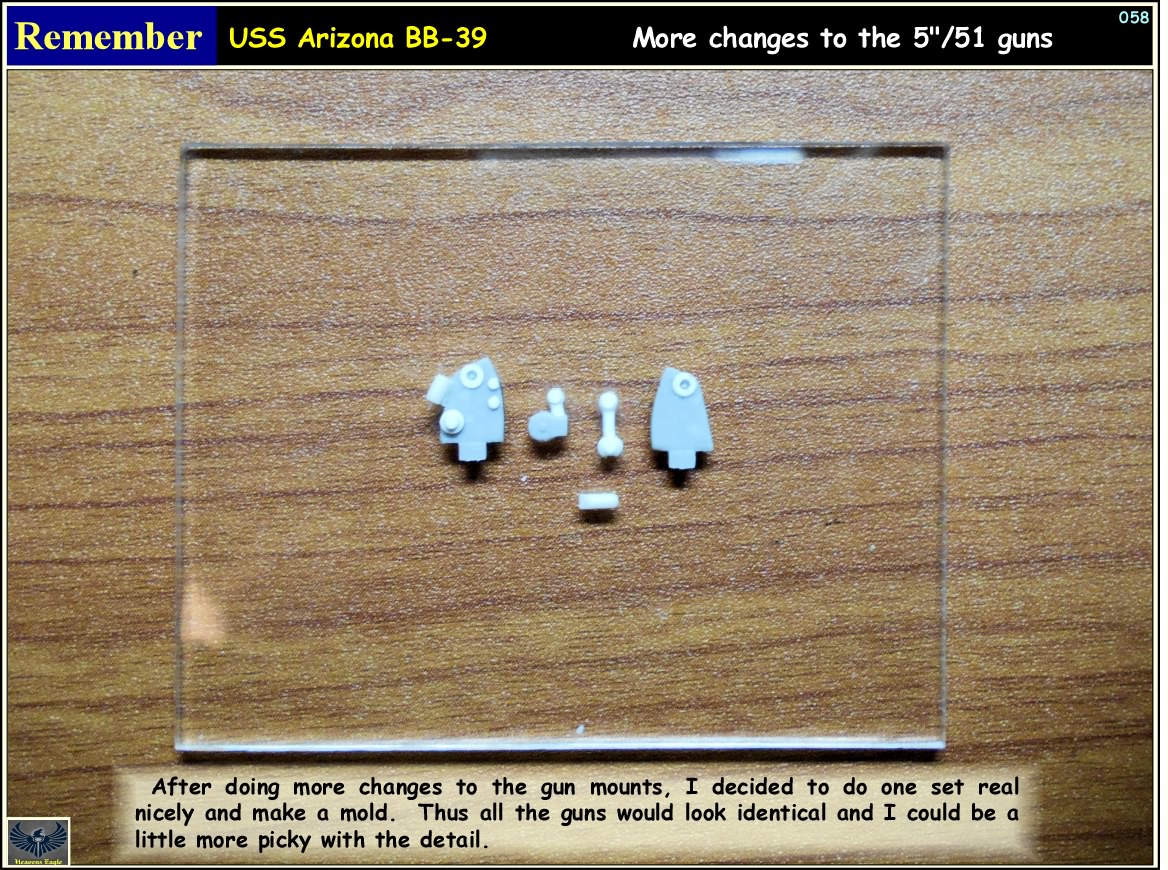
Maybe this will help a little. I decided to redo the gun mounts on my Arizona build, but with so many changes to the small parts it made more sense to make one really good set and cast them.

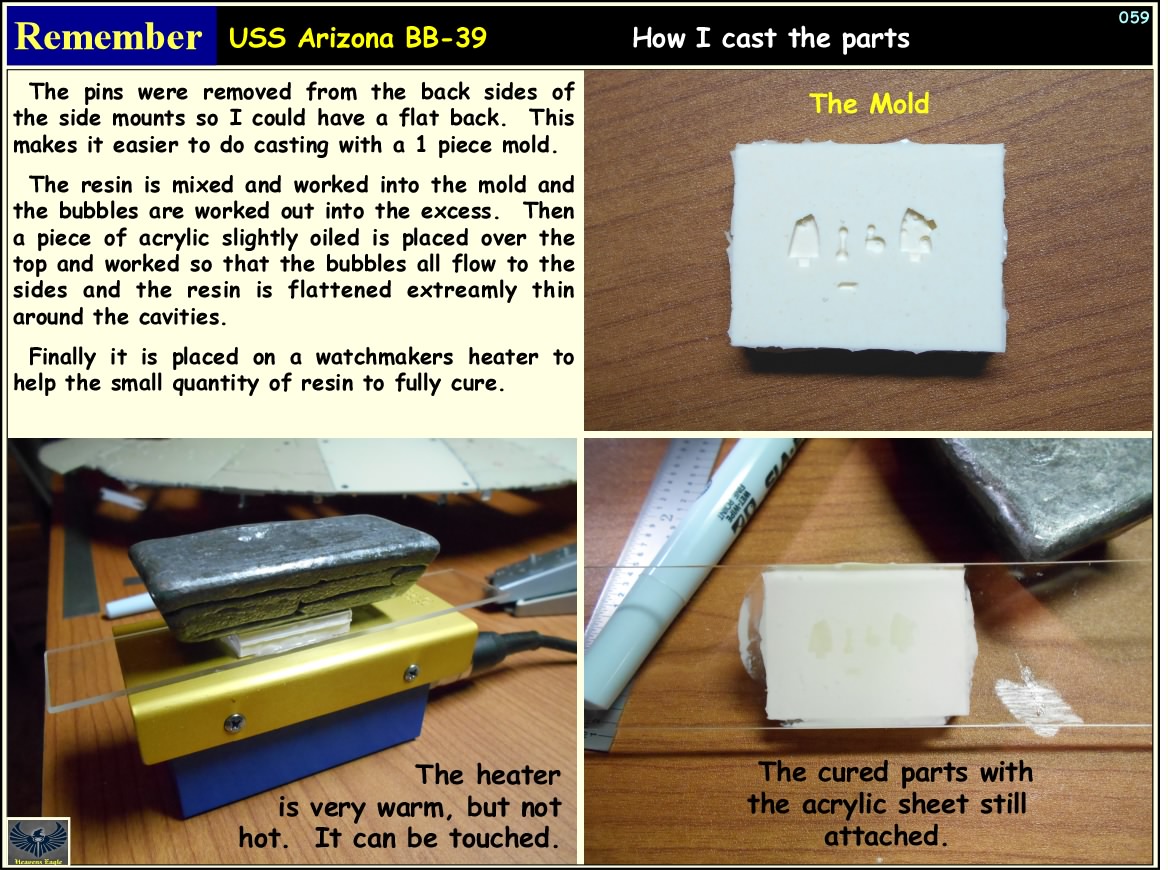
This stuff is all from a resin casting set I bought at Hobby Lobby. Rubber, resin, and all basic needed stuff was about $75 which you could get cheaper if you use the 40% off coupon.

Arizona-058.jpg


Arizona-059.jpg


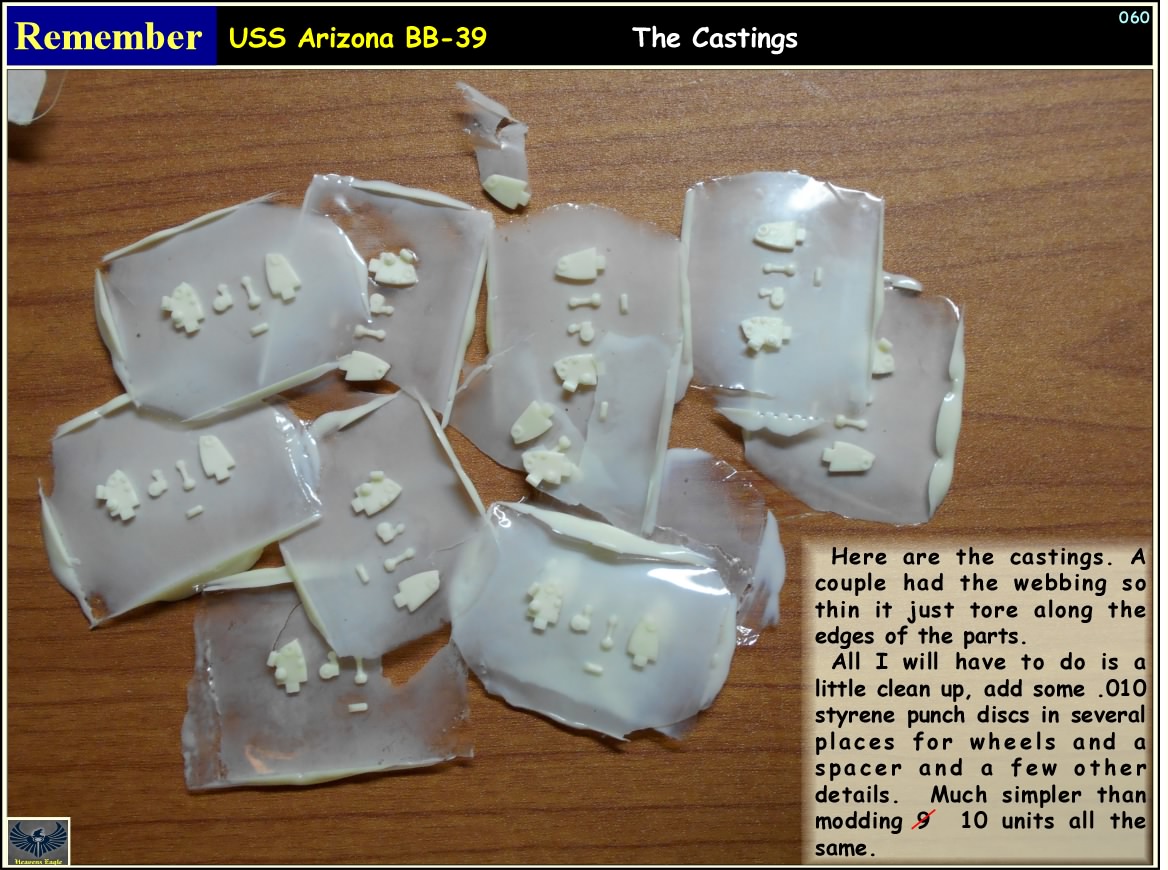
Arizona-060.jpg


Note that after making the first batch, I didn't like some things, changed the master and made a new mold. Still have a ton of resin as I only use a few drops of each part for each cast.

If you design the mold right with the part, you can do a one piece mold. I have made molds that split and tear slightly to remove the part, but since they are rubber they close back up like they should and make more parts.

I use some mold release painted on with an old Testors paint brush about everyother or every 3rd casting. Not doing so will let the resin stick to the rubber and tear out small details.
 
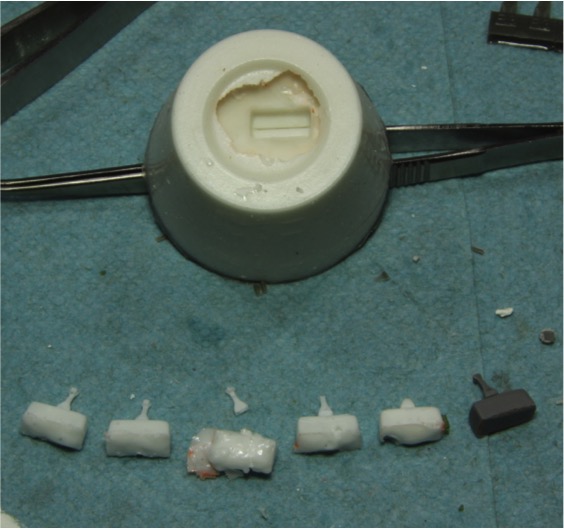
Tried my hand at casting today. First attempt was less then successful. :S

I made a silicone mold of the part in gray. Basically held the part on the bottom of a mixing cup and filled the cup with the mold making rubber. After the rubber cured, I poured in the resin. You can see the results in the white part. It looks like the resin is not getting to the bottom of the mold. I've cast a couple with the same results.


h5678778.jpg


Anyone have any suggestions? :idonno

Thanks for the help!
Mike
 
If that part is a very tall piece what you need to do is try to chase the bubbles out and get the resin down into the cavities.

I have done a number of small molds of rather small parts. The latest one was a complex small part for my Arizona build. In that case I made the master so the mold could split. I ended up splitting the mold completely in half so I could chase all the bubbles out of each side of the cavity then I pressed the 2 halves together to squeeze the extra resin up through the small pour hole.

To chase bubbles out I made a couple of steel wires about 1/32 in dia. with rounded and smoothed ends (you don't want to poke holes in your mold) I put a little resin in the mold with a spatula work all the deep crevase bubbles out and then add more resin and work the bubbles all the way out of the cavity. As the resin I have been using sets fairly quickly I don't waste too much time.

Be sure to wipe your tools off quickly and completely then before the resin sets up or it can be a bear to clean them.

The reddish orange sticky you used also reacted with the mold. When I have a small flat part I want to attach I will use a clean piece of double sided sticky Scotch tape. There are 2 types, permanent with the yellow label that sticks hard and temporary with a blue label that is slightly more sticky than a post it. I stick the part to a flat piece of acrylic sheet and build the box around it from LEGOS. When the rubber cures I break apart the LEGO blocks remove the extra bits of rubber and I have a nice clean mold. With the LEGO block method you can determine how many CC's of rubber you need and thus won't waste too much. On critical molds I use flat topped LEGOs and can place another piece of acrylic on top to give a nice smooth flat bottom on the mold. This can make it more stable especially on larger pieces.

What I would try with your mold would be to take a small wire round and smooth the end of it where it can slide down the hole in the mold. Carefully chase out the bubbles in the tight spots and then add more resin and work the bubbles up away from the part.

As this doesn't look to be a large part, you might try mixing your resin by the drop method. I use some clear Vac-formed condiment cups to mix the resin in as these are very smooth inside. I use some clay or blue tac to mount the cup at an angle and place 5, 8, or 10 drops of the thinner part in the cup first. Then add the same number of drops of the thicker part. The first is harder to control so do it first. The second being thicker and a bit slower is easier to match the number of drops. Once the resin sets up you can pop it out of the cup and use the cup again.

Hope this helps. If you have any other questions I will try to guide you. You might also check out my Millennium Falcon build and my 1/200 scale Arizona builds. Both of those builds have master parts made, rubber molds, and numerous castings made.

Oh! Duh! I scanned up the thread and there are some of my Arizona castings. :facepalm However, you might check that build again because I made another part that is much more difficult to cast and that might help too.
 
I wonder if it would work better making the mold flat instead of tall. Never done any of this so I'm just guessing.
 
Mold making is as much of an art form as the object itself. I've been dealing with them for years, from multiple piece human sized gypsum molds that needed temporary ovens to be built around them, to silicone pieces like you're trying here.

The issue of course is air entrapment as mentioned. I use both pressure and vacuum and honestly, the only way to pull off pieces like that consistently is with vacuum. I get 1/35 fingers, gun barrels and sight, bayonets, etc with nearly zero failure rate be vacuum, but that not only removes the bubbles from the mold, but the bubbles in the resin from mixing and reaction.

Now, I'm not suggesting you get a vacuum system, they are expensive to buy and maintain, but there are ways around it:

First is resin choice. Use the lowest viscosity resin you can find and get it in the mold as fast as possible (or choose a slower resin to get more pot life). Lower viscosity means the bubbles can move quicker, and small voids will fill.

Second is mold design. You're correct in your choice, that's the best way to do it. You always want the thinnest point the lowest from the pour area as vertical as possible, the widest part at the pour gate. Only difference is I would use a lot less material and make the mold smaller, almost thimble size. Silicone (at least the good stuff) has relatively good strength, so the walls can be thinner around that object. Thinner walls will allow you to squeeze the mold and force air out as well as mechanically manipulate as Paul does.

Depending on your silicone choice, you can find their preferred release agent. Some recommend dry powders like talc that work to break the surface tension of the resin, allowing it to flow.

Bottom line is, without vacuum you'll always get bubbles, you can just cut down on the chance as much as possible by either working them out or keeping them inside.

With pressure casting (up to 90PSI) I can suppress bubbles until the resin sets, but even then, tiny fingers, etc still won't fill because the air is trapped. Vacuuming is amazing, since it just pulls the air out of everything. Water 'boils' at room temperature, Marshmellows explode, etc. Resin foams up to 3 or 4 times it's volume, then collapses on itself, leaving it air free.
 
Thanks for the help guys! I'm happy that I at least understood the problem. I'm going to give it a go again today and see how I do.

This would be so much easier if Shawn Hull would come back into business!!!! :blink
 
Using Paul's techniques I have success! :yippee You can see the progression. Middle one has an air bubble but is serviceable. Final two are pretty good, and more importantly, repeatable!


h0a371a0.jpg


Thanks again for the help guys!
Mike
 
You guys might hate me, but I ran across an antique investment (for jewelry) vacuum table. One of my coworker's dad has it and doesn't use it any more. So in a couple 3 weeks (or the next time I cast) I will get to try the vacuum out.
 
Back
Top