• Modelers Alliance has updated the forum software on our website. We have migrated all post, content and user accounts but we could not migrate the passwords.
    This requires that you manually reset your password.
    Please click here, http://modelersalliance.org/forums/login to go to logon page and use the "Forgot your Password" option.

new 1:35 cold weather US infantry sculpt

BradJ

Member
Hey all
Well here's another that is in the works.
As a few of you probably know I juggle a few different sculpts to keep the interest levels piqued; this is no exception...
I actually had a similar figure already sculpted, but felt I could do it better and superseded it with this one IMHO.
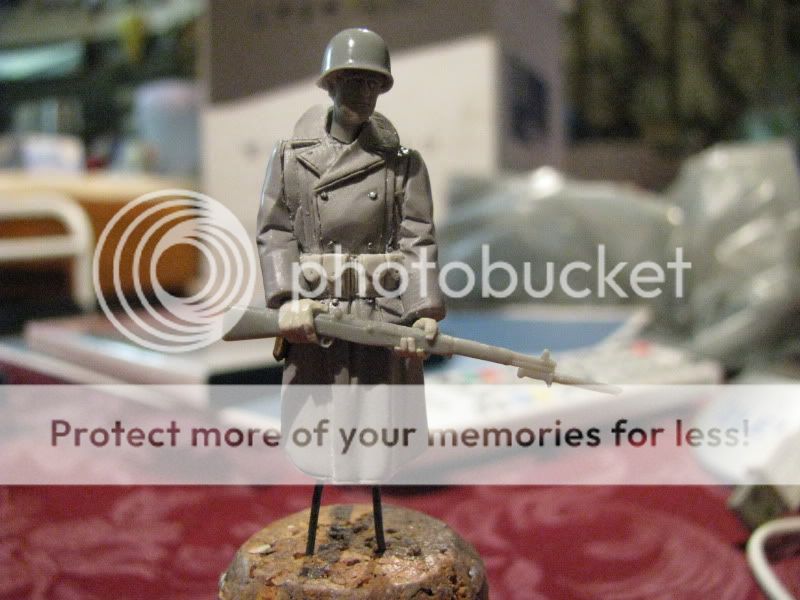
I have rediscovered tinting the Aves Apoxie I am using here, with grey seemingly giving the best tone to work with to identify flaws, as per priming a tank/AFV I guess, where it shows up any faults?

(The M1923 belt and his hands are in the untinted natural colour of the putty for comparison.)
FYI I simply use a black Sharpie to tint. Once the two measures of putty are rolled together, I squash it as per bread dough ready for kneading, and roll the bullet tip Sharpie over on whole side, before folding it inside and rolling through to mix evenly.
There are lots of little things to touch up, such as the undergarment sleeves which will poke out of the woolen jacket sleeves, the jacket shoulders including epaulets, a scarf for his neck etc etc.

IMG_1441.jpg
 
Great work on those hands!

I did learn about tinting the putty from Taesung at his seminar at the AMPS Nationals. He used dyes made for tinting resin but your method is cheap and attainable with the Sharpie!

Regards,
 
Great work on those hands!

Thanks Saul. They are probably my best pair of hands to date! Nothing better than having hands on a figure that actually grip a weapon tight. Why they can't cast injection plastic kit weapons with attached hands is a wonder...

I did learn about tinting the putty from Taesung at his seminar at the AMPS Nationals. He used dyes made for tinting resin but your method is cheap and attainable with the Sharpie!

I did pick his brains on the forums, but he would have better access to tinting dyes than I, and the Sharpie is no mess no fuss as far as I'm concerned, and really does get a nice even grey tone.

:laugh: Gene, since the photos were taken this evening I have added a pair of overshoes, so he is back in the game :)
Brad
 
Why they can't cast injection plastic kit weapons with attached hands is a wonder...

Dragon did get close. In the modern weapons sets from their Quartermaster Series, DML included hands holding the pistol grip. The modeler could then cut off the plain pistol grip and attach the one with the hand molded on.

I agree, a figure actually holding a heavy appearing weapon is something to behold.

Regards,
 
Very nice sculpt!
And Zvezda makes the weapons with hands on in some of their kits, it looks much much better then the old way of doing it :)
//Mats
 
Very cool work Brad !!!

What's up with the new avatar , ........... don't make me guess the event you're dressed up for ................. ?
 
Thanks everyone, not least of all for giving hope to plastic sets with attached hands to weapons!!

Very cool work Brad !!!

What's up with the new avatar , ........... don't make me guess the event you're dressed up for ................. ?

I'll make you guess pal ;) It was a wedding, but deffo not mine. My missus shot through late last year. We were only going out for a few months though. About 100 of them :(

Andy, to smooth the putty out, it is a constant swapping of fingers and saliva (Okay, I'll try and get this back on track ;) )
I would let the putty cure a little before application. A drop of ca in the centre of the area of intended coverage. Stick the blob on, then wetting a finger tip, I would smooth the edges down into the area needed. Most importantly, you need to know when to swap fingers so as to not have the putty stick and drag, shredding it's surface 'smoothness'. Have an old rag ready to wipe the finger clean, then apply moisture again and continue. As soon as the saliva/liquid dries out, you need to halt proceedings, clean and repeat. Same with the use of tools. To put the long hanging folds in the front of the overcoat below the belt, the above method was executed and then a long thin clay shaping tool is used, well wetted and is carefully pressed in to form the basic trough, then cleaned and wetted again and again. The more the putty cures, the more pressure can be applied with a finger to smooth things out further. Wetted again of course. You will begin to get used to the 'how', 'how much' and 'whens' of it all as you progress. Finer details such as seams can be added with a tool, wetted again! I find that the fingertip is a great universal tool for smoothing curves and slightly uneven surface details etc. The above figure has reached that level of finish during the curing phase of the putty without any 'cured' fine sanding refinement as yet, so it will get smoother again.
Brad
 
:laugh: :laugh:

Brad , you know I love your sculpts , ..... to quote Van Halen , ......... UNCHAINED ..............

" Hey man that suit is you !!! "

" You'll get some leg tonight for sure "

" Tell us how you do "

[ Come on Dave give us a break ]

" Hey , hey , hey , ............ one break commin up "
 
Glenn, Joe, thanks for the nice comments. I can see this thread was started about a year ago, and the figure is in the same state! That said, it will not take much to finish it off.
Brad
 
Back
Top