
-
Modelers Alliance has updated the forum software on our website. We have migrated all post, content and user accounts but we could not migrate the passwords.
This requires that you manually reset your password.
Please click here, http://modelersalliance.org/forums/login to go to logon page and use the "Forgot your Password" option.
You are using an out of date browser. It may not display this or other websites correctly.
You should upgrade or use an alternative browser.
You should upgrade or use an alternative browser.
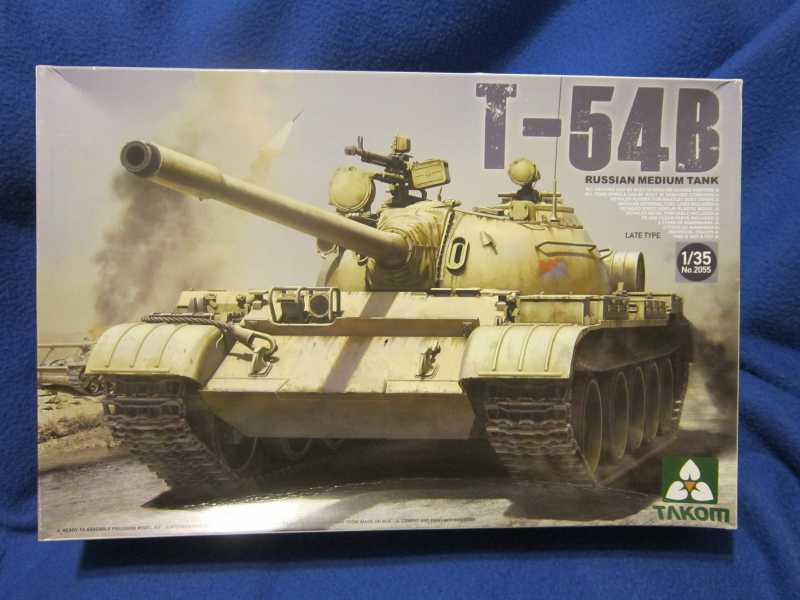
NVA T-54B
- Thread starter iambrb
- Start date

Sherman 18
Master at Arms
Nice choice!

Oh yes went very well But you guys dont really want to hear how glorious our sunshine and beaches are do youThanks Dave, hop the new year went well over in SA!

JamesOLeary
Master at Arms
Looking forward to your progress on this kit. Been thinking about making one, but with limited armor modeling experience I had been sticking with subjects I am familiar with. After seeing how yours turns out, I might try venturing out of my comfort zone.
Cheers,
James
Cheers,
James
iambrb
Well-known member
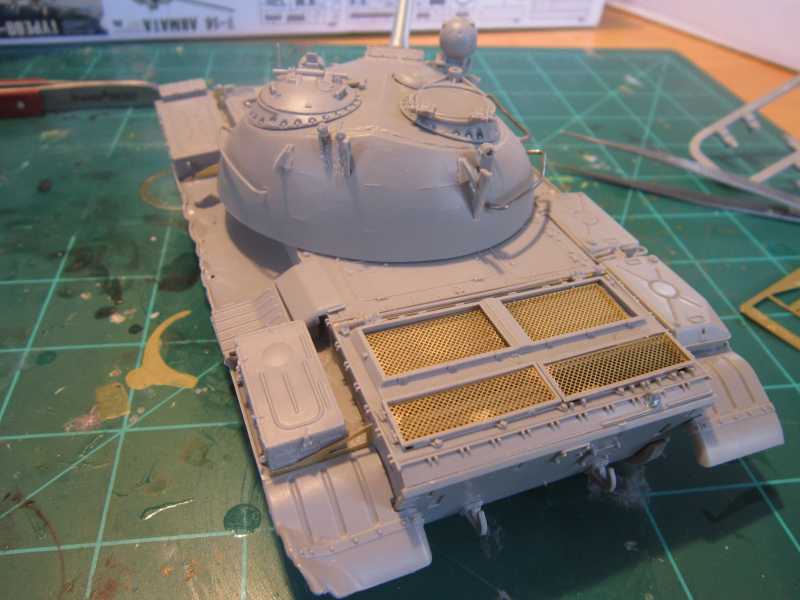
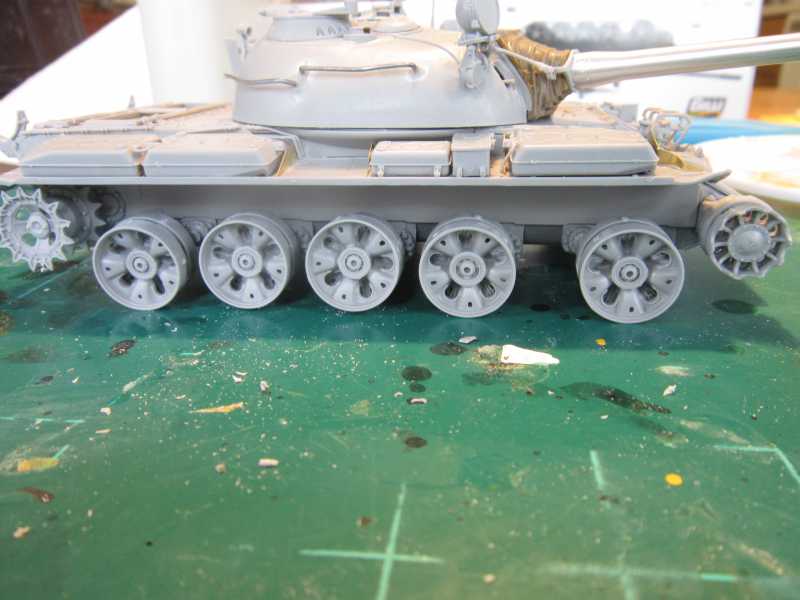
It seems to be really well made! Thier plastic is oddly "Softer" than others I have seen, but the solvents seem to take to it well. You also have the option of the early 'spoke' type wheels, or the later 'starfish' wheels. I am going 'starfish' as that is what I have seen on every NVN T-54 pic I can find. You also have move Really slowly thru the directions, as they make it easy to make an error. This is especially so on the suspension arms, you can easily get them mixed up when creating the subassy's., making installing them in correct order a bear. But the detail is really super, and it is going together really well!
JamesOLeary
Master at Arms
Looking forward to seeing some in-progress pics...
Cheers,
James
Cheers,
James
iambrb
Well-known member
Only a few pics of progress, but here they are.
1-The instruction have Lousy pics! Good idea to keep reference photos handy, as some of the pics in instructions are nothing close to the part on the tree, and you need those ref. pics to get it in there correctly!
2-Despite my whine above (what..no cheese?) It is owrth it as the model is coming together beautifully! Detail is really incredible, and the softer grade of styrene allows for really fine parts like the fuel lines, which look great and require very little cleanup.
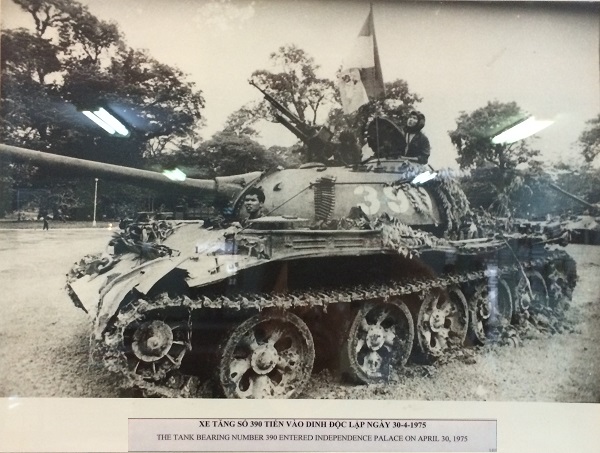
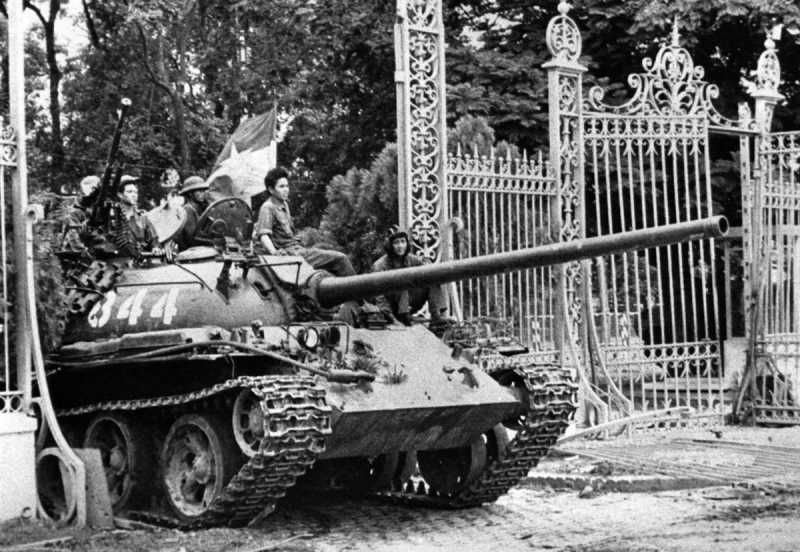
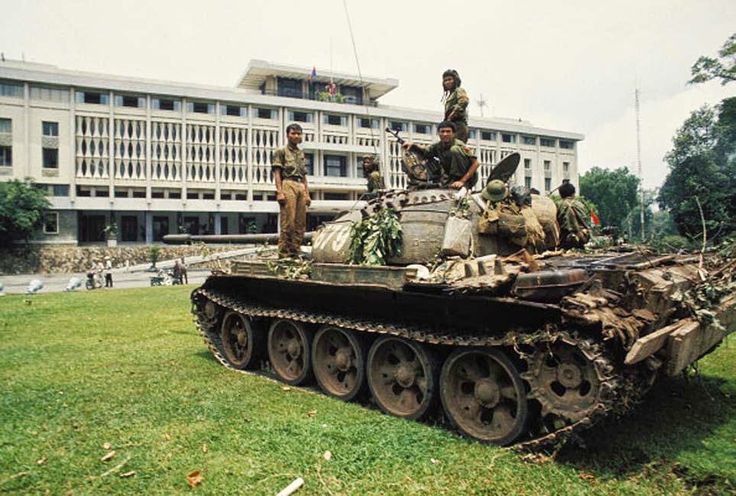
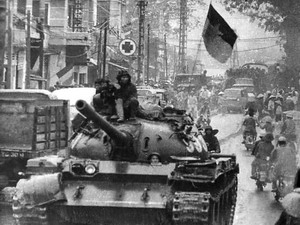
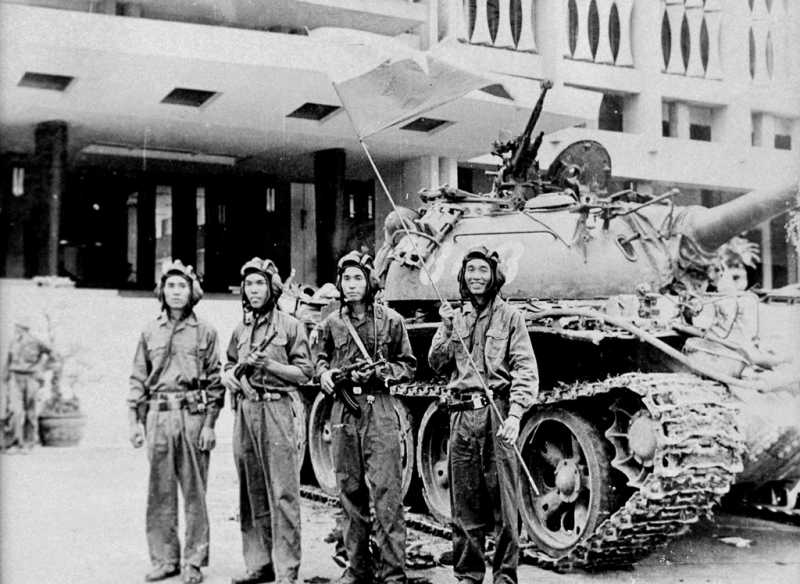
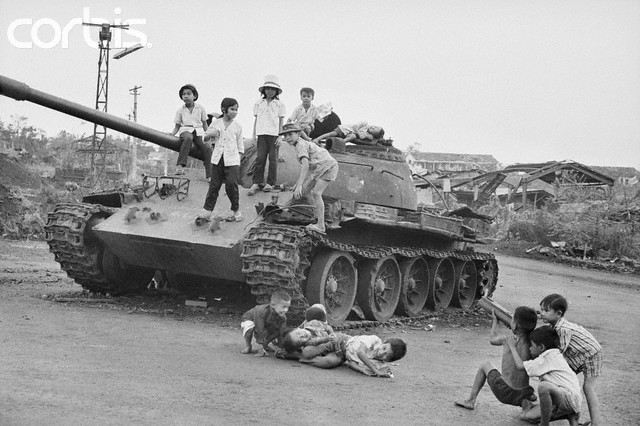
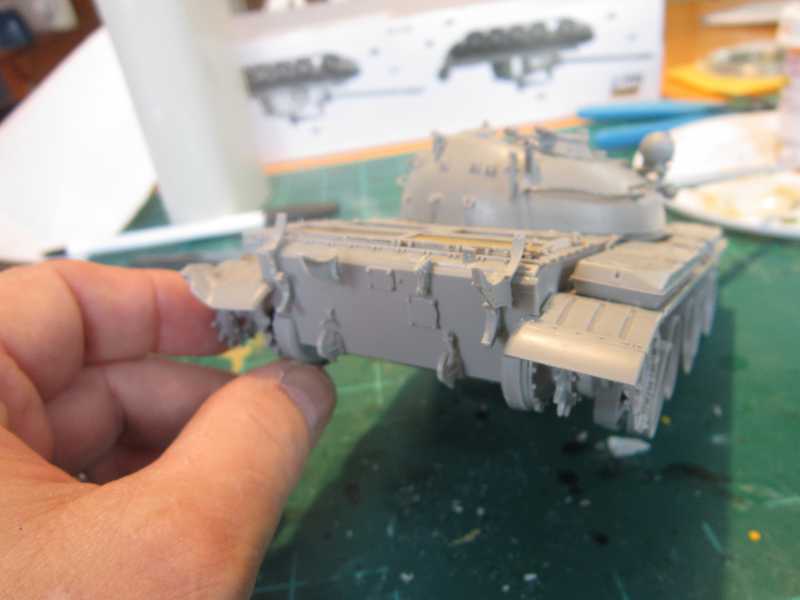
3-In looking at NVA Ref. pics (see below), it appears that none of the T-54's in Saigon or even on the march carried fuel drums on the rear (some tanks even appear to have their drum racks removed!). They also almost all seem to have damaged fenders, so you can see that on the fender I have completed (Press-fit only) there is damage at the front and it will not have anything in front of that, haven't made my mind up about the fenders at the rear or not.......
Showing the running gear and the nice fit of this model:

Showing the fender with most of the fuel lines done (incomplete/press-fit only):

Here is the damaged fender detail:

Here are a few more reference pics showing typical usage damage:


1-The instruction have Lousy pics! Good idea to keep reference photos handy, as some of the pics in instructions are nothing close to the part on the tree, and you need those ref. pics to get it in there correctly!
2-Despite my whine above (what..no cheese?) It is owrth it as the model is coming together beautifully! Detail is really incredible, and the softer grade of styrene allows for really fine parts like the fuel lines, which look great and require very little cleanup.
3-In looking at NVA Ref. pics (see below), it appears that none of the T-54's in Saigon or even on the march carried fuel drums on the rear (some tanks even appear to have their drum racks removed!). They also almost all seem to have damaged fenders, so you can see that on the fender I have completed (Press-fit only) there is damage at the front and it will not have anything in front of that, haven't made my mind up about the fenders at the rear or not.......
Showing the running gear and the nice fit of this model:
Showing the fender with most of the fuel lines done (incomplete/press-fit only):
Here is the damaged fender detail:
Here are a few more reference pics showing typical usage damage:
iambrb
Well-known member
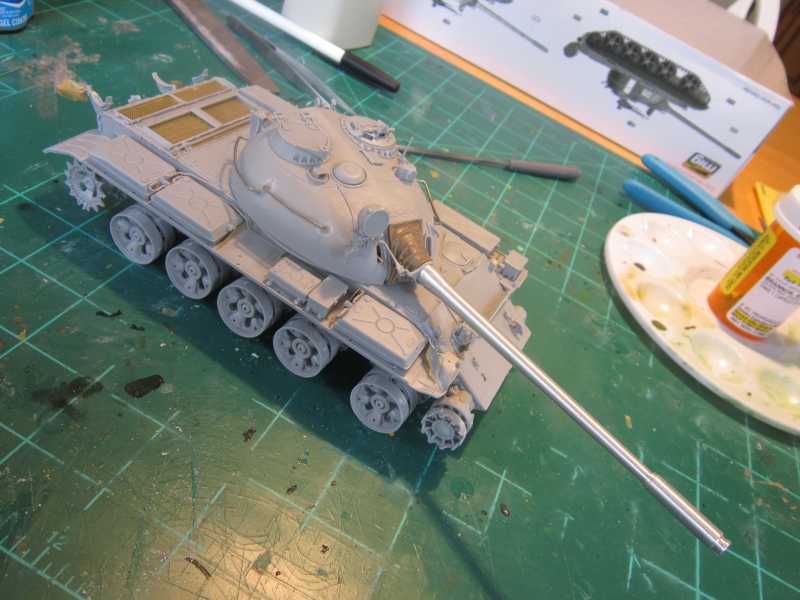
OK looks like she is alllll-most ready for paint!


the 12.7mm HMG is just press-fit at this time:

I still find it odd that the NVA did not carry the fuel drums on the rear. In fact, all the pics I find appear to show all kinds of crap strapped to the rear EXCEPT the fuel drums! So still not sure what I am going to do here:
the 12.7mm HMG is just press-fit at this time:
I still find it odd that the NVA did not carry the fuel drums on the rear. In fact, all the pics I find appear to show all kinds of crap strapped to the rear EXCEPT the fuel drums! So still not sure what I am going to do here:
Looks good, carry on.
Duke Maddog
Well-known member
This is excellent. I love it.
One thing you could do is pile a bunch of stowage on the back, cover it haphazardly with a tarp that drapes over and covers the holes where the fuel tanks are supposed to be mounted and then it will look natural. That's all I can come up with.
Looking forward to seeing more.
One thing you could do is pile a bunch of stowage on the back, cover it haphazardly with a tarp that drapes over and covers the holes where the fuel tanks are supposed to be mounted and then it will look natural. That's all I can come up with.
Looking forward to seeing more.
iambrb
Well-known member
Current plan is to have that or something pretty similar on the area with the holes. Holes on the opposite side where the fuel tanks are I already have items yet to go in there...thanks for the compliment!This is excellent. I love it.
One thing you could do is pile a bunch of stowage on the back, cover it haphazardly with a tarp that drapes over and covers the holes where the fuel tanks are supposed to be mounted and then it will look natural. That's all I can come up with.
Looking forward to seeing more.
JamesOLeary
Master at Arms
You're doing an excellent job with this model. Can't wait to see it painted. Do you plan on adding any figures? Not sure if you can find them now, but Warriors used to have an NVA tack crew and Paracel Miniatures from Vietnam have a couple tank crew and rider sets.
Cheers,
James
Cheers,
James
iambrb
Well-known member
You're doing an excellent job with this model. Can't wait to see it painted. Do you plan on adding any figures? Not sure if you can find them now, but Warriors used to have an NVA tack crew and Paracel Miniatures from Vietnam have a couple tank crew and rider sets.
Cheers,
James
Neat! But no, I did not intend to add riders/figures. I am trying to build with an eye not so much to complete as to really increase my skill, I want to be able to feel good enough about what I am building to consider entering competitions...at least, that is the goal.
iambrb
Well-known member
OK, so here is the latest. Until it is warmer & I can paint, I am at a stop-point. Note that the wheels are just press-fit:

I have ordered the NVA STOWAGES http://www.paracelminiatures.com/home/48-nva-stowages.html From Paracel Miniatures in Vietnam (Ho Chi Minh City...formally Saigon!) but it has to get here by the first part of next month. If that doesn't happen, then on to plan B (Got to have a Plan B...). At any rate, I have gone ahead an added the foilage hooks on the back of the turret, and finished off the rear of the tank, I am picturing some tarps, boards, etc. being back here, tied to the Fuel drum racks, as I have only been able to find one pic of the NVA T-54 using the Fuel drums:
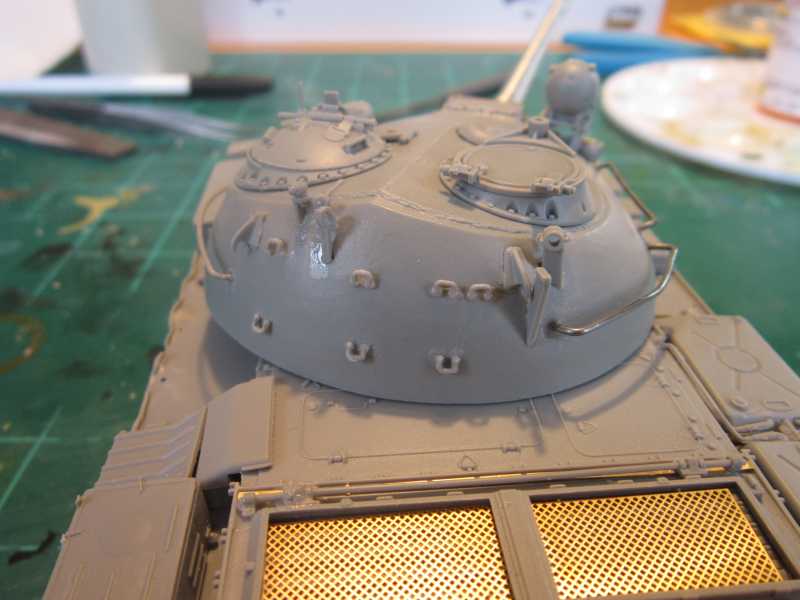
I have ordered the NVA STOWAGES http://www.paracelminiatures.com/home/48-nva-stowages.html From Paracel Miniatures in Vietnam (Ho Chi Minh City...formally Saigon!) but it has to get here by the first part of next month. If that doesn't happen, then on to plan B (Got to have a Plan B...). At any rate, I have gone ahead an added the foilage hooks on the back of the turret, and finished off the rear of the tank, I am picturing some tarps, boards, etc. being back here, tied to the Fuel drum racks, as I have only been able to find one pic of the NVA T-54 using the Fuel drums:
JamesOLeary
Master at Arms
Looking good. I hope the Paracel stowage arrives for you on time.
Here is is warm enough for painting, but it is too windy outside to do any spray painting. I thought I was at a standstill, too, but while my wife was out I opened the bathroom window, turned on the exhaust fan, and sprayed dullcote on a wedgie I am working on in the shower area. The result was that I was able to get the dullcote on the model without fighting the wind and the odor will be gone by the time my wife gets back.
Cheers,
James